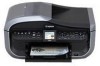
Canon MX850 Network Setup Guide - Page 9
Check Wired LAN Connection, When the, dialog box appears, remove the LAN, connector cap - printer
 |
UPC - 013803087871
View all Canon MX850 manuals
Add to My Manuals
Save this manual to your list of manuals |
Page 9 highlights
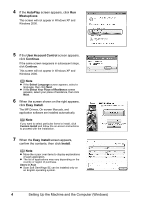
4 When the Check Wired LAN Connection dialog box appears, remove the LAN connector cap, connect the machine to the network devices such as hubs with a LAN cable, then click Yes. (A) Wired LAN connector (B) LAN connector cap Note The connection may vary depending on your network environment. The machine connected with the USB cable is detected automatically via LAN connection. In Windows Vista, go to step 6. In Windows XP and Windows 2000, go to step 5. I Note If the machine was not detected, the Set Printer IP Address dialog box appears. Make sure of the following, then click Connect. z The network devices such as hubs or routers are turned on, and the machine and the computer are connected to the network. z The machine is connected to the computer with the USB cable. z The IP address to be set for the machine is displayed on the Set Printer IP Address dialog box. If it is different from the address you want to set for the machine, select Use next IP address and enter the desired IP address. (If the machine is turned off, the Set Printer IP Address dialog box does not appear.) If it still fails, see "The Set Printer IP Address dialog box is displayed" on page 33. (A) (B) Setting Up the Machine and the Computer (Windows) 7
-
 1
1 -
2
-
3
-
 4
4 -
 5
5 -
 6
6 -
 7
7 -
 8
8 -
 9
9 -
 10
10 -
 11
11 -
 12
12 -
 13
13 -
 14
14 -
15
-
16
-
17
-
18
-
19
-
20
-
21
-
22
-
23
-
24
-
25
-
26
-
27
-
28
-
29
-
30
-
31
-
32
-
33
-
34
-
35
-
36
-
37
-
38
-
39
-
40
-
41
-
42
-
43
 |
 |
