Canon SELPHY CP740 SELPHY CP750 / CP740 Printer User Guide - Page 21
My Colors Settings SELPHY CP750 Only, Red-Eye Correction Settings
 |
View all Canon SELPHY CP740 manuals
Add to My Manuals
Save this manual to your list of manuals |
Page 21 highlights
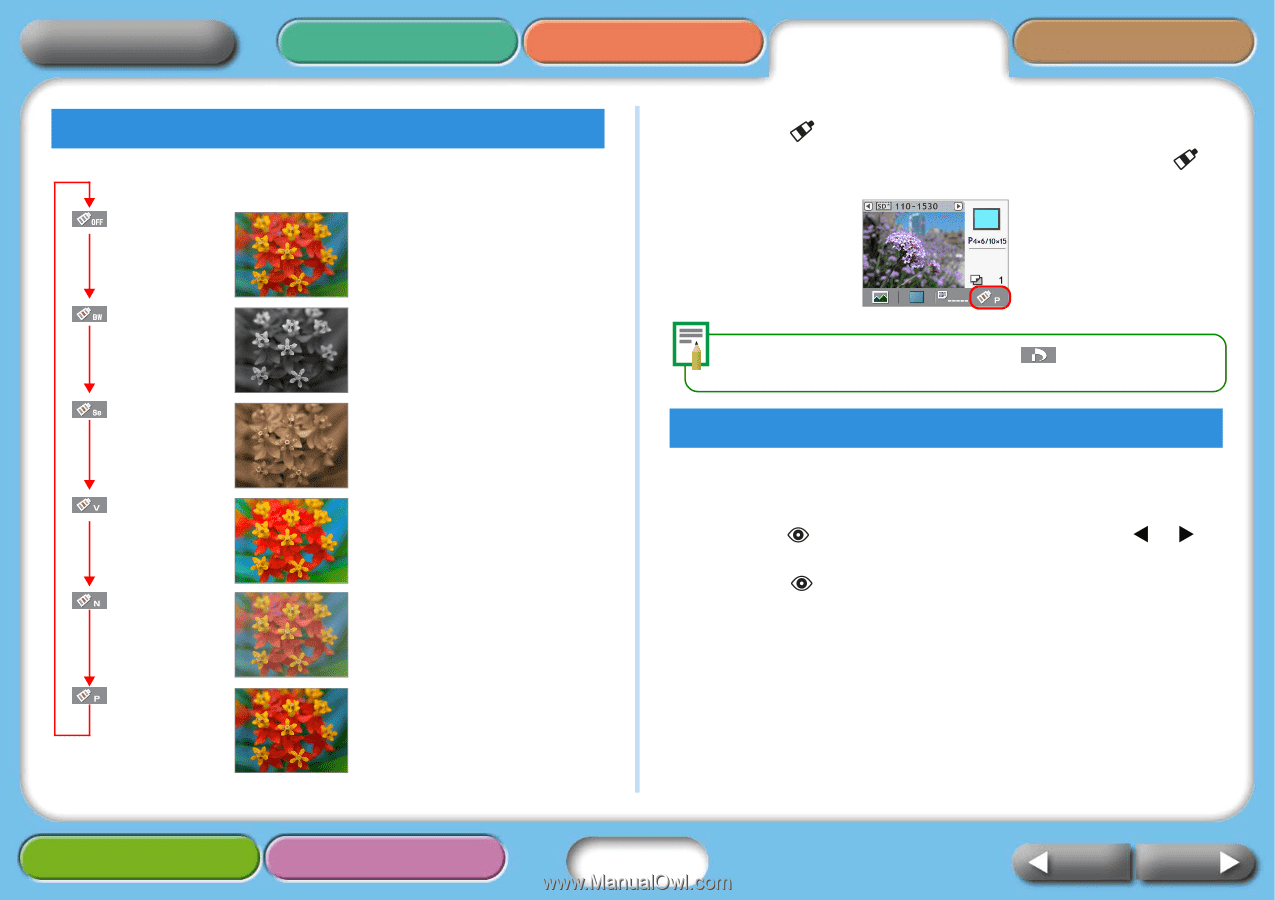
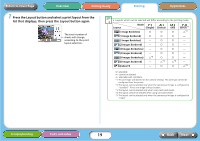
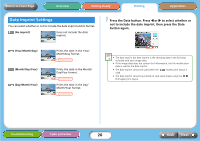
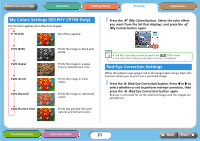
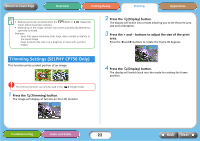
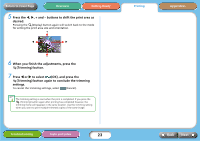
Return to Cover Page Overview Getting Ready Printing Appendices My Colors Settings (SELPHY CP750 Only) This function applies color effects to images. (Off) No effects applied. 1 Press the (My Colors) button. Select the color effect you want from the list that displays, and press the (My Colors) button again. (B/W) (Sepia) (Vivid) (Neutral) (Positive Film) Prints the image in black and white. Prints the image in a sepia tone (a faded brown tint). Prints the image in vivid colors. Prints the image in restrained colors. Prints like positive film with natural and brilliant colors. • The My Colors effect cannot be used in the (DPOF) mode. • The color effect setting is reset when the print is completed. Red-Eye Correction Settings When the subject's eyes appear red in the image taken using a flash, this function allows you to print out a corrected image. 1 Press the (Red-Eye Correction) button. Press W or X to select whether or not to perform red-eye correction, then press the (Red-Eye Correction) button again. Red-eye is corrected for all the selected images and the images are printed out. Troubleshooting Tasks and Index 21 Back Next
-
 1
1 -
2
-
3
-
4
-
5
-
6
-
7
-
8
-
9
-
10
-
11
-
12
-
13
-
14
-
15
-
 16
16 -
 17
17 -
 18
18 -
 19
19 -
 20
20 -
 21
21 -
 22
22 -
 23
23 -
 24
24 -
 25
25 -
 26
26 -
27
-
28
-
29
-
30
-
31
-
32
-
33
-
34
-
35
-
36
-
37
-
38
-
39
-
40
-
41
-
42
-
43
-
44
-
45
-
46
-
47
-
48
-
49
-
50
 |
 |