Canon SELPHY CP740 SELPHY CP750 / CP740 Printer User Guide - Page 25
Printing from a Camera
 |
View all Canon SELPHY CP740 manuals
Add to My Manuals
Save this manual to your list of manuals |
Page 25 highlights
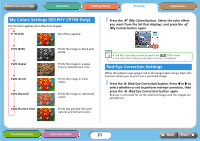
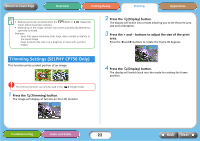
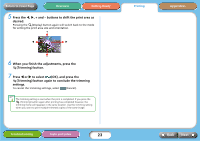
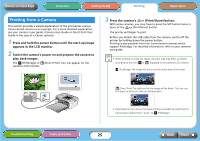
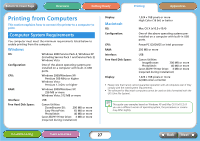
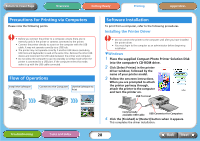
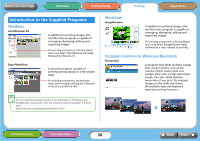
Return to Cover Page Overview Getting Ready Printing Appendices Printing from a Camera This section provides a simple explanation of the procedures using a Canon-brand camera as an example. For a more detailed explanation, see your camera's user guide. (Camera User Guide or Direct Print User Guide in the case of a Canon camera) 1 Press and hold the power button until the start-up image appears in the LCD monitor. 2 Switch the camera's power on and prepare the camera to play back images. The (PictBridge) or (Direct Print) icon will appear on the camera's LCD monitor. 3 Press the camera's (Print/Share) button. With some cameras, you may have to press the SET button twice in place of the (Print/Share) button. The printer will begin to print. Before you detach the USB cable from the camera, switch off the printer by holding down the power button. Printing is also possible from non Canon-brand cameras which support PictBridge. For detailed information, refer to your camera's user guide. • When printing on wide size sheets, the print area may differ as follows according to the icon ( or ) displayed in the camera's LCD monitor. (PictBridge) The image will print over the entire area of the sheet. (Direct Print) The right end of the image will be blank. (You can use this space to write text with an oil-based pen.) • Depending on the camera, full page printing is possible by switching the transmission method from "Auto" to (PictBridge). Troubleshooting Tasks and Index 25 Back Next
-
 1
1 -
2
-
3
-
4
-
5
-
6
-
7
-
8
-
9
-
10
-
11
-
12
-
13
-
14
-
15
-
16
-
17
-
18
-
19
-
 20
20 -
 21
21 -
 22
22 -
 23
23 -
 24
24 -
 25
25 -
 26
26 -
 27
27 -
 28
28 -
 29
29 -
 30
30 -
31
-
32
-
33
-
34
-
35
-
36
-
37
-
38
-
39
-
40
-
41
-
42
-
43
-
44
-
45
-
46
-
47
-
48
-
49
-
50
 |
 |