Canon SELPHY CP740 SELPHY CP750 / CP740 Printer User Guide - Page 28
Precautions for Printing via Computers, Flow of Operations, Software Installation - compact photo printer
 |
View all Canon SELPHY CP740 manuals
Add to My Manuals
Save this manual to your list of manuals |
Page 28 highlights
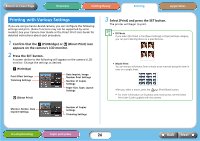
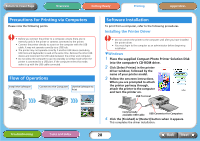
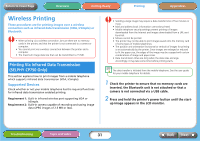
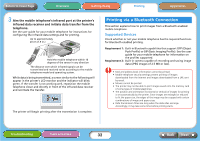
Return to Cover Page Overview Getting Ready Printing Appendices Precautions for Printing via Computers Please note the following points. • Before you connect the printer to a computer, ensure there are no memory cards in the printer or cameras connected to the printer. • Connect the printer directly to a port on the computer with the USB cable. It may not operate correctly via a USB hub. • The printer may not operate correctly if another USB device (excluding USB mice and keyboards) is used at the same time. Remove the other USB device and reconnect the USB cable between the printer and computer. • Do not allow the computer to go into standby (or sleep) mode when the printer is connected to a USB port. If the computer enters this mode, wake it up with the USB cable connected. Flow of Operations Install the Software Connect to the Computer Use the Software to Print Software Installation To print from a computer, refer to the following procedures. Installing the Printer Driver • Do not connect the printer to the computer until after you have installed the printer driver. • You must login to the computer as an administrator before beginning installation. TWindows 1 Place the supplied Compact Photo Printer Solution Disk into the computer's CD-ROM drive. 2 Click [Select Printer] in the printer driver window, followed by the name of your printer model. 3 Follow the onscreen instructions. When you are prompted to attach the printer partway through, attach the printer to the computer and turn the printer on. USB Terminal Troubleshooting Tasks and Index Commercially available USB Cable USB Connector for Computers 4 Click the [Finished] or [Restart] button when it appears. This completes the driver installation. 28 Back Next
-
 1
1 -
2
-
3
-
4
-
5
-
6
-
7
-
8
-
9
-
10
-
11
-
12
-
13
-
14
-
15
-
16
-
17
-
18
-
19
-
20
-
21
-
22
-
 23
23 -
 24
24 -
 25
25 -
 26
26 -
 27
27 -
 28
28 -
 29
29 -
 30
30 -
 31
31 -
 32
32 -
 33
33 -
34
-
35
-
36
-
37
-
38
-
39
-
40
-
41
-
42
-
43
-
44
-
45
-
46
-
47
-
48
-
49
-
50
 |
 |