Casio WK3800 User Guide - Page 26
Dr awba r 1
 |
View all Casio WK3800 manuals
Add to My Manuals
Save this manual to your list of manuals |
Page 26 highlights
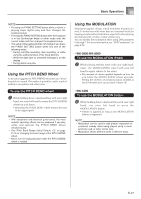
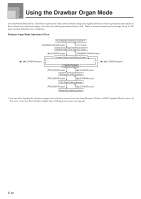
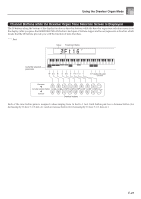
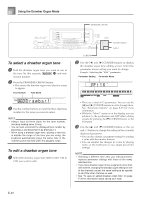
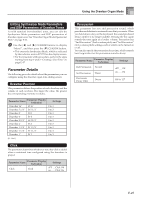
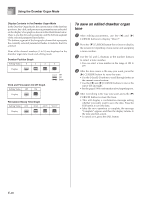
Using the Drawbar Organ Mode DRAWBAR ORGAN To select a drawbar organ tone 1 Find the drawbar organ tone you want to use in the tone list (the separate Appendix A) and note its tone number. 2 Press the DRAWBAR ORGAN button. • This causes the drawbar organ tone selection screen to appear. Tone Number Tone Name Dr awba r 1 3 Use the number buttons to input the three digit tone number for the tone you want to select. NOTE • Always input all three digits for the tone number, including leading zeros (if any). • You can also increment the displayed tone number by pressing [+] and decrement it by pressing [-]. • When using a drawbar organ tone, playing a note that is outside the range of the tone you are using, the keyboard automatically plays the same note in the nearest octave that falls within the playable range. To edit a drawbar organ tone 1 Select the drawbar organ tone (000 to 049, 100 to 199) you want to edit. Number buttons [+]/[-] CURSOR 2 Use the [̇] and [̈] CURSOR buttons to display the drawbar organ tone editing screen. Select the parameter whose setting you want to change. Example: Selecting the "Ft16'" parameter Parameter Setting Parameter Name Ft 16 ' • There are a total of 13 parameters. You can use the [̇] and [̈] CURSOR buttons to cycle through them. See "Parameter Details" on page E-25 for more information. • While the "More?" screen is on the display, you can advance to the synthesizer and DSP effect editing screens by pressing the [̄] CURSOR button or the [+] button. 3 Use the [̆] and [̄] CURSOR buttons or the [+] and [-] buttons to change the setting of the currently displayed parameter. • You can also change a parameter setting by entering a value with the number buttons. • You can monitor the changes in a tone by playing notes on the keyboard as you adjust parameter settings. NOTE • Selecting a different tone after you edit parameters replaces parameter settings with those of the newly selected tone. • If you have drawbar organ tones assigned to more than one channel, changing the drawbar organ setting for one of the channels causes the same setting to be applied to all of the other channels as well. • See "To save an edited drawbar organ tone" on page E-26 for information about saving your edits. E-24
-
 1
1 -
2
-
3
-
4
-
5
-
6
-
7
-
8
-
9
-
10
-
11
-
12
-
13
-
14
-
15
-
16
-
17
-
18
-
19
-
20
-
 21
21 -
 22
22 -
 23
23 -
 24
24 -
 25
25 -
 26
26 -
 27
27 -
 28
28 -
 29
29 -
 30
30 -
 31
31 -
32
-
33
-
34
-
35
-
36
-
37
-
38
-
39
-
40
-
41
-
42
-
43
-
44
-
45
-
46
-
47
-
48
-
49
-
50
-
51
-
52
-
53
-
54
-
55
-
56
-
57
-
58
-
59
-
60
-
61
-
62
-
63
-
64
-
65
-
66
-
67
-
68
-
69
-
70
-
71
-
72
-
73
-
74
-
75
-
76
-
77
-
78
-
79
-
80
-
81
-
82
-
83
-
84
-
85
-
86
-
87
-
88
-
89
-
90
-
91
-
92
-
93
-
94
-
95
-
96
-
97
-
98
-
99
-
100
-
101
-
102
-
103
-
104
-
105
-
106
-
107
-
108
 |
 |
