Casio WK3800 User Guide - Page 75
Setting Menu Items
 |
View all Casio WK3800 manuals
Add to My Manuals
Save this manual to your list of manuals |
Page 75 highlights
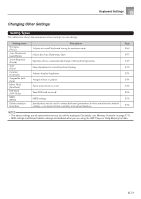
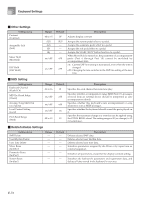
Keyboard Settings 3 Use the [+] and [-] buttons or the number buttons to change the values. • Settings you make are applied even if you do not press the EXIT button. • See the following section titled "Setting Menu Items" for details on each setting. • After making the settings you want, press the TRANSPOSE/FUNCTION button or EXIT button to return to the tone or rhythm selection screen. I In case of a delete or initialize procedure 4 Press the YES button. • This displays the user area number and data name of the data to be deleted. • The data size value represents kilobyte units. 5 Now use the number buttons, or the [+] (increase) and [-] (decrease) buttons to select the data you want. 6 Press the [̄] CURSOR button. • This causes the message "Sure?" to appear, confirming whether you really want to perform the delete or initialize operation. 7 Press the YES button to complete the operation. • This performs the delete or initialize operation and returns to the step 5 screen. 8 After making the settings you want, press the TRANSPOSE/FUNCTION button or EXIT button to return to the tone or rhythm selection screen. IMPORTANT! • It can take one or two minutes to perform a delete or initialize procedure after you pressing the YES button in step 7 above. The message "Pls Wait" will remain on the display to indicate that a procedure is being performed. Never try to perform any operation while "Pls Wait" is displayed. Performing any operation can damage the keyboard's memory and cause it to malfunction. Setting Menu Items { Auto Harmonize Types You can select from among the 10 different types of auto harmonize listed below. Type No. (Parameter Name) 0 Duet1 1 Duet2 2 Country 3 Octave 4 5th 5 3-Way Open 6 3-Way Close 7 Strings 8 Block 9 Big Band Description Adds a 1-part harmony to keyboard play. Adds a 1-part harmony to keyboard play. Duet2 harmony is more open than Duet1. Adds a country-flavor harmony to keyboard play. Adds notes one octave below notes played on the keyboard. Adds fifth notes above notes played on the keyboard. Adds two open harmony parts to notes played on the keyboard (creating three-part harmony). Adds two close harmony parts to notes played on the keyboard (creating three-part harmony). Adds harmony suitable for strings. Adds block chord notes. Adds harmony suitable for big band play. E-73
-
 1
1 -
2
-
3
-
4
-
5
-
6
-
7
-
8
-
9
-
10
-
11
-
12
-
13
-
14
-
15
-
16
-
17
-
18
-
19
-
20
-
21
-
22
-
23
-
24
-
25
-
26
-
27
-
28
-
29
-
30
-
31
-
32
-
33
-
34
-
35
-
36
-
37
-
38
-
39
-
40
-
41
-
42
-
43
-
44
-
45
-
46
-
47
-
48
-
49
-
50
-
51
-
52
-
53
-
54
-
55
-
56
-
57
-
58
-
59
-
60
-
61
-
62
-
63
-
64
-
65
-
66
-
67
-
68
-
69
-
 70
70 -
 71
71 -
 72
72 -
 73
73 -
 74
74 -
 75
75 -
 76
76 -
 77
77 -
 78
78 -
 79
79 -
 80
80 -
81
-
82
-
83
-
84
-
85
-
86
-
87
-
88
-
89
-
90
-
91
-
92
-
93
-
94
-
95
-
96
-
97
-
98
-
99
-
100
-
101
-
102
-
103
-
104
-
105
-
106
-
107
-
108
 |
 |
