Cisco WRT300N User Manual - Page 14
Connecting the Wireless-N Broadband Router - repeater
 |
View all Cisco WRT300N manuals
Add to My Manuals
Save this manual to your list of manuals |
Page 14 highlights
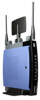
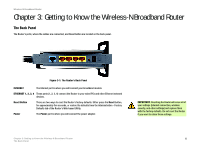
Wireless-N Broadband Router Chapter 4: Connecting the Wireless-N Broadband Router Hardware Installation 1. Make sure that all of your hardware is powered off, including the broadband modem and PCs. 2. Connect your broadband modem's Ethernet cable to the Router's Internet port. 3. Connect one end of an Ethernet network cable to one of the numbered ports on the back of the Router. Connect the other end to an Ethernet port on a network device, e.g., a PC, print server, or switch. Repeat this step to connect more PCs or other network devices to the Router. 4. Power on the broadband modem. 5. Connect the included power adapter to the Router's Power port, and then plug the power adapter into an electrical outlet. The Power LED on the front panel will light up when the adapter is connected properly. 6. Power on your PC(s). 7. Locate an optimum location for the Router. The best place for the Router is usually at the center of your wireless network, with line of sight to all of your wireless devices. Proceed to "Chapter 5: Configuring the Wireless-N Broadband Router". Figure 4-1: Connect the Modem Figure 4-2: Connect a PC Chapter 4: Connecting the Wireless-N Broadband Router Hardware Installation Figure 4-3: Connect the Power IMPORTANT: Make sure you use the power adapter that is supplied with the Router. Use of a different power adapter could damage the Router. 8
-
 1
1 -
2
-
3
-
4
-
5
-
6
-
7
-
8
-
 9
9 -
 10
10 -
 11
11 -
 12
12 -
 13
13 -
 14
14 -
 15
15 -
 16
16 -
 17
17 -
 18
18 -
 19
19 -
20
-
21
-
22
-
23
-
24
-
25
-
26
-
27
-
28
-
29
-
30
-
31
-
32
-
33
-
34
-
35
-
36
-
37
-
38
-
39
-
40
-
41
-
42
-
43
-
44
-
45
-
46
-
47
-
48
-
49
-
50
-
51
-
52
-
53
-
54
-
55
-
56
-
57
-
58
-
59
-
60
-
61
-
62
-
63
-
64
-
65
-
66
-
67
-
68
-
69
-
70
-
71
-
72
-
73
-
74
-
75
-
76
-
77
-
78
-
79
-
80
-
81
-
82
-
83
-
84
-
85
-
86
-
87
-
88
-
89
-
90
-
91
-
92
-
93
-
94
-
95
-
96
 |
 |
