Cisco WRT300N User Manual - Page 48
The Administration Tab - Log - login
 |
View all Cisco WRT300N manuals
Add to My Manuals
Save this manual to your list of manuals |
Page 48 highlights
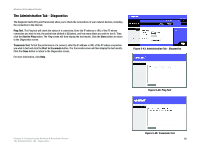
Wireless-N Broadband Router The Administration Tab - Log When you click the Administration tab, you will see the Log screen. It provides you with a log of all incoming and outgoing URLs or IP addresses for your Internet connection. Log Log. To access activity logs, select the Enabled radio button. With logging enabled, you can choose to view temporary logs or keep a permanent record using the Logviewer software. Click the Disabled button to disable this function. Logviewer IP Address. For a permanent record of these logs, Logviewer software must be used. This software is downloadable from the Linksys website, www.linksys.com/international. The Logviewer saves all incoming and outgoing activity in a permanent file on your PC's hard drive. In the Logviewer IP Address field, enter the fixed IP address of the PC running the Logviewer software. The Router will now send updated logs to that PC. View Log. When you wish to view the logs, click View Log. A new screen will appear. Select Incoming Log, Outgoing Log, Security Log, or DHCP Client Log. from the Type drop-down menu. The Incoming Log will display a temporary log of the source IP addresses and destination port numbers for the incoming Internet traffic. The Outgoing Log will display a temporary log of the local IP addresses, destination URLs/IP addresses, and service/port numbers for the outgoing Internet traffic. The Security log will display the login information for the Web-based Utility. The DHCP Client Log will display the LAN DHCP server status information. Click the Save the Log button to save this information to a file on your PC's hard drive. Click the Refresh button to update the log. Click the Clear button to clear all the information that is displayed. When you have finished making changes to this screen, click the Save Settings button to save the changes, or click the Cancel Changes button to undo your changes. For more information, click Help. Figure 5-41: Administration Tab - Log Figure 5-42: View Log Chapter 5: Configuring the Wireless-N Broadband Router 42 The Administration Tab - Log
-
 1
1 -
2
-
3
-
4
-
5
-
6
-
7
-
8
-
9
-
10
-
11
-
12
-
13
-
14
-
15
-
16
-
17
-
18
-
19
-
20
-
21
-
22
-
23
-
24
-
25
-
26
-
27
-
28
-
29
-
30
-
31
-
32
-
33
-
34
-
35
-
36
-
37
-
38
-
39
-
40
-
41
-
42
-
 43
43 -
 44
44 -
 45
45 -
 46
46 -
 47
47 -
 48
48 -
 49
49 -
 50
50 -
 51
51 -
 52
52 -
 53
53 -
54
-
55
-
56
-
57
-
58
-
59
-
60
-
61
-
62
-
63
-
64
-
65
-
66
-
67
-
68
-
69
-
70
-
71
-
72
-
73
-
74
-
75
-
76
-
77
-
78
-
79
-
80
-
81
-
82
-
83
-
84
-
85
-
86
-
87
-
88
-
89
-
90
-
91
-
92
-
93
-
94
-
95
-
96
 |
 |
