Compaq Evo n800c Maintenance and Service Guide - Page 127
Removing the Hard Drive Bezel, Hard Drive Bezel, Spare Part Number Information
 |
View all Compaq Evo n800c manuals
Add to My Manuals
Save this manual to your list of manuals |
Page 127 highlights
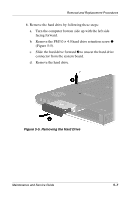
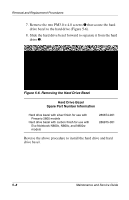
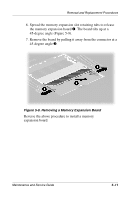
Removal and Replacement Procedures 7. Remove the two PM3.0 × 4.0 screws 1 that secure the hard drive bezel to the hard drive (Figure 5-6). 8. Slide the hard drive bezel forward to separate it from the hard drive 2. Figure 5-6. Removing the Hard Drive Bezel Hard Drive Bezel Spare Part Number Information Hard drive bezel with silver finish for use with Presario 2800 models Hard drive bezel with carbon finish for use with Evo Notebook N800c, N800v, and N800w models 286874-001 286875-001 Reverse the above procedure to install the hard drive and hard drive bezel. 5-8 Maintenance and Service Guide
-
 1
1 -
2
-
3
-
4
-
5
-
6
-
7
-
8
-
9
-
10
-
11
-
12
-
13
-
14
-
15
-
16
-
17
-
18
-
19
-
20
-
21
-
22
-
23
-
24
-
25
-
26
-
27
-
28
-
29
-
30
-
31
-
32
-
33
-
34
-
35
-
36
-
37
-
38
-
39
-
40
-
41
-
42
-
43
-
44
-
45
-
46
-
47
-
48
-
49
-
50
-
51
-
52
-
53
-
54
-
55
-
56
-
57
-
58
-
59
-
60
-
61
-
62
-
63
-
64
-
65
-
66
-
67
-
68
-
69
-
70
-
71
-
72
-
73
-
74
-
75
-
76
-
77
-
78
-
79
-
80
-
81
-
82
-
83
-
84
-
85
-
86
-
87
-
88
-
89
-
90
-
91
-
92
-
93
-
94
-
95
-
96
-
97
-
98
-
99
-
100
-
101
-
102
-
103
-
104
-
105
-
106
-
107
-
108
-
109
-
110
-
111
-
112
-
113
-
114
-
115
-
116
-
117
-
118
-
119
-
120
-
121
-
 122
122 -
 123
123 -
 124
124 -
 125
125 -
 126
126 -
 127
127 -
 128
128 -
 129
129 -
 130
130 -
 131
131 -
 132
132 -
133
-
134
-
135
-
136
-
137
-
138
-
139
-
140
-
141
-
142
-
143
-
144
-
145
-
146
-
147
-
148
-
149
-
150
-
151
-
152
-
153
-
154
-
155
-
156
-
157
-
158
-
159
-
160
-
161
-
162
-
163
-
164
-
165
-
166
-
167
-
168
-
169
-
170
-
171
-
172
-
173
-
174
-
175
-
176
-
177
-
178
-
179
-
180
-
181
-
182
-
183
-
184
-
185
-
186
-
187
-
188
-
189
-
190
-
191
-
192
-
193
-
194
-
195
-
196
-
197
-
198
-
199
-
200
-
201
-
202
-
203
-
204
-
205
-
206
-
207
-
208
-
209
-
210
-
211
-
212
-
213
-
214
-
215
-
216
-
217
-
218
-
219
-
220
-
221
 |
 |

5–8
Maintenance and Service Guide
Removal and Replacement Procedures
7. Remove the two PM3.0 × 4.0 screws
1
that secure the hard
drive bezel to the hard drive (Figure 5-6).
8.
Slide the hard drive bezel forward to separate it from the hard
drive
2
.
Figure 5-6. Removing the Hard Drive Bezel
Reverse the above procedure to install the hard drive and hard
drive bezel.
Hard Drive Bezel
Spare Part Number Information
Hard drive bezel with silver finish for use with
Presario 2800 models
Hard drive bezel with carbon finish for use with
Evo Notebook N800c, N800v, and N800w
models
286874-001
286875-001