D-Link DWS-3024 Product Manual - Page 173
Table 59., Field, Description, CP Web Customization
 |
UPC - 790069288760
View all D-Link DWS-3024 manuals
Add to My Manuals
Save this manual to your list of manuals |
Page 173 highlights
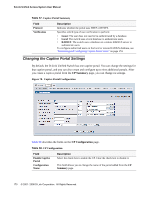
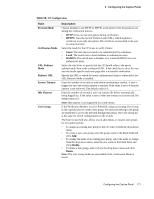
9 Configuring the Captive Portal The following table describes the fields on the CP Web Page Customization page. Table 59. CP Web Page Customization Field Available Images Branding Image Fonts Browser Title Page Title Colors Account Image Account Title User Label Password Label Button Label Acceptance Use Policy Text Box Acceptance Check Box Prompt Instructional Text Denied Message Resource Message Timeout Message Description The menu shows the images that are available to use for the page branding and the account image. To add images, click Browse and select an image on your local system (or accessible from your local system). Click Download to download the image to the switch. The image should be 5 KB max, 200 x 200 pixels, GIF or JPG format. To delete an image from the list, select the file name from the menu and click Delete. You can only delete images that you download. Select the name of the image file to display on the top left corner of the page. This image is used for branding purposes, such as the company logo. Enter the name of the font to use for all text on the CP page. Enter the text to display on the client's Web browser title bar or tab. Enter the text to use as the page title. This is the text that identifies the page. Select the colors to use for the CP page. Click the ... button, and then select the color to use. The sample account information is updated with the colors you choose. Select the image that will display on the Captive Portal page above the login field. To download a new image to the switch, use the Available Image field. Enter the summary text to display that instructs users to authenticate. Enter the text to display next to the field where the user enters the username. Enter the text to display next to the field where the user enters the password. Enter the text to display on the button the user clicks to connect to the network. Enter the text to display in the Acceptance Use Policy field. The acceptance use policy instructs users about the conditions under which they are allowed to access the network. The policy can contain up to 8192 text characters. Enter the text to display next to the box that the user must select to indicate that he or she accepts the terms of use. Enter the detailed text to display that instructs users to authenticate. This text appears under the button. Enter the text to display when the user does not provide valid authentication information. This message also appears when the user is not a member of the user group assigned through the CP Configuration page. This message displays after the user clicks the button to connect to the network. Enter the text to display when the system has rejected authentication due to system resource limitations. This message displays after the user clicks the button to connect to the network. Enter the text to display when the system has rejected authentication because the authentication transaction took too long. This could be due to user input time, or a timeout due to the overall transaction. Configuring the Captive Portal 173
-
 1
1 -
2
-
3
-
4
-
5
-
6
-
7
-
8
-
9
-
10
-
11
-
12
-
13
-
14
-
15
-
16
-
17
-
18
-
19
-
20
-
21
-
22
-
23
-
24
-
25
-
26
-
27
-
28
-
29
-
30
-
31
-
32
-
33
-
34
-
35
-
36
-
37
-
38
-
39
-
40
-
41
-
42
-
43
-
44
-
45
-
46
-
47
-
48
-
49
-
50
-
51
-
52
-
53
-
54
-
55
-
56
-
57
-
58
-
59
-
60
-
61
-
62
-
63
-
64
-
65
-
66
-
67
-
68
-
69
-
70
-
71
-
72
-
73
-
74
-
75
-
76
-
77
-
78
-
79
-
80
-
81
-
82
-
83
-
84
-
85
-
86
-
87
-
88
-
89
-
90
-
91
-
92
-
93
-
94
-
95
-
96
-
97
-
98
-
99
-
100
-
101
-
102
-
103
-
104
-
105
-
106
-
107
-
108
-
109
-
110
-
111
-
112
-
113
-
114
-
115
-
116
-
117
-
118
-
119
-
120
-
121
-
122
-
123
-
124
-
125
-
126
-
127
-
128
-
129
-
130
-
131
-
132
-
133
-
134
-
135
-
136
-
137
-
138
-
139
-
140
-
141
-
142
-
143
-
144
-
145
-
146
-
147
-
148
-
149
-
150
-
151
-
152
-
153
-
154
-
155
-
156
-
157
-
158
-
159
-
160
-
161
-
162
-
163
-
164
-
165
-
166
-
167
-
 168
168 -
 169
169 -
 170
170 -
 171
171 -
 172
172 -
 173
173 -
 174
174 -
 175
175 -
 176
176 -
 177
177 -
 178
178 -
179
-
180
-
181
-
182
-
183
-
184
-
185
-
186
-
187
-
188
-
189
-
190
-
191
-
192
-
193
-
194
-
195
-
196
-
197
-
198
-
199
-
200
-
201
-
202
-
203
-
204
-
205
-
206
-
207
-
208
-
209
-
210
-
211
-
212
-
213
-
214
-
215
-
216
-
217
-
218
-
219
-
220
-
221
-
222
-
223
-
224
-
225
-
226
-
227
-
228
-
229
-
230
-
231
-
232
-
233
-
234
-
235
-
236
-
237
-
238
-
239
-
240
-
241
-
242
-
243
-
244
-
245
-
246
-
247
-
248
-
249
-
250
-
251
-
252
-
253
-
254
-
255
-
256
-
257
-
258
-
259
-
260
-
261
-
262
-
263
-
264
-
265
-
266
-
267
-
268
-
269
-
270
 |
 |
