D-Link DWS-3024 Product Manual - Page 175
Configuring Users in the Local Database, Delete, Delete All, Local User Configuration
 |
UPC - 790069288760
View all D-Link DWS-3024 manuals
Add to My Manuals
Save this manual to your list of manuals |
Page 175 highlights
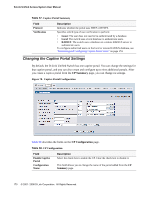
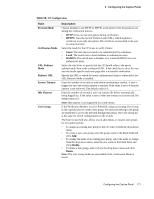
9 Configuring the Captive Portal Table 60. Local User Summary Field Description User Session Timeout Identifies the name of the user. Shows the number of seconds a user is permitted to remain connected to the network. Once the Session Timeout value is reached, the user is logged out automatically. A value of 0 means that the user does not have a Session Timeout limit. Idle Timeout Shows the number of seconds the user can remain idle before the switch automatically logs the user out. A value of 0 means that the user will not be logged out automatically. Note: Idle timeout is not supported for wired clients. Use the buttons at the bottom of the page to perform the following tasks: • To access the configuration page for a specific user listed on the page, click the user name. • To add a new user and configure the Local User settings, click Add. • To delete a user from the local database, select the check box next to the user to remove and click Delete. Select multiple check boxes to delete more than one user at a time. • Click Delete All to remove all configured users from the local database. Configuring Users in the Local Database From the Local User Configuration page, you can configure additional settings for an existing CP user in the local database. Figure 81. Local User Configuration Table 61 describes the fields you use to configure CP users in the local database. Table 61. Local User Configuration Field User Name Password Description Enter the name of the user. Enter a password for the user. The password length can be from 8 to 64 characters. Monitoring and Configuring Captive Portal Users 175
-
 1
1 -
2
-
3
-
4
-
5
-
6
-
7
-
8
-
9
-
10
-
11
-
12
-
13
-
14
-
15
-
16
-
17
-
18
-
19
-
20
-
21
-
22
-
23
-
24
-
25
-
26
-
27
-
28
-
29
-
30
-
31
-
32
-
33
-
34
-
35
-
36
-
37
-
38
-
39
-
40
-
41
-
42
-
43
-
44
-
45
-
46
-
47
-
48
-
49
-
50
-
51
-
52
-
53
-
54
-
55
-
56
-
57
-
58
-
59
-
60
-
61
-
62
-
63
-
64
-
65
-
66
-
67
-
68
-
69
-
70
-
71
-
72
-
73
-
74
-
75
-
76
-
77
-
78
-
79
-
80
-
81
-
82
-
83
-
84
-
85
-
86
-
87
-
88
-
89
-
90
-
91
-
92
-
93
-
94
-
95
-
96
-
97
-
98
-
99
-
100
-
101
-
102
-
103
-
104
-
105
-
106
-
107
-
108
-
109
-
110
-
111
-
112
-
113
-
114
-
115
-
116
-
117
-
118
-
119
-
120
-
121
-
122
-
123
-
124
-
125
-
126
-
127
-
128
-
129
-
130
-
131
-
132
-
133
-
134
-
135
-
136
-
137
-
138
-
139
-
140
-
141
-
142
-
143
-
144
-
145
-
146
-
147
-
148
-
149
-
150
-
151
-
152
-
153
-
154
-
155
-
156
-
157
-
158
-
159
-
160
-
161
-
162
-
163
-
164
-
165
-
166
-
167
-
168
-
169
-
 170
170 -
 171
171 -
 172
172 -
 173
173 -
 174
174 -
 175
175 -
 176
176 -
 177
177 -
 178
178 -
 179
179 -
 180
180 -
181
-
182
-
183
-
184
-
185
-
186
-
187
-
188
-
189
-
190
-
191
-
192
-
193
-
194
-
195
-
196
-
197
-
198
-
199
-
200
-
201
-
202
-
203
-
204
-
205
-
206
-
207
-
208
-
209
-
210
-
211
-
212
-
213
-
214
-
215
-
216
-
217
-
218
-
219
-
220
-
221
-
222
-
223
-
224
-
225
-
226
-
227
-
228
-
229
-
230
-
231
-
232
-
233
-
234
-
235
-
236
-
237
-
238
-
239
-
240
-
241
-
242
-
243
-
244
-
245
-
246
-
247
-
248
-
249
-
250
-
251
-
252
-
253
-
254
-
255
-
256
-
257
-
258
-
259
-
260
-
261
-
262
-
263
-
264
-
265
-
266
-
267
-
268
-
269
-
270
 |
 |
