Dell Inspiron 27 7710 All-in-One Service Manual - Page 60
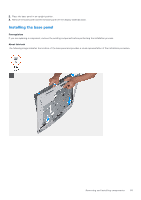
Steps, Slide the display backlight
 |
View all Dell Inspiron 27 7710 All-in-One manuals
Add to My Manuals
Save this manual to your list of manuals |
Page 60 highlights
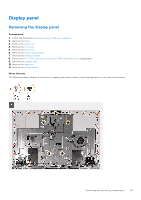
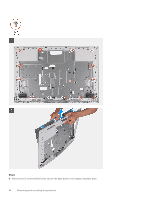
Steps 1. Remove the 12 screws (M3x5) that secure the display panel to the display-assembly base. 2. Remove the five screws (M3x3) that secure the display panel to the display-assembly base. 3. Place the computer in an upright position. 4. Holding the top corner, push the display panel away from the display-assembly base using the push holes available on the display-assembly base. 5. Slide the display backlight, touchscreen and display cable on the display panel through slots on the display assembly base. 6. Lift the display panel up from the display-assembly base. 60 Removing and installing components
-
 1
1 -
2
-
3
-
4
-
5
-
6
-
7
-
8
-
9
-
10
-
11
-
12
-
13
-
14
-
15
-
16
-
17
-
18
-
19
-
20
-
21
-
22
-
23
-
24
-
25
-
26
-
27
-
28
-
29
-
30
-
31
-
32
-
33
-
34
-
35
-
36
-
37
-
38
-
39
-
40
-
41
-
42
-
43
-
44
-
45
-
46
-
47
-
48
-
49
-
50
-
51
-
52
-
53
-
54
-
 55
55 -
 56
56 -
 57
57 -
 58
58 -
 59
59 -
 60
60 -
 61
61 -
 62
62 -
 63
63 -
 64
64 -
 65
65 -
66
-
67
-
68
-
69
-
70
-
71
-
72
-
73
-
74
-
75
-
76
-
77
-
78
-
79
-
80
-
81
-
82
-
83
-
84
-
85
 |
 |

Steps
1.
Remove the 12 screws (M3x5) that secure the display panel to the display-assembly base.
2.
Remove the five screws (M3x3) that secure the display panel to the display-assembly base.
3.
Place the computer in an upright position.
4.
Holding the top corner, push the display panel away from the display-assembly base using the push holes available on the
display-assembly base.
5.
Slide the display backlight, touchscreen and display cable on the display panel through slots on the display assembly base.
6.
Lift the display panel up from the display-assembly base.
60
Removing and installing components