Dell XPS 630i Owner's Manual - Page 86
After the Microsoft, ee System Setup - windows 10
 |
View all Dell XPS 630i manuals
Add to My Manuals
Save this manual to your list of manuals |
Page 86 highlights
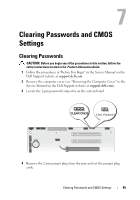
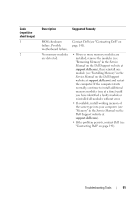
5 Replace the computer cover (see "Replacing the Computer Cover" in the Service Manual on the Dell Support website at support.dell.com). 6 Connect your keyboard and mouse, then connect your computer and monitor to electrical outlets and turn them on. 7 After the Microsoft® Windows® desktop appears on your computer, turn off the computer. NOTE: Ensure that the computer is off and not in a power management mode. If you cannot shut down the computer using the operating system, press and hold the power button for 4 seconds. 8 Disconnect the keyboard and mouse, then disconnect the computer and monitor from their electrical outlets. 9 Press the power button on the computer to ground the system board. 10 Remove the computer cover. 11 Replace the 2-pin jumper plug onto the pins of the password connector on the system board. NOTE: The password jumper plug must be reinstalled on the password jumper pins in order to enable the password feature. 12 Replace the computer cover. NOTICE: To connect a network cable, first plug the cable into the network wall jack and then plug it into the computer. 13 Connect your computer and devices to electrical outlets, and then turn them on. NOTE: In System Setup (see "System Setup" on page 77), both system and administrator password options appear as Not Set. The password feature is enabled, but a password is not assigned. 86 Clearing Passwords and CMOS Settings
-
 1
1 -
2
-
3
-
4
-
5
-
6
-
7
-
8
-
9
-
10
-
11
-
12
-
13
-
14
-
15
-
16
-
17
-
18
-
19
-
20
-
21
-
22
-
23
-
24
-
25
-
26
-
27
-
28
-
29
-
30
-
31
-
32
-
33
-
34
-
35
-
36
-
37
-
38
-
39
-
40
-
41
-
42
-
43
-
44
-
45
-
46
-
47
-
48
-
49
-
50
-
51
-
52
-
53
-
54
-
55
-
56
-
57
-
58
-
59
-
60
-
61
-
62
-
63
-
64
-
65
-
66
-
67
-
68
-
69
-
70
-
71
-
72
-
73
-
74
-
75
-
76
-
77
-
78
-
79
-
80
-
 81
81 -
 82
82 -
 83
83 -
 84
84 -
 85
85 -
 86
86 -
 87
87 -
 88
88 -
 89
89 -
 90
90 -
 91
91 -
92
-
93
-
94
-
95
-
96
-
97
-
98
-
99
-
100
-
101
-
102
-
103
-
104
-
105
-
106
-
107
-
108
-
109
-
110
-
111
-
112
-
113
-
114
-
115
-
116
-
117
-
118
-
119
-
120
-
121
-
122
-
123
-
124
-
125
-
126
-
127
-
128
-
129
-
130
-
131
-
132
-
133
-
134
-
135
-
136
-
137
-
138
-
139
-
140
-
141
-
142
-
143
-
144
-
145
-
146
-
147
-
148
-
149
-
150
-
151
-
152
-
153
-
154
-
155
-
156
-
157
-
158
-
159
-
160
-
161
-
162
-
163
-
164
-
165
-
166
-
167
-
168
 |
 |