Denon AVR 1906 Owners Manual
Denon AVR 1906 - AV Receiver Manual
 |
UPC - 081757506557
View all Denon AVR 1906 manuals
Add to My Manuals
Save this manual to your list of manuals |
Denon AVR 1906 manual content summary:
- Denon AVR 1906 | Owners Manual - Page 1
AV SURROUND RECEIVER AVR-1906 OPERATING INSTRUCTIONS MODE D'EMPLOI - Denon AVR 1906 | Owners Manual - Page 2
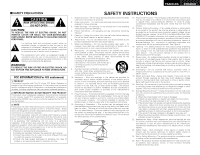
This product, when installed as indicated in the instructions contained in this manual, meets FCC requirements. Modification not expressly approved by DENON may void your authority, granted by the FCC, to use the product. 3. NOTE This product has been tested and found to comply with the limits for - Denon AVR 1906 | Owners Manual - Page 3
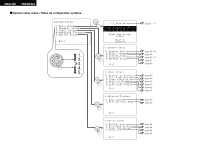
ENGLISH FRANCAIS 2 System setup menu / Menu de configuration système page 8 ~ 11 page 45, 46 page 46 page 46, 47 page 47 page 48 page 40 page 40 page 40 page 41 page 42 page 42 page 43 page 43 page 44 page 44 page 44 page 45 - Denon AVR 1906 | Owners Manual - Page 4
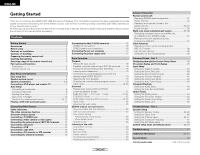
mode 28 Channel Level 28 Listening to the radio Auto preset memory 29 Auto tuning 29 Manual tuning 30 Preset stations 30 Checking the preset stations 30 Recalling preset stations 30 1 ENGLISH Getting Started Advanced Operation Remote control unit Operating DENON audio components 31 Preset - Denon AVR 1906 | Owners Manual - Page 5
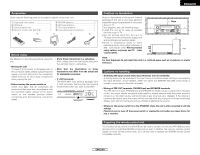
be sure to turn off the power switch or unplug the cord when you leave home for, say, a vacation. Preparing the remote control unit The included remote control unit (RC-978) can be used to operate not only the AVR-1906 but other remote control compatible DENON components as well. In addition, the - Denon AVR 1906 | Owners Manual - Page 6
light. • Do not press buttons on the main unit and remote control unit simultaneously. Doing so may result in malfunction. • Neon signs or other devices emitting pulsetype noise nearby may result in malfunction, so keep the set as far away from such devices as possible. q Power ON/STANDBY - Denon AVR 1906 | Owners Manual - Page 7
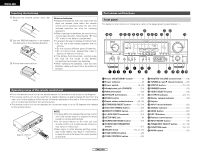
a microphone. Mode selector switches 8, 31) Connecting a monitor and a DVD player. System buttons 31~33) SYSTEM SETUP/SETUP button 9, 32) Master volume control buttons 18, 37) MUTING button 18) Starting the Auto Setup. Cursor buttons 9, 21) ON SCREEN/DISPLAY button 19, 24, 32) TEST TONE - Denon AVR 1906 | Owners Manual - Page 8
if it is very hot. Improve the ventilation condition around the unit and switch the power back on. If the protection circuit is activated again even though there are no problems with the wiring or the ventilation around the unit, switch off the power and contact a DENON service center. 5 ENGLISH - Denon AVR 1906 | Owners Manual - Page 9
of input terminals, for bi-amplification. The AVR1906 Power Amp Assign. mode allows you to power bi-amp-capable speakers with two amplifier channels ( page 44). Be sure to consult the owner's manual of your bi-amp-capable speakers for further information before proceeding. AVR-1906 SPEAKER SPEAKER - Denon AVR 1906 | Owners Manual - Page 10
output from the DVD player to the AVR-1906, you only need to choose one connection type. Component video connection offers the best quality (and or video components (Y, PB, PR; Y, CB, CR; Y, B-Y, R-Y). Check the owner's manuals for the other components for further information. Audio signal flow - Denon AVR 1906 | Owners Manual - Page 11
remote control unit. 4 Press the ON/STANDBY switch on the main unit or ON/SOURCE button on the remote control unit. • Turn on the power. 5 Press the SPEAKER A button to turn the speakers on. 6 Set the MODE 1 switch to "AUDIO" (only when operating with the remote control unit). Place the microphone - Denon AVR 1906 | Owners Manual - Page 12
(A) once measurements are completed. 2: The subwoofer speaker is measured twice. 3: When "ZONE2" and "Bi-Amp" are selected, these are not displayed. After each channel is measured, "Calculating" appears. The display switches to the Auto Setup check screen automatically. 2 About automatic retry - Denon AVR 1906 | Owners Manual - Page 13
of the surround speakers was detected. • Sound was output from the R channel when only one surround back speaker was connected. • The surround back speaker was detected, but the surround speaker was not detected. w This screen will be displayed when the speaker • Check the polarity of the pertinent - Denon AVR 1906 | Owners Manual - Page 14
) (Blue) (Red) Component video cable Signal direction Audio signal IN Video signal IN OUT OUT OUT OUT (Y) (PB/CB) (PR/CR) IN IN NOTE: • Do not plug in the power supply cord until all connections have been completed. • When making connections, also refer to the operating instructions of the - Denon AVR 1906 | Owners Manual - Page 15
output terminals Cautions on the video conversion function: When the component video terminals are used to connect the AVR-1906 with a TV (or monitor, projector, etc.) and the video (yellow) or S-Video terminals are used to connect the AVR1906 with a VTR, depending on the combination of the TV and - Denon AVR 1906 | Owners Manual - Page 16
decoder, or a component with a different type of multi-channel decoder, such as a DVD Audio player, a multichannel Super Audio CD player, or another future multi-channel sound format decoder. • The video signal connection is the same as that for a DVD player. • For instructions on playback using - Denon AVR 1906 | Owners Manual - Page 17
in addition to the digital audio connections. CD recorder / MD recorder A AUDIO OUT L L L R R R D OPTICAL OUT D OPTICAL IN A AUDIO IN L L L R R R NOTE: • Do not connect the output of the component connected to the OPTICAL 2 OUT terminal on the AVR-1906's rear panel to any terminal - Denon AVR 1906 | Owners Manual - Page 18
cable plug can be connected directly to the unit. Direction of broadcasting station FM antenna AM loop antenna (Supplied) 75 Ω/ohm COAXIAL cable FM indoor antenna (Supplied) AM outdoor antenna Ground 2 AM loop antenna assembly Connect to the AM antenna terminals. 1 2 3 Remove the vinyl - Denon AVR 1906 | Owners Manual - Page 19
in the MAIN ZONE can be controlled from ZONE2 using the remote control unit. ENGLISH Connecting Other Sources ZONE2 speaker out connections • When the power amplifier is assigned to the ZONE2 output channel at "Power Amp Assign." in the "System Setup" menu, the surround back speaker terminals - Denon AVR 1906 | Owners Manual - Page 20
is switched between on and standby from the remote control unit. No power is supplied from these outlets when this unit's power is at standby. Never connect equipment whose total power consumption exceeds 120 W (1 A.). NOTE: • Only use the AC OUTLETS for connecting audio equipment. Never use it for - Denon AVR 1906 | Owners Manual - Page 21
operating instructions, refer to the component's manual. 4 Adjust the volume. (Main unit) (Remote control unit) The volume level is displayed on the master volume level display. The volume can be adjusted within the range of -70 to 0 to 18 dB, in steps of 1 dB. However, when the channel level - Denon AVR 1906 | Owners Manual - Page 22
Press the DIMMER button. The display brightness changes in four steps (bright, medium, dim and off). Input mode The AVR-1906 has an AUTO signal detection mode that automatically identifies the type of incoming audio signals, but is also equipped with a manual mode that can be switched according - Denon AVR 1906 | Owners Manual - Page 23
" indicator does not light, check whether the Digital In Assign. setup ( page 40) and connections are correct and whether the component's power is turned on. NOTE: • The "DIGITAL" indicator will light when playing CD-ROMs containing data other than audio signals, but no sound will be heard. 20 - Denon AVR 1906 | Owners Manual - Page 24
achieve the desired sound while watching images. Press the DIRECT/STEREO button on the main unit or the STEREO button on the remote control unit to select the STEREO mode. 2 Play a program source. For operating instructions, refer to the manuals of the respective components. 3 Press the SURROUND - Denon AVR 1906 | Owners Manual - Page 25
quality. The Game mode is for playing games. The game mode can only be used with 2-channel audio sources. Select one of the modes ("Cinema", "Music", "Pro Logic" or "Game"). • Panorama Control: This mode extends the front stereo image to include the surround speakers for an exciting "wraparound - Denon AVR 1906 | Owners Manual - Page 26
page 40). Example: DVD (Main unit) (Remote control unit) 2 Press the INPUT MODE button sound produced from the subwoofer sounds distorted due to the LFE signals when playing Dolby Digital or DTS sources when the peak limiter is turned off with the subwoofer peak limit level setting (system setup - Denon AVR 1906 | Owners Manual - Page 27
by pressing the remote control unit's ON SCREEN button. SIGNAL: Displays the type of signal (DTS, DOLBY DIGITAL, PCM, etc.). fs: Displays the input signal's sampling frequency. FORMAT: Displays the input signal's number of channels. "Number of front channels/Number of surround channels/ LFE on/off - Denon AVR 1906 | Owners Manual - Page 28
respect to the sound. In this case, adjust the audio delay to delay the sound and synchronize it with the picture. • The audio delay setting is stored separately for each input source. • This adjustment can be performed with the system setup ( page 43) or from the remote control unit, as described - Denon AVR 1906 | Owners Manual - Page 29
sound will be one-sided if signals are only input to one channel (left or right), so input signals to both channels. If you have a source component with only one audio The surround parameters, tone control settings and playback level balance for the different output channels are memorized for each - Denon AVR 1906 | Owners Manual - Page 30
remote control unit 1 Select the surround mode for the input channel. (Remote control . • When making parameter settings, the display will return to the regular condition several ) and "large". "small" recreates a small sound field, "large" a large sound field. EFFECT LEVEL: This sets the strength of - Denon AVR 1906 | Owners Manual - Page 31
or treble: Turn the control counterclockwise. (The bass or treble sound can be decreased down to -12 dB in steps of 2 dB.) SW SL SBL SBR When the surround back speaker setting is set to "1sp" for "Speaker Configuration", this is set to "SB". "SB" appears only when the "Power Amp Assign." setting is - Denon AVR 1906 | Owners Manual - Page 32
setup" ( page 42). Hold the PRESET • button and press the POWER . Channel A1 Remote control unit) 2 Watching the display lights on the display Manual tuning" operation to tune in the station, then preset it using the manual "Preset memory" operation. • To interrupt this function, press the ON/STANDBY - Denon AVR 1906 | Owners Manual - Page 33
tuning mode. Check that the display's "AUTO" indicator turns off. 4 Press the TUNING (+) or (-) button to tune in the desired station. The frequency changes continuously when the button is held in. • When the manual tuning mode is set, FM stereo broadcasts are received in monaural and the "STEREO - Denon AVR 1906 | Owners Manual - Page 34
(CDR/MD) system buttons 3. Tuner system buttons Advanced Operation MODE 1 MODE 2 Remote control unit Operating DENON audio components 1 Set the MODE 1 switch to "AUDIO". 6, 7 2 1 8, 9 3 DISC SKIP + : Manual search (forward and reverse) : Stop : Play : Auto search (cue) : Pause : Switch - Denon AVR 1906 | Owners Manual - Page 35
4. Set to the AUDIO side for the CD, Tape deck or CDR/MD position, and to the VIDEO side for the DVD/VDP, DBS/CABLE, VCR or TV position. 2 Set the MODE 2 switch to the component you want to operate. ON/SOURCE : Power on/standby OFF : DENON DVD power off 6, 7 : Manual search (forward and reverse - Denon AVR 1906 | Owners Manual - Page 36
: Manual search (forward and reverse) 2 : Stop 1 : Play 3 : Pause Channel +, - : Channel up/down ON/SOURCE : Power on/standby MENU : Menu RETURN : Return •, ª, 0, 1 : Cursor up, down, left and right ENTER : Enter CHANNEL +, - : Channel up/down 0 ~ 9, +10 : Number DISPLAY : Switch display VOL - Denon AVR 1906 | Owners Manual - Page 37
: Power on/standby MENU : Menu RETURN : Return •, ª, 0, 1 : Cursor up, down, left and right ENTER : Enter CHANNEL +, - : Channel up/down 0 ~ 9, +10 : Number DISPLAY : Switch display TV/VCR : Switch between TV and video player VOL +, - : Volume up/down 2 Set the MODE 2 switch to the component to - Denon AVR 1906 | Owners Manual - Page 38
] Using external amplifier. MAIN ZONE 7.1-channel systems Monitor ZONE2 FL Center FR DVD player This unit B SW Input SL ZONE2 AUDIO OUT (FIXED OUT) SR B Premain amplifier or Power amplifier RC-617 RC-616 SBL SBR SYSTEM REMOTE CONTROL UNIT RC-978 PROGRAMMABLE REMOTE CONTROL UNIT - Denon AVR 1906 | Owners Manual - Page 39
of the ZONE2 SPEAKER OUT terminals can be adjusted with the remote control unit's ZONE2 VOLUME button. [System configuration and connections example] Using this unit's internal amplifier as the ZONE2. MAIN ZONE 5.1-channel systems Monitor ENGLISH Advanced Operation FL DVD player B Input C This - Denon AVR 1906 | Owners Manual - Page 40
program source to amplifier, etc., in a different room (ZONE2 mode) Remote control unit operations during multi-source playback (selecting the source) 1 1 Press the ZONE2/REC SELECT button to display the "ZONE2 SOURCE" on the display. Set the MODE 1 switch to the "AUDIO". The display switches as - Denon AVR 1906 | Owners Manual - Page 41
of the microprocessor If the indication on the display is not normal or if the operation of the unit is not correct, then the microprocessor should be reset by the following procedure. For operating instructions, refer to the manual of the component on which you want to record. To cancel - Denon AVR 1906 | Owners Manual - Page 42
of this unit ( page 49, 50). Navigating through the System Setup Menu You can change the settings using the buttons on the front panel or remote control unit. MODE 1 Advanced Setup - Part 1 On-screen display and front display The AVR-1906 is equipped with an intuitive and easy-to-understand on - Denon AVR 1906 | Owners Manual - Page 43
or other digital recorder. Use this for digital recording between a digital audio source (stereo - 2 channels) and a digital audio recorder. • Do not connect the output of the component connected to the OPTICAL 2 OUT terminal on the AVR-1906's rear panel to any terminal other than the OPTICAL 2 IN - Denon AVR 1906 | Owners Manual - Page 44
. ABCDEFGHIJKLMNOPQRSTUVWXY Z a b c d e f g h i j k l m n o p q r s t u v w x y z 0 1 2 3 4 5 6 7 8 9 space) Up to 5 characters can be input. • When the input source is selected, the display is as shown below. Example: When the name has been changed to "DENON" 41 ENGLISH Advanced Setup - Part 1 - Denon AVR 1906 | Owners Manual - Page 45
component monitor output terminals. 4 Press the ENTER button to enter the setting. • The "Input Setup" menu appears. • Down-converting from the component Setup - Part 1 Setting the Auto Tuner Preset Use this to automatically search for FM broadcasts and store up to 56 stations at preset channels - Denon AVR 1906 | Owners Manual - Page 46
with respect to the sound. In this case, adjust the audio delay to delay the sound and synchronize it with the picture. • The audio delay setting is stored separately for each input source. 1 Press the CURSOR D or H button to select "Advanced Playback" at the "System Setup" menu, then press the - Denon AVR 1906 | Owners Manual - Page 47
the ENTER button. • The "On Screen Display" screen appears. Advanced Setup - Part 1 Setting the Power Amp Assign. Make this setting to switch the power amplifier for the surround back channel to ZONE2 or Bi-Amp. Power Amp Assign. Surround back ZONE2 Bi-Amp SPEAKER OUT MAIN ZONE ZONE2 7.1ch - Denon AVR 1906 | Owners Manual - Page 48
control settings • Channel level settings (including test tones) • To unlock, press the SETUP button again and display the "Setup Lock" screen, then select "OFF" and press the ENTER button. • System setup is complete. Once these settings are made, there is no need to change them unless different AV - Denon AVR 1906 | Owners Manual - Page 49
adjusted directly from the remote control unit ( page 47). 1 Press the CURSOR D or H button to select "Channel Level" at the "Speaker Setup" menu, then press the ENTER button. • The "Channel Level" screen appears. 2 Press the CURSOR F or G button to select "Auto" or "Manual". Auto: Adjust the level - Denon AVR 1906 | Owners Manual - Page 50
the settings again. • When adjusting the level of an active subwoofer system, you may also need to adjust the subwoofer's own volume control. • When you adjust the channel levels while in the system setup channel level mode, the channel level adjustments made will affect all surround modes. Consider - Denon AVR 1906 | Owners Manual - Page 51
Digital or DTS signal playback) and the channels specified as "Small" in the setup menu. • Select the play mode that offers the fullest bass. • When the subwoofer is set to "Yes", bass sound is output from the subwoofer regardless of the subwoofer mode setting in surround modes other than Dolby - Denon AVR 1906 | Owners Manual - Page 52
from the factory) 1. Auto Setup 1 Auto Setup Auto Setup Power Amp Assign. Set this to switch the surround back channel's power amplifier for ZONE2 or BiAmp use . Default setting SURROUND BACK Page 8~11 2. Speaker Setup 1 Speaker Config. Speaker Setup Input the combination of speakers in - Denon AVR 1906 | Owners Manual - Page 53
to display the on-screen display that appears on the monitor screen when the controls on the remote control unit or main unit are operated. A setting to prevent flickering. 3 Power Amp Assign. Set this to switch the surround back channel's power amplifier for ZONE2 or Bi-Amp use. 4 Setup Lock - Denon AVR 1906 | Owners Manual - Page 54
Page Display not lit and sound not produced when POWER switch set to on. • Power supply cord not plugged in • Check the insertion of the power securely. supply cord plug. • Turn the power on with the remote control unit after turning the POWER switch on. 17 8 Display lit but sound not - Denon AVR 1906 | Owners Manual - Page 55
surround sound for different sources There are currently various types of multi-channel signals (signals or formats with more than two channels). 2 Types of multi-channel signals Dolby Digital, Dolby Pro Logic, DTS, high definition 3-1 signals (Japan MUSE Hi-Vision audio), DVD-Audio, Super Audio CD - Denon AVR 1906 | Owners Manual - Page 56
channels but also with conventional 2- to 5.1-channel sources. Furthermore, all the DENON original surround modes ( page 26) are compatible with 7.1-channel playback, so you can enjoy 7.1-channel sound examples as guides to set owner's manual for your subwoofer for advice on placing the subwoofer - Denon AVR 1906 | Owners Manual - Page 57
. Please refer to the instruction manual of the adapter when making connection. 2: Some DVD digital outputs have the function of switching the Dolby Digital signal output method between "bit stream" and "(convert to) PCM". When playing in Dolby Digital surround on the AVR-1906, switch the DVD player - Denon AVR 1906 | Owners Manual - Page 58
sound. • There are two types of DVD Dolby surround recording signals. q 2-channel PCM stereo signals w 2-channel Dolby Digital signals • When either of these signals is input to the AVR-1906 Recent DENON DVD player models feature DTS-compatible digital output - consult the player's owner's manual for - Denon AVR 1906 | Owners Manual - Page 59
as having a 5.1-channel format, so the DTS-ES Matrix 6.1 mode must be set manually to play these sources. (For instructions on selecting the surround channel audio with such normal media as DVD videos and CDs. Thus, with DTS 96/24, the same 96 kHz/24-bit multi-channel surround sound as with DVD-Audio - Denon AVR 1906 | Owners Manual - Page 60
Channel output FRONT L/R CENTER SURROUND L/R SURROUND BACK VIDEO GAME MONO MOVIE MATRIX VIRTUAL SB CH OUT (MODE) TONE CONTROL CINEMA EQ. E E E C (0 dB) E E C PRO LOGIC II / IIx only ROOM SIZE EFFECT LEVEL DELAY TIME SUBWOOFER PANORAMA DIMENSION ON/OFF CENTER WIDTH E E E E E E - Denon AVR 1906 | Owners Manual - Page 61
Specifications 2 Audio section • Power amplifier -3 dB • Color component video terminal Input / Power supply: Power consumption: Maximum external dimensions: Mass: AC 120 V, 60 Hz 5.1 A 434 (W) x 147 (H) x 417 (D) mm (17-3/32" x 5-25/32" x 16-27/64") 11.7 (25 lbs 13 oz) kg 2 Remote control - Denon AVR 1906 | Owners Manual - Page 62
Zenith VDP Denon Magnavox Mitsubishi Panasonic Philips Pioneer RCA Sony 014, *[111] 009 010 006, 011 012, 013 005 004 014 005, 015, 016, 017 003, 008 018 002, 019, 020 001, 021, 022 023 028, 029, 112 026 028 029, 030 026 028, 031 032 033, 034, 035, 036 Audio Dynamic - Denon AVR 1906 | Owners Manual - Page 63
Optonica Panasonic Perdio Pentax Philco Philips Pilot Pioneer Portland Proscan Pulsar Quartz Quasar Radio Shack Radix Randex RCA Realistic Ricoh Salora Samsung Sanky Sansui Sanyo SBR Scott Sears Sentra Sharp Shogun Sony STS 021 024, 049, 064, 066, 067, 068, 069, 107 009 009, 013, 023, 058, 090 015, - Denon AVR 1906 | Owners Manual - Page 64
125 Minutz Mitsubishi Montgomery Ward Motorola MTC NAD National National Quenties NEC Nikko NTC Optimus Optonica Orion Panasonic Philco Philips Pioneer Portland Price Club Proscan Proton Pulsar Quasar Radio Shack RCA Realistic Saisho Samsung Sansui Sanyo 066 001, 016, 039, 048, 056, 057, 058, 065 - Denon AVR 1906 | Owners Manual - Page 65
036 Sony 049, 067 STS1 043 STS2 044 STS3 045 SRS4 046 Technisat 077, 078, 079, 081, 082 Toshiba 047, 050 Uniden 061 CD Denon Aiwa Burmster Carver *[111] 001, 035, 043 002 003, 035 FRANCAIS ENGLISH Emerson Fisher JVC Kenwood Magnavox Marantz MCS Onkyo Optimus Philips Pioneer Sears - Denon AVR 1906 | Owners Manual - Page 66
ENGLISH FRANCAIS Magnavox Marantz Onkyo Optimus Panasonic Philips Pioneer Sony Technics Victor Wards Yamaha 002 002 016, 018 007, 008 012 002 007, 008, 009 013, 014, 015 012 004 007 010, 011 *[ ] : Preset codes set upon shipment from the factory. *[ ] : Les codes préréglés diffèrent en fonctiom - Denon AVR 1906 | Owners Manual - Page 67
TOKYO, JAPAN www.denon.com Denon Brand Company, D&M Holdings Inc. Printed in China 00D 511 4324 004
-
 1
1 -
 2
2 -
 3
3 -
 4
4 -
 5
5 -
 6
6 -
 7
7 -
8
-
9
-
10
-
11
-
12
-
13
-
14
-
15
-
16
-
17
-
18
-
19
-
20
-
21
-
22
-
23
-
24
-
25
-
26
-
27
-
28
-
29
-
30
-
31
-
32
-
33
-
34
-
35
-
36
-
37
-
38
-
39
-
40
-
41
-
42
-
43
-
44
-
45
-
46
-
47
-
48
-
49
-
50
-
51
-
52
-
53
-
54
-
55
-
56
-
57
-
58
-
59
-
60
-
61
-
62
-
63
-
64
-
65
-
66
-
67
 |
 |
AV SURROUND RECEIVER
AVR-1906
OPERATING INSTRUCTIONS
MODE D’EMPLOI