Denon AVR 1906 Owners Manual - Page 13
Cursor, Enter - reset
 |
UPC - 081757506557
View all Denon AVR 1906 manuals
Add to My Manuals
Save this manual to your list of manuals |
Page 13 highlights
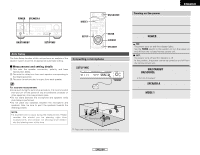
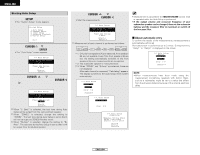
ENGLISH Easy Setup and Operation About error messages • These error screens may be displayed when performing Auto Setup measurement and the automatic measurements can not be completed because of the speaker arrangement, measurement environment, or other factors. Please check the following matters, reset the pertinent items, and measure again. • When there is too much noise in the room, the speakers may not be detected properly. Should this happen, perform the measurements when the noise level is low, or switch off the power of the equipment that is producing the noise for the duration of the measurements. Easy Setup and Operation Check of the measurement results 1 Press the CURSOR D or H button to select an item, then press the ENTER button. Screen example Cause Measures q This screen will be displayed when the speakers • Check that the pertinent speakers are required for producing suitable reproduction have properly connected. not been detected. • The front L or front R speaker was not properly detected. • Only one channel of the surround speakers was detected. • Sound was output from the R channel when only one surround back speaker was connected. • The surround back speaker was detected, but the surround speaker was not detected. w This screen will be displayed when the speaker • Check the polarity of the pertinent polarity is connected in reverse. speakers. For some speakers, this screen may be displayed even though the speakers are properly connected. If so, select "Skip0". The measurement results of each item can be checked here. 2 Press the ENTER button. • The verification screen appears. Example: Speaker Config. Check e This screen will be displayed when accurate • Set up the speakers so that their position measurements cannot be made due to the input is farther away from the listening level of the microphone being too high. position. • Lower the volume of the subwoofer speaker. 3 Press the ENTER button again once you have checked the results. r This screen will be displayed when the • Connect the measurement microphone measurement microphone is not connected. to the microphone connector. 10 ENGLISH
-
 1
1 -
2
-
3
-
4
-
5
-
6
-
7
-
 8
8 -
 9
9 -
 10
10 -
 11
11 -
 12
12 -
 13
13 -
 14
14 -
 15
15 -
 16
16 -
 17
17 -
 18
18 -
19
-
20
-
21
-
22
-
23
-
24
-
25
-
26
-
27
-
28
-
29
-
30
-
31
-
32
-
33
-
34
-
35
-
36
-
37
-
38
-
39
-
40
-
41
-
42
-
43
-
44
-
45
-
46
-
47
-
48
-
49
-
50
-
51
-
52
-
53
-
54
-
55
-
56
-
57
-
58
-
59
-
60
-
61
-
62
-
63
-
64
-
65
-
66
-
67
 |
 |
