Denon AVR 1906 Owners Manual - Page 45
Setting the Video Input Mode, Setting the Auto Tuner Preset
 |
UPC - 081757506557
View all Denon AVR 1906 manuals
Add to My Manuals
Save this manual to your list of manuals |
Page 45 highlights
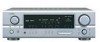
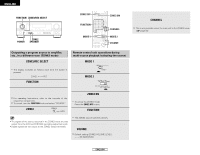
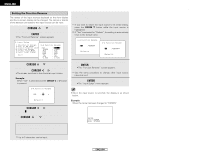
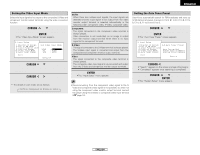
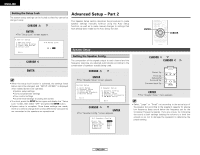
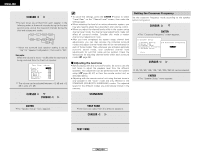
ENGLISH Advanced Setup - Part 1 Setting the Video Input Mode Select the input signal to be output to the composite S-Video and component monitor output terminals using the video conversion function. 1 Press the CURSOR D or H button to select "Video Input Mode" at the "Input Setup" menu, then press the ENTER button. • The "Video Input Mode" screen appears. 2 Press the CURSOR D or H button to select the input source for which you want to set the video input mode. 3 Press the CURSOR F or G button to select the mode as below. The details in each mode are as follows. AUTO Component S-Video Video AUTO: When there are multiple input signals, the input signals are detected and the input signal to be output from the video monitor output terminal is selected automatically in the following order: component video, S-Video, composite video. Component: The signal connected to the component video terminal is always played. Video conversion is not conducted, so no image is output from the monitor output terminal when there is no input signal to the component terminal. S-Video: The signal connected to the S-Video terminal is always played. The S-Video input signal is converted and output from the composite and component monitor output terminal. Video: The signal connected to the composite video terminal is always played. The composite video input signal is up-converted and output from the S-Video and component monitor output terminals. 4 Press the ENTER button to enter the setting. • The "Input Setup" menu appears. • Down-converting from the component video signal to the SVideo and composite video signal is not possible, so when not using the component video monitor output terminal connect the player using the S-Video or composite video input terminal ( page 12). Advanced Setup - Part 1 Setting the Auto Tuner Preset Use this to automatically search for FM broadcasts and store up to 56 stations at preset channels A1 to 8, B1 to 8, C1 to 8, D1 to 8, E1 to 8, F1 to 8 and G1 to 8. 1 Press the CURSOR D or H button to select "Auto Tuner Preset" at the "Input Setup" menu, then press the ENTER button. • The "Auto Tuner Preset" screen appears. 2 Press the CURSOR F button to select "Start". • "Search" appears on the screen and searching begins. • "Completed" appears once searching is completed. 3 Press the CURSOR D or H button to select "Exit", then press the ENTER button. • The "System Setup" menu appears. 42 ENGLISH
-
 1
1 -
2
-
3
-
4
-
5
-
6
-
7
-
8
-
9
-
10
-
11
-
12
-
13
-
14
-
15
-
16
-
17
-
18
-
19
-
20
-
21
-
22
-
23
-
24
-
25
-
26
-
27
-
28
-
29
-
30
-
31
-
32
-
33
-
34
-
35
-
36
-
37
-
38
-
39
-
 40
40 -
 41
41 -
 42
42 -
 43
43 -
 44
44 -
 45
45 -
 46
46 -
 47
47 -
 48
48 -
 49
49 -
 50
50 -
51
-
52
-
53
-
54
-
55
-
56
-
57
-
58
-
59
-
60
-
61
-
62
-
63
-
64
-
65
-
66
-
67
 |
 |