Denon AVR 1906 Owners Manual - Page 41
Other functions - power supply
 |
UPC - 081757506557
View all Denon AVR 1906 manuals
Add to My Manuals
Save this manual to your list of manuals |
Page 41 highlights
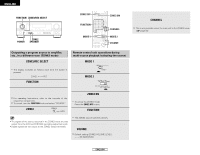
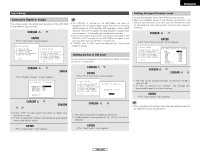
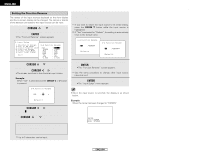
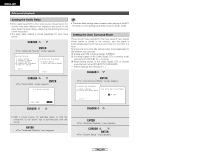
Advanced Operation Other functions Playing one source while recording another (REC OUT mode) 1 Press the ZONE2/REC SELECT button to display the "RECOUT SOURCE" on the display. The display switches as follows each time the button is pressed. ZONE2 REC Last function memory • This unit is equipped with a last function memory which stores the input and output setting conditions as they were immediately before the power is switched off. This function eliminates the need to perform complicated resettings when the power is switched on. • The unit is also equipped with a back-up memory. This function provides approximately one week of memory storage when the main unit's POWER switch is off and the power supply cord disconnected. 2 Turn the FUNCTION knob to select the source you want to output appears on the display. 3 Set the recording mode. Initialization of the microprocessor If the indication on the display is not normal or if the operation of the unit is not correct, then the microprocessor should be reset by the following procedure. For operating instructions, refer to the manual of the component on which you want to record. To cancel, turn the FUNCTION knob and select "SOURCE". 1 Switch off the unit using the main unit's POWER switch. • Recording sources other than digital inputs selected in the REC OUT mode are also output to the ZONE2 audio output terminals. • Digital signals are not output to the REC SOURCE or audio output terminals. • The DIGITAL IN's signal selected with the FUNCTION knob is output to the DIGITAL OUT (OPTICAL) terminal. 2 Keep both SPEAKER A and B buttons depressed and turn on the unit by pressing the main unit's POWER switch. 3 Check that the entire display is flashing at 1second intervals and release the buttons. • The microprocessor will be initialized. • If step 3 does not work, start over from step 1. • If the microprocessor has been reset, all the button settings are reset to the default values (the values set upon shipment from the factory). 38 ENGLISH ENGLISH Advanced Operation
-
 1
1 -
2
-
3
-
4
-
5
-
6
-
7
-
8
-
9
-
10
-
11
-
12
-
13
-
14
-
15
-
16
-
17
-
18
-
19
-
20
-
21
-
22
-
23
-
24
-
25
-
26
-
27
-
28
-
29
-
30
-
31
-
32
-
33
-
34
-
35
-
 36
36 -
 37
37 -
 38
38 -
 39
39 -
 40
40 -
 41
41 -
 42
42 -
 43
43 -
 44
44 -
 45
45 -
 46
46 -
47
-
48
-
49
-
50
-
51
-
52
-
53
-
54
-
55
-
56
-
57
-
58
-
59
-
60
-
61
-
62
-
63
-
64
-
65
-
66
-
67
 |
 |