Denon AVR-3805 Owners Manual - Page 42
Auto Tuner Presets
 |
UPC - 081757505987
View all Denon AVR-3805 manuals
Add to My Manuals
Save this manual to your list of manuals |
Page 42 highlights
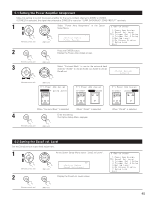
NOTE: Down-converting from the component video signal to the S-Video and composite video signal is not possible, so when not using the component video monitor output terminal connect the player using the S-Video or composite video input terminal. Cautions on the video conversion function: When the component video terminals are used to connect the AVR-3805 with a TV (or monitor, projector, etc.) and the video (yellow) or S video terminals are used to connect the AVR-3805 with a VTR, depending on the combination of the TV and VTR the picture may flicker in the horizontal direction, be distorted, be out of sync or not display at all when playing video tapes. If this happens, connect a commercially available video stabilizer, etc., with a TBC (time base corrector) function between the AVR-3805 and the VTR, or if your VTR has a TBC function, turn it on. 4 CH SEL ENTER Enter the setting. CH SEL ENTER The System Setup Menu reappears. (Remote control unit) (Main unit) 3-5 Auto Tuner Presets Use this to automatically search for FM broadcasts and store up to 56 stations at preset channels A1 to 8, B1 to 8, C1 to 8, D1 to 8, E1 to 8, F1 to 8 and G1 to 8. NOTE: • If an FM station cannot be preset automatically due to poor reception, use the "Manual tuning" operation to tune in the station, then preset it using the manual "Preset memory" operation. 1 Select "Auto Tuner Presets"at the Input Setup Menu. CH SEL ENTER CH SEL ENTER (Remote control unit) (Main unit) *Input Setup Auto Tuner 2 CH SEL ENTER Display the Auto Preset Memory screen. CH SEL ENTER (Remote control unit) (Main unit) *Auto Tuner Start :Yes 3 CH SEL ENTER Press the CURSOR left button to select "Yes". "Search" flashes on the screen and searching begins. "Completed" appears once searching is completed. CH SEL ENTER The display automatically switches to screen. (Remote control unit) 4 CH SEL ENTER (Main unit) CH SEL ENTER (Remote control unit) (Main unit) Enter the setting. The Input Setup Menu reappears. 42
-
 1
1 -
2
-
3
-
4
-
5
-
6
-
7
-
8
-
9
-
10
-
11
-
12
-
13
-
14
-
15
-
16
-
17
-
18
-
19
-
20
-
21
-
22
-
23
-
24
-
25
-
26
-
27
-
28
-
29
-
30
-
31
-
32
-
33
-
34
-
35
-
36
-
 37
37 -
 38
38 -
 39
39 -
 40
40 -
 41
41 -
 42
42 -
 43
43 -
 44
44 -
 45
45 -
 46
46 -
 47
47 -
48
-
49
-
50
-
51
-
52
-
53
-
54
-
55
-
56
-
57
-
58
-
59
-
60
-
61
-
62
-
63
-
64
-
65
-
66
-
67
-
68
-
69
-
70
-
71
-
72
-
73
-
74
-
75
-
76
-
77
-
78
-
79
-
80
-
81
-
82
-
83
-
84
-
85
-
86
-
87
-
88
-
89
-
90
-
91
-
92
-
93
-
94
-
95
-
96
-
97
-
98
-
99
-
100
-
101
-
102
-
103
-
104
 |
 |
