Denon AVR-791 Owners Manual - English - Page 36
Set up speakers - microphone
 |
UPC - 883795001359
View all Denon AVR-791 manuals
Add to My Manuals
Save this manual to your list of manuals |
Page 36 highlights
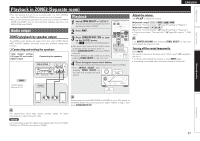
Simple version Basic version ENGLISH Set up speakers Here we describe how to set up speakers other than 5.1-channel speakers. For the method of setting up 5.1-channel speakers, see "Simple version", "Set up speakers (Audyssey® Auto Setup)" (vpage 6). First install and connect the speakers to this unit. 1 Set up the remote control unit nn Set up the zone mode Press ZONE SELECT to switch the zone mode to "MAIN". The "MAIN" indicator lights. Press ZONE SELECT nn Set up the operation mode Press AMP to set the remote control unit to amplifier operation mode. 2 Connect the setup microphone. When the setup microphone is connected, the following screen is displayed. 3-1.Audyssey Auto Setup MultEQ Please place microphone at ear height at main listening position. Amp Assign: ZONE2 Start Cancel [ENT]:Select [RTN]:Back 3 Use ui to select "Amp Assign". 3-1.Audyssey Auto Setup MultEQ Please place microphone at ear height at main listening position. Amp Assign: ZONE2 Start Cancel [RTN]:Back 4 Use o p to select the configuration of the connected speakers. Normal ZONE2 Front Height Front Bi-Amp Front B Set when using 7.1-channel (Front/Center/Surround/Surround Back/Subwoofer) speakers. Set for connecting the speakers for ZONE2 to the SURR. BACK/ AMP ASSIGN terminals. Set for connecting the front height speakers to the SURR. BACK/AMP ASSIGN terminals. Set for connecting a tweeter of a front speaker to the SURR. BACK/AMP ASSIGN terminals and a woofer of the front speaker to the FRONT terminals. Set for connecting the second set of front speakers to the SURR. BACK/AMP ASSIGN terminals. In this case, go to step 6. 5 GWhen "Front B" is selected in step 4H q Use ui to select "Front Sp.". w Press o p to select a speaker. A Select this to use front speaker A. B Select this to use front speaker B. A+B Select this to use front speakers A and B simultaneously. around items indicate the settings. 6 Proceed to page 8 " Preparation " step 5. NOTE After performing Audyssey Auto Setup, do not change the speaker connections or subwoofer volume. In event of a change, perform Audyssey Auto Setup again. Press AMP Advanced version Information Remote control operation buttons Move the cursor (Up/Down/Left/Right) Confirm the setting Return to previous menu 33
-
 1
1 -
2
-
3
-
4
-
5
-
6
-
7
-
8
-
9
-
10
-
11
-
12
-
13
-
14
-
15
-
16
-
17
-
18
-
19
-
20
-
21
-
22
-
23
-
24
-
25
-
26
-
27
-
28
-
29
-
30
-
 31
31 -
 32
32 -
 33
33 -
 34
34 -
 35
35 -
 36
36 -
 37
37 -
 38
38 -
 39
39 -
 40
40 -
 41
41 -
42
-
43
-
44
-
45
-
46
-
47
-
48
-
49
-
50
-
51
-
52
-
53
-
54
-
55
-
56
-
57
-
58
-
59
-
60
-
61
-
62
-
63
-
64
-
65
-
66
-
67
-
68
-
69
-
70
-
71
-
72
-
73
-
74
-
75
-
76
-
77
-
78
-
79
-
80
-
81
-
82
-
83
-
84
 |
 |
