Denon AVR-791 Owners Manual - English - Page 40
Playback in ZONE2 Separate room - zone 2 hdmi connection
 |
UPC - 883795001359
View all Denon AVR-791 manuals
Add to My Manuals
Save this manual to your list of manuals |
Page 40 highlights
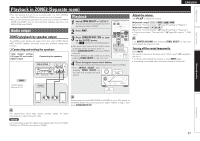
Simple version Basic version Playback in ZONE2 (Separate room) • You can operate this unit so as to enjoy audio in a room (ZONE2) other than the MAIN ZONE (room where the unit is located). • You can simultaneously play back the same source in both the MAIN ZONE and ZONE2. You can also play back separate sources in the MAIN ZONE and ZONE2. Audio output ZONE2 playback by speaker output The ZONE2 audio signals are output from this unit's SURR. BACK/ AMP ASSIGN speaker terminals using the amplifier assignment function. nnConnecting and setting the speakers "Amp Assign" setting (vpage 52) and audio signals output Connecting the speakers MAIN ZONE This unit Playback 1 Switch ZONE SELECT to "ZONE2". The remote control unit switches to the operating mode for ZONE2. 2 Press AMP. 3 Press ZONE/DEVICE ON to turn on the ZONE2 power. The indicator on the display lights. • Also press input source select button when in standby mode, the power turns on. • When ZONE/DEVICE OFF is pressed, ZONE2 turns off. • Power in ZONE2 can be turned on or off by pressing ZONE2 ON/OFF on the main unit. Input source select buttons 4 Press the input source select button. The audio signal of the selected source is output to ZONE2. • Turn SOURCE SELECT after pressing ZONE2 SELECT on the main unit to select an input source. ZONE2 Output signal : Stereo (L / R) ZONE2 ENGLISH Adjust the volume Use VOL df to adjust the volume. GAdjustable rangeH - - - -80dB - -40dB - 18dB (When the "Volume Display" (vpage 57) setting is "Relative") GAdjustable rangeH 0 - 41 - 99 (When the "Volume Display" (vpage 57) setting is "Absolute") • At time of purchase, "Volume Limit" (vpage 56) is set to "-10dB (71)". Turn MASTER VOLUME after pressing ZONE2 SELECT on the main unit to adjust the sound volume. Turning off the sound temporarily Press MUTE. The sound is reduced to the level set at "Mute Level" (vpage 56) in the menu. • To cancel, either adjust the volume or press MUTE again. • The setting is canceled when the zone's power is turned off. Advanced version Information When power for both MAIN ZONE and ZONE2 is set to ON, power of the MAIN ZONE only can be turned off. Select "MAIN" in step 1 then press ZONE/DEVICE OFF. We recommend using high quality pin-plug cables for audio connections in order to prevent noise. NOTE It is not possible to play the digital audio signals input from the HDMI, COAXIAL or OPTICAL connectors in ZONE2. 37
-
 1
1 -
2
-
3
-
4
-
5
-
6
-
7
-
8
-
9
-
10
-
11
-
12
-
13
-
14
-
15
-
16
-
17
-
18
-
19
-
20
-
21
-
22
-
23
-
24
-
25
-
26
-
27
-
28
-
29
-
30
-
31
-
32
-
33
-
34
-
 35
35 -
 36
36 -
 37
37 -
 38
38 -
 39
39 -
 40
40 -
 41
41 -
 42
42 -
 43
43 -
 44
44 -
 45
45 -
46
-
47
-
48
-
49
-
50
-
51
-
52
-
53
-
54
-
55
-
56
-
57
-
58
-
59
-
60
-
61
-
62
-
63
-
64
-
65
-
66
-
67
-
68
-
69
-
70
-
71
-
72
-
73
-
74
-
75
-
76
-
77
-
78
-
79
-
80
-
81
-
82
-
83
-
84
 |
 |
