Epson BrightLink 1480Fi Installation Guide - Page 25
Projection distance worksheets, If the total exceeds the ceiling height
 |
View all Epson BrightLink 1480Fi manuals
Add to My Manuals
Save this manual to your list of manuals |
Page 25 highlights
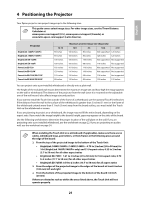
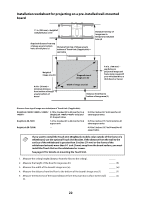
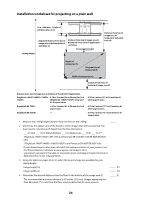
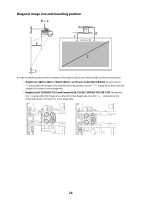
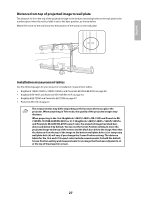
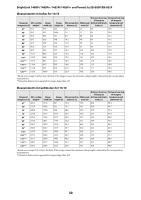
English 5. Find the top of the projected image area by adding distances (f ) and (h). _____ 6. Use the tables on pages 30 to 32 to determine the required distance from the top of the image area to the bottom holes of the wall plate (c). _____ (c) 7. Use the tables on pages 30 to 32 to determine the required distance between the top of the image area and the temporary wall plate hole (d). _____ (d) 8. Add: Required distance from top of image area to bottom holes of wall plate (c) _____ (c) Height of image area (h) _____ (h) Distance from floor to bottom of image area (f ) _____ (f ) Height of wall plate plus cover + 11 inches If the total exceeds the ceiling height, you will need to reduce the image size or reduce (280 mm) the distance from the floor to the bottom of the image area. _____ total 9. After confirming your image size, use tape or a pencil to mark the distance (c) from the top of the image area on the board to the bottom holes of the wall plate. 10. Align the line (horizontal) on the template sheet with the (c) mark, then align the center line on the template sheet with the center of the image area. Follow the instructions on page 43 to install the projector. Projection distance worksheets The tables on the following pages provide installation information for select image sizes. The minimum ceiling height is based on an image 30 inches (762 mm) from the floor; if the image is lower, the minimum ceiling height is reduced by the corresponding measurement. Use the worksheets, the illustrations, and the information in the tables on the following pages to determine the projection distance and placement of the wall plate. 25
-
 1
1 -
2
-
3
-
4
-
5
-
6
-
7
-
8
-
9
-
10
-
11
-
12
-
13
-
14
-
15
-
16
-
17
-
18
-
19
-
 20
20 -
 21
21 -
 22
22 -
 23
23 -
 24
24 -
 25
25 -
 26
26 -
 27
27 -
 28
28 -
 29
29 -
 30
30 -
31
-
32
-
33
-
34
-
35
-
36
-
37
-
38
-
39
-
40
-
41
-
42
-
43
-
44
-
45
-
46
-
47
-
48
-
49
-
50
-
51
-
52
-
53
-
54
-
55
-
56
-
57
-
58
-
59
-
60
-
61
-
62
-
63
-
64
-
65
-
66
-
67
-
68
-
69
-
70
-
71
-
72
-
73
-
74
-
75
-
76
-
77
-
78
-
79
-
80
-
81
-
82
-
83
-
84
-
85
-
86
-
87
-
88
-
89
-
90
-
91
-
92
-
93
-
94
-
95
-
96
-
97
-
98
-
99
-
100
-
101
-
102
-
103
-
104
-
105
 |
 |
