Epson BrightLink 1480Fi Installation Guide - Page 8
Attaching the Covers, Installing the Touch Unit, Installing the HDBaseT Control Pad and Pen Stand
 |
View all Epson BrightLink 1480Fi manuals
Add to My Manuals
Save this manual to your list of manuals |
Page 8 highlights
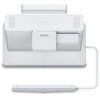
7 Attaching the Covers 64 Attach the wall plate cover and end cap 64 Attach the cable cover to the projector (BrightLink 1480Fi/1480Fi+/1485Fi/ 65 1485Fi+ and PowerLite EB-800F/EB-805F only) 8 Installing the Touch Unit 67 Installing the touch unit on a whiteboard 68 Install infrared deflectors along any obstacles 68 Display the installation pattern 69 Determine the installation position for the touch unit 70 Install the touch unit 72 Turn on the touch unit 74 Adjust the angle 76 Installing the touch unit above a whiteboard 80 Install infrared deflectors along any obstacles 80 Turn on the projector 81 Display the installation pattern 81 Determine the installation position for the bracket 82 Drill holes for the bracket 83 Install the bracket 83 Turn on the touch unit 85 Adjust the angle 87 9 Installing the HDBaseT Control Pad and Pen Stand 92 Check the installation location 92 Installing the HDBaseT Control Pad 92 Remove the front cover 93 Connect the power cable 94 Attach the control pad 93 Secure the AC adapter 94 Connect the projector cables to the control pad 94 Attach the front cover 95 Installing the pen stand 95 10 Appendix 97 Using the Easy Interactive Function 97 Using Auto Screen Adjustment 97 Making Additional Screen Adjustments 100 Attaching a Security Cable 105 8
-
 1
1 -
2
-
 3
3 -
 4
4 -
 5
5 -
 6
6 -
 7
7 -
 8
8 -
 9
9 -
 10
10 -
 11
11 -
 12
12 -
 13
13 -
14
-
15
-
16
-
17
-
18
-
19
-
20
-
21
-
22
-
23
-
24
-
25
-
26
-
27
-
28
-
29
-
30
-
31
-
32
-
33
-
34
-
35
-
36
-
37
-
38
-
39
-
40
-
41
-
42
-
43
-
44
-
45
-
46
-
47
-
48
-
49
-
50
-
51
-
52
-
53
-
54
-
55
-
56
-
57
-
58
-
59
-
60
-
61
-
62
-
63
-
64
-
65
-
66
-
67
-
68
-
69
-
70
-
71
-
72
-
73
-
74
-
75
-
76
-
77
-
78
-
79
-
80
-
81
-
82
-
83
-
84
-
85
-
86
-
87
-
88
-
89
-
90
-
91
-
92
-
93
-
94
-
95
-
96
-
97
-
98
-
99
-
100
-
101
-
102
-
103
-
104
-
105
 |
 |
