Epson BrightLink 1480Fi Installation Guide - Page 49
Route the cables through the wall mount arm, Attach the mount arm to the wall plate
 |
View all Epson BrightLink 1480Fi manuals
Add to My Manuals
Save this manual to your list of manuals |
Page 49 highlights
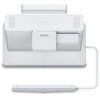
English D Route the cables through the wall mount arm For BrightLink projectors with a Touch Unit: Make sure to route the Touch Unit connection cable through the wall mount arm. Route the Touch Unit connection cable so that the end that connects to the Touch Unit appears from the lower part of the wall mount as shown above. E Attach the mount arm to the wall plate 1. Insert the hexagonal shaft into the wall mount ( ). 2. Insert and turn the hexagonal shaft at the top of the mount arm into the slot on the wall plate ( ). 49
-
 1
1 -
2
-
3
-
4
-
5
-
6
-
7
-
8
-
9
-
10
-
11
-
12
-
13
-
14
-
15
-
16
-
17
-
18
-
19
-
20
-
21
-
22
-
23
-
24
-
25
-
26
-
27
-
28
-
29
-
30
-
31
-
32
-
33
-
34
-
35
-
36
-
37
-
38
-
39
-
40
-
41
-
42
-
43
-
 44
44 -
 45
45 -
 46
46 -
 47
47 -
 48
48 -
 49
49 -
 50
50 -
 51
51 -
 52
52 -
 53
53 -
 54
54 -
55
-
56
-
57
-
58
-
59
-
60
-
61
-
62
-
63
-
64
-
65
-
66
-
67
-
68
-
69
-
70
-
71
-
72
-
73
-
74
-
75
-
76
-
77
-
78
-
79
-
80
-
81
-
82
-
83
-
84
-
85
-
86
-
87
-
88
-
89
-
90
-
91
-
92
-
93
-
94
-
95
-
96
-
97
-
98
-
99
-
100
-
101
-
102
-
103
-
104
-
105
 |
 |

49
English
D
Route the cables through the wall mount arm
E
Attach the mount arm to the wall plate
1.
Insert the hexagonal shaft into the wall mount (
).
2.
Insert and turn the hexagonal shaft at the top of the mount arm into the slot on the wall plate (
).
For BrightLink projectors with a Touch Unit: Make sure to route the Touch Unit
connection cable through the wall mount arm. Route the Touch Unit connection cable
so that the end that connects to the Touch Unit appears from the lower part of the wall
mount as shown above.