Epson BrightLink 1480Fi Installation Guide - Page 83
Drill holes for the bracket, Install the bracket
 |
View all Epson BrightLink 1480Fi manuals
Add to My Manuals
Save this manual to your list of manuals |
Page 83 highlights
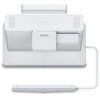
English E Drill holes for the bracket If possible, drill holes at the four points labeled Main on the template sheet. If you're unable to use the points labeled Main, you can secure the bracket at the points labeled Sub. Make sure you secure the bracket at four points (two on the left and two on the right) for proper balance. F Install the bracket 1. Loosen the screws (×2) at the top of the bracket. 2. Slide the front of the bracket forward until it is fully extended. To prevent the front of the bracket from slipping during installation, loosely tighten the top screws. 3. Secure the bracket on the wall using four (×4) 3.8 mm wood screws that are 46 mm long or four (×4) M4 anchor bolts (not included). 83
-
 1
1 -
2
-
3
-
4
-
5
-
6
-
7
-
8
-
9
-
10
-
11
-
12
-
13
-
14
-
15
-
16
-
17
-
18
-
19
-
20
-
21
-
22
-
23
-
24
-
25
-
26
-
27
-
28
-
29
-
30
-
31
-
32
-
33
-
34
-
35
-
36
-
37
-
38
-
39
-
40
-
41
-
42
-
43
-
44
-
45
-
46
-
47
-
48
-
49
-
50
-
51
-
52
-
53
-
54
-
55
-
56
-
57
-
58
-
59
-
60
-
61
-
62
-
63
-
64
-
65
-
66
-
67
-
68
-
69
-
70
-
71
-
72
-
73
-
74
-
75
-
76
-
77
-
 78
78 -
 79
79 -
 80
80 -
 81
81 -
 82
82 -
 83
83 -
 84
84 -
 85
85 -
 86
86 -
 87
87 -
 88
88 -
89
-
90
-
91
-
92
-
93
-
94
-
95
-
96
-
97
-
98
-
99
-
100
-
101
-
102
-
103
-
104
-
105
 |
 |

83
English
E
Drill holes for the bracket
If possible, drill holes at the four points labeled
Main
on the template sheet.
If you’re unable to use the points labeled
Main
, you can secure the bracket at the points labeled
Sub
.
F
Install the bracket
1.
Loosen the screws (×2) at the top of the bracket.
2.
Slide the front of the bracket forward until it is fully extended.
To prevent the front of the bracket from slipping during installation, loosely tighten the top screws.
3.
Secure the bracket on the wall using four (×4) 3.8 mm wood screws that are 46 mm long or four (×4) M4
anchor bolts (not included).
Make sure you secure the bracket at four points (two on the left and two on the right)
for proper balance.