Epson BrightLink 1480Fi Installation Guide - Page 68
Installing the touch unit on a whiteboard, Install infrared deflectors along any obstacles
 |
View all Epson BrightLink 1480Fi manuals
Add to My Manuals
Save this manual to your list of manuals |
Page 68 highlights
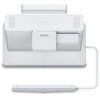
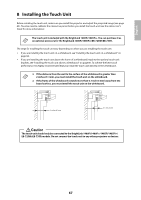
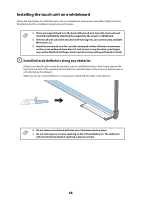
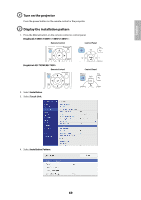
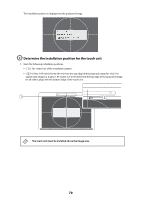
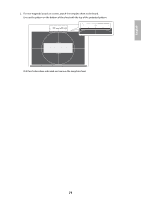
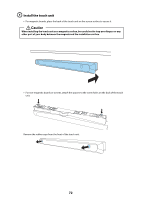
Installing the touch unit on a whiteboard Follow the steps below to install the touch unit on a whiteboard. Some menus may differ slightly from the illustrations, but the installation instructions are the same. ❏ There are magnets built in to the back of the touch unit. Typically, the touch unit should be installed by attaching the magnets to the screen or whiteboard. ❏ If the touch unit cannot be attached with the magnets, use commercially available M4 screws (×2). ❏ Install the touch unit on a flat, smooth, unwarped surface. If there is unevenness on the screen surface of more than 0.2 inch (5 mm) in any direction, your fingers may not be detected and finger touch operations may not be performed correctly. A Install infrared deflectors along any obstacles If there is an obstacle that cannot be removed, such as a whiteboard tray or thick frame, remove the tape from the back of the supplied infrared deflectors and stick them to the screen so that the laser is not reflected by the obstacle. Make sure to use as many deflectors as necessary to match the full width of the obstacle. ❏ Do not remove an infrared deflector once it has been stuck in place. ❏ Do not stick tape on or place anything on the infrared deflectors. The deflectors will not function properly if anything is placed on them. 68
-
 1
1 -
2
-
3
-
4
-
5
-
6
-
7
-
8
-
9
-
10
-
11
-
12
-
13
-
14
-
15
-
16
-
17
-
18
-
19
-
20
-
21
-
22
-
23
-
24
-
25
-
26
-
27
-
28
-
29
-
30
-
31
-
32
-
33
-
34
-
35
-
36
-
37
-
38
-
39
-
40
-
41
-
42
-
43
-
44
-
45
-
46
-
47
-
48
-
49
-
50
-
51
-
52
-
53
-
54
-
55
-
56
-
57
-
58
-
59
-
60
-
61
-
62
-
 63
63 -
 64
64 -
 65
65 -
 66
66 -
 67
67 -
 68
68 -
 69
69 -
 70
70 -
 71
71 -
 72
72 -
 73
73 -
74
-
75
-
76
-
77
-
78
-
79
-
80
-
81
-
82
-
83
-
84
-
85
-
86
-
87
-
88
-
89
-
90
-
91
-
92
-
93
-
94
-
95
-
96
-
97
-
98
-
99
-
100
-
101
-
102
-
103
-
104
-
105
 |
 |
