Gateway MX6750h 8511340 - Gateway Notebook Hardware Reference - Page 45
Replacing the hard drive kit
 |
View all Gateway MX6750h manuals
Add to My Manuals
Save this manual to your list of manuals |
Page 45 highlights
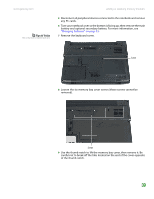
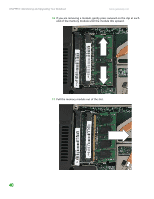
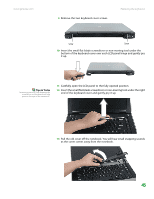
www.gateway.com Replacing the hard drive kit Tips & Tricks The screw hole is marked with a K. 12 Hold the new or replacement module at a 30-degree angle and press it into the empty memory slot. This module is keyed so it can only be inserted in one direction. If the module does not fit, make sure that the notch in the module lines up with the tab in the memory bay. 13 Replace the memory bay cover, then tighten the cover screws. 14 Replace the keyboard screw. 15 Insert the battery(ies), then turn your notebook over. 16 Connect the optional port replicator. -OR- Connect the power adapter, modem cable, and network cable. Replacing the hard drive kit Tools Required You need a small Phillips screwdriver to replace the hard drive kit. If you would like more hard drive capacity, you can replace your original drive with a higher-capacity drive. Hard drive kit To replace the hard drive kit: 1 Create a Drivers and Applications Recovery disc. For more information, see "Creating Drivers and Applications Recovery discs" in the online User Guide. 2 Print the "Recovering Your System" chapter from the online User Guide for use in Step 21. 3 Back up any data you want to transfer to the new hard drive. For more information, see "Backing up files" in the online User Guide. 4 Follow the guidelines under "Preventing static electricity discharge" on page 38. 5 Turn off your notebook. 41
-
 1
1 -
2
-
3
-
4
-
5
-
6
-
7
-
8
-
9
-
10
-
11
-
12
-
13
-
14
-
15
-
16
-
17
-
18
-
19
-
20
-
21
-
22
-
23
-
24
-
25
-
26
-
27
-
28
-
29
-
30
-
31
-
32
-
33
-
34
-
35
-
36
-
37
-
38
-
39
-
 40
40 -
 41
41 -
 42
42 -
 43
43 -
 44
44 -
 45
45 -
 46
46 -
 47
47 -
 48
48 -
 49
49 -
 50
50 -
51
-
52
-
53
-
54
-
55
-
56
-
57
-
58
-
59
-
60
-
61
-
62
-
63
-
64
-
65
-
66
-
67
-
68
-
69
-
70
-
71
-
72
 |
 |