Gateway MX6750h 8511340 - Gateway Notebook Hardware Reference - Page 49
end of the keyboard cover and gently pry it up.
 |
View all Gateway MX6750h manuals
Add to My Manuals
Save this manual to your list of manuals |
Page 49 highlights
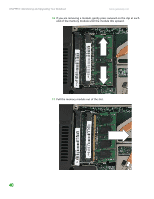
www.gateway.com 9 Remove the two keyboard cover screws. Replacing the keyboard Screw Screw 10 Insert the small flat-blade screwdriver or non-marring tool under the bottom of the keyboard cover over each LCD panel hinge and gently pry it up. Tips & Tricks Inserting a piece of cloth between the screwdriver and keyboard will help prevent damage to the notebook... 11 Carefully open the LCD panel to the fully opened position. 12 Insert the small flat-blade screwdriver or non-marring tool under the right end of the keyboard cover and gently pry it up. 13 Pull the old cover off the notebook. You will hear small snapping sounds as the cover comes away from the notebook. 45
-
 1
1 -
2
-
3
-
4
-
5
-
6
-
7
-
8
-
9
-
10
-
11
-
12
-
13
-
14
-
15
-
16
-
17
-
18
-
19
-
20
-
21
-
22
-
23
-
24
-
25
-
26
-
27
-
28
-
29
-
30
-
31
-
32
-
33
-
34
-
35
-
36
-
37
-
38
-
39
-
40
-
41
-
42
-
43
-
 44
44 -
 45
45 -
 46
46 -
 47
47 -
 48
48 -
 49
49 -
 50
50 -
 51
51 -
 52
52 -
 53
53 -
 54
54 -
55
-
56
-
57
-
58
-
59
-
60
-
61
-
62
-
63
-
64
-
65
-
66
-
67
-
68
-
69
-
70
-
71
-
72
 |
 |

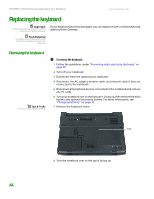
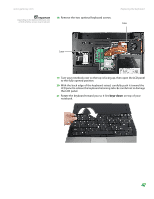
Replacing the keyboard
www.gateway.com
45
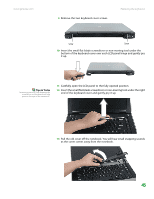
9
Remove the two keyboard cover screws.
10
Insert the small flat-blade screwdriver or non-marring tool under the
bottom of the keyboard cover over each LCD panel hinge and gently pry
it up.
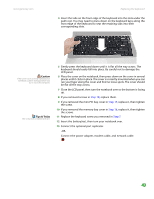
11
Carefully open the LCD panel to the fully opened position.
Tips & Tricks
Inserting a piece of cloth between the
screwdriver and keyboard will help
prevent damage to the notebook...
12
Insert the small flat-blade screwdriver or non-marring tool under the right
end of the keyboard cover and gently pry it up.
13
Pull the old cover off the notebook. You will hear small snapping sounds
as the cover comes away from the notebook.
Screw
Screw