Gigabyte GA-990FXA-UD3 Manual - Page 80
Delete an Array, Delete Array, Main Menu, Delete LD Menu, View Drive Assignments, Assignment
 |
View all Gigabyte GA-990FXA-UD3 manuals
Add to My Manuals
Save this manual to your list of manuals |
Page 80 highlights
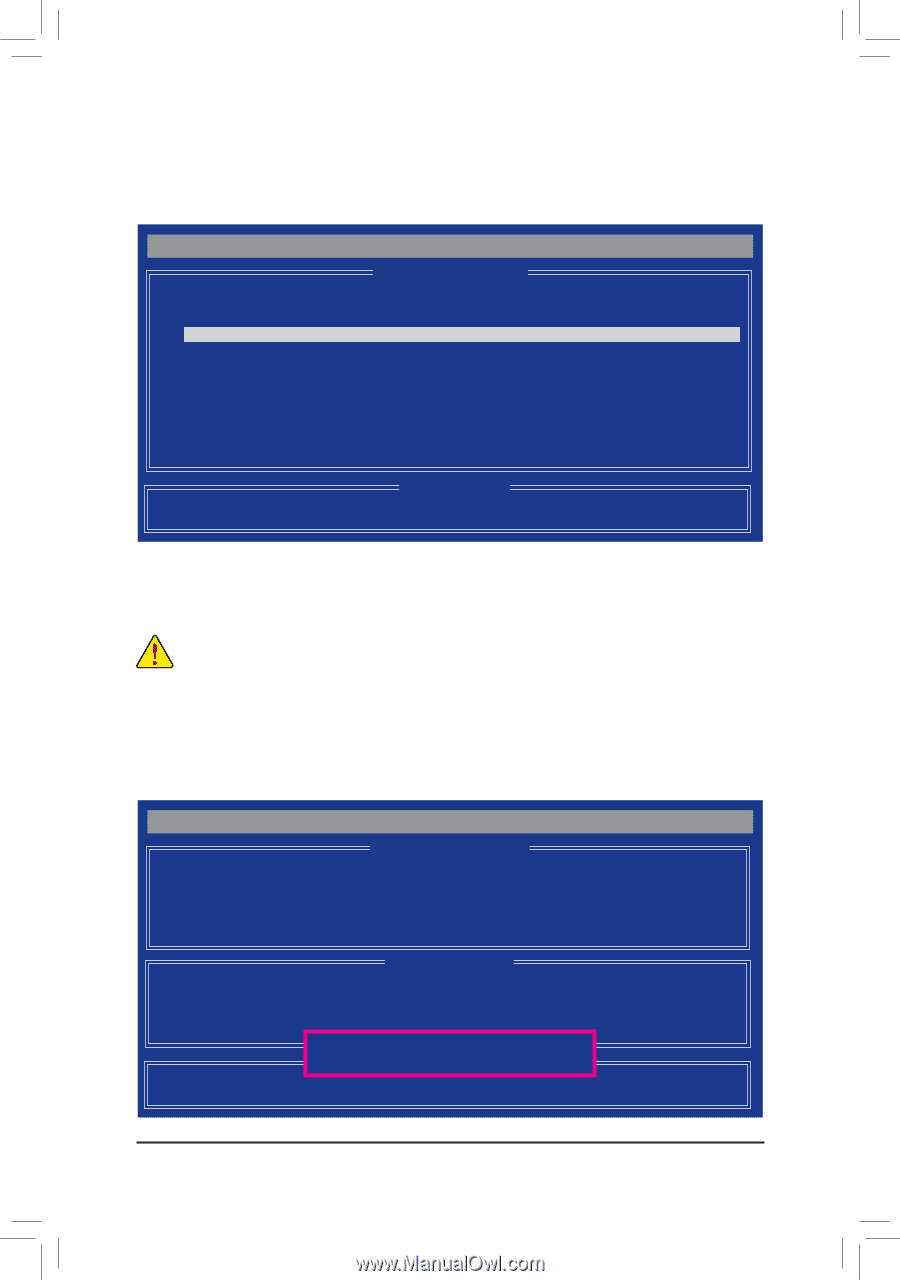
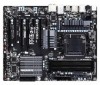
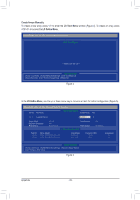
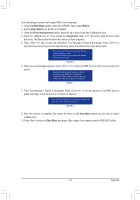
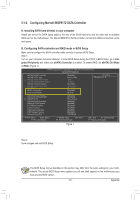
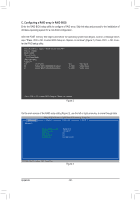
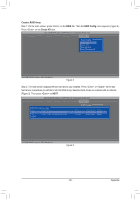
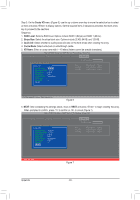
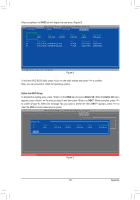
View Drive Assignments The View Drive Assignments option in the Main Menu displays whether the attached hard drives are assigned to a disk array or are unassigned. Under the Assignment column, drives are labeled with their assigned disk array or shown as Free if unassigned. Option ROM Utility (c) 2011 Advanced Micro Devices, Inc. [ View Drives Assignments ] Port:ID Drive Model Capabilities 01:00 WDC WD800JD-22LSA0 SATA 3G [S.M.A.R.T.] Health Extent 1 02:00 WDC WD800JD-22LSA0 SATA 3G Extent 1 [S.M.A.R.T.] Health Capacity (GB) 79.89 79.82 80.2 80.02 Assignment LD 1-1 LD 1-2 [ Keys Available ] [h] Up [i] Down [PaUp/PaDn] Switch Page [Ctrl+H] Secure Erase [ESC] Exit Figure 9 Delete an Array The Delete Array menu option allows for deletion of disk array assignments. Deleting an existing disk array could result in loss of data. Record all array information including the array type, the disk members, and stripe block size in case you wish to undo a deletion. 1. To delete an array, press in the Main Menu to enter the Delete LD Menu. Then highlight the array you wish to delete and press the key or the + keys. 2. The View LD Defination Menu will appear (as shown in Figure 10) showing which drives are assigned to this array. Press + if you are sure to delete the array or other keys to abort. 3. When the array is deleted, the screen will return to Delete LD Menu. Press to return to Main Menu. Option ROM Utility (c) 2011 Advanced Micro Devices, Inc. LD No LD Name [ View LD Defination Menu ] RAID Mode Drv Capacity(GB) LD 1 GBT RAID 0 2 80 Stripe Block Read Policy 64 KB Read Ahead Write Policy WriteBack Port:ID 01:00 02:00 [ Drives Assignments ] Drive Model WDC WD800JD-22LSA0 WDC WD800JD-22LSA0 Capabilities SATA 3G SATA 3G Capacity (GB) 79.89 80.02 Press Ctrl-Y to delete the data in the disk! or press any othe[[rKKkeeeyyysstAoAvavabaiolialratb.bl..ele]] Appendix Figure 10 - 80 -
-
 1
1 -
2
-
3
-
4
-
5
-
6
-
7
-
8
-
9
-
10
-
11
-
12
-
13
-
14
-
15
-
16
-
17
-
18
-
19
-
20
-
21
-
22
-
23
-
24
-
25
-
26
-
27
-
28
-
29
-
30
-
31
-
32
-
33
-
34
-
35
-
36
-
37
-
38
-
39
-
40
-
41
-
42
-
43
-
44
-
45
-
46
-
47
-
48
-
49
-
50
-
51
-
52
-
53
-
54
-
55
-
56
-
57
-
58
-
59
-
60
-
61
-
62
-
63
-
64
-
65
-
66
-
67
-
68
-
69
-
70
-
71
-
72
-
73
-
74
-
 75
75 -
 76
76 -
 77
77 -
 78
78 -
 79
79 -
 80
80 -
 81
81 -
 82
82 -
 83
83 -
 84
84 -
 85
85 -
86
-
87
-
88
-
89
-
90
-
91
-
92
-
93
-
94
-
95
-
96
-
97
-
98
-
99
-
100
-
101
-
102
-
103
-
104
-
105
-
106
-
107
-
108
-
109
-
110
-
111
-
112
 |
 |