Gigabyte GA-990FXA-UD3 Manual - Page 82
C. Configuring a RAID array in RAID BIOS
 |
View all Gigabyte GA-990FXA-UD3 manuals
Add to My Manuals
Save this manual to your list of manuals |
Page 82 highlights
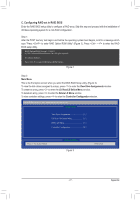
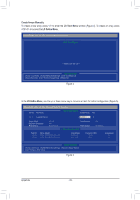
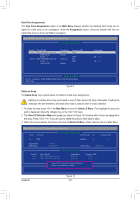
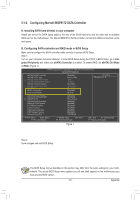
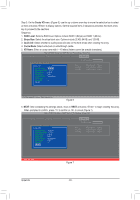
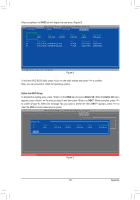
C. Configuring a RAID array in RAID BIOS Enter the RAID BIOS setup utility to configure a RAID array. Skip this step and proceed to the installation of Windows operating system for a non-RAID configuration. After the POST memory test begins and before the operating system boot begins, look for a message which says "Press + to enter BIOS Setup or to continue" (Figure 2). Press + to enter the RAID setup utility. Marvell 88SE91xx Adapter - BIOS Version 1.0.0.0017 PCIe x1 5.0Gbps Mode: RAID [Virtual Disks] No Virtual Disk! [Physical Disks] Adapter 0 Port Disk Name S0 SATA: WDC WD800JD-22LSA0 S1 SATA: WDC WD800JD-22LSA0 Size 76.3GB 76.3GB Max Speed SATA 3Gb/s SATA 3Gb/s Press + to enter BIOS Setup or to continue Figure 2 On the main screen of the RAID setup utility (Figure 3), use the left or right arrow key to move through tabs. [Selection] Adapter 0 Marvell BIOS Setup (c) 2009 Marvell Technology Group Ltd. [ Adapter] [ Devices] [ RAID ] Vendor ID Device ID: BIOS Version: PCI Slot: IRQ Number: Raid Mode: 1B4B:9192 1.0.0.0017 00 0A RAID0 RAID1 ENTER/SPACE: Select, ESC: Back/Exit Figure 3 Appendix - 82 -
-
 1
1 -
2
-
3
-
4
-
5
-
6
-
7
-
8
-
9
-
10
-
11
-
12
-
13
-
14
-
15
-
16
-
17
-
18
-
19
-
20
-
21
-
22
-
23
-
24
-
25
-
26
-
27
-
28
-
29
-
30
-
31
-
32
-
33
-
34
-
35
-
36
-
37
-
38
-
39
-
40
-
41
-
42
-
43
-
44
-
45
-
46
-
47
-
48
-
49
-
50
-
51
-
52
-
53
-
54
-
55
-
56
-
57
-
58
-
59
-
60
-
61
-
62
-
63
-
64
-
65
-
66
-
67
-
68
-
69
-
70
-
71
-
72
-
73
-
74
-
75
-
76
-
 77
77 -
 78
78 -
 79
79 -
 80
80 -
 81
81 -
 82
82 -
 83
83 -
 84
84 -
 85
85 -
 86
86 -
 87
87 -
88
-
89
-
90
-
91
-
92
-
93
-
94
-
95
-
96
-
97
-
98
-
99
-
100
-
101
-
102
-
103
-
104
-
105
-
106
-
107
-
108
-
109
-
110
-
111
-
112
 |
 |