HTC Radar Radar4G CBW User Guide - Page 59
Syncing pictures, music, and videos, Changing sync options
 |
View all HTC Radar manuals
Add to My Manuals
Save this manual to your list of manuals |
Page 59 highlights
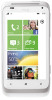
59 Syncing Syncing pictures, music, and videos After setting up Zune on your computer, choose what you want to sync with your phone. If you don't have music, videos, or podcasts on your computer yet, get them first from Marketplace. 1. Connect your phone to your computer using the supplied USB cable. Zune automatically opens on your computer, if you haven't opened it. 2. On top of the Zune screen, click collection. 3. Find the item you want to sync. You can: § Click a category (music, videos, pictures, or podcasts), and browse until you find the item you want to sync with your phone (such as a song, album, artist, playlist, genre, and so on). § In the search box, enter what you're looking for (for example, a song title or artist name). In the search results, click the desired item. 4. Drag the item to the phone icon at the bottom left side of the screen. If you have captured photos and videos on your phone, they will automatically be copied to your computer when you sync with the Zune software. Changing sync options If you want more control over what gets synced between your phone and computer, try experimenting with the Zune software sync options. For example, if you don't want to bother dragging individual songs, artists, or albums to the phone icon, you can configure the Zune software to auto sync all music on your computer with your phone (space permitting). 1. In the Zune software, click Settings > Phone > Sync Options. 2. Click the items that you want to change (for example, in the Music section, click All), and then click OK.
-
 1
1 -
2
-
3
-
4
-
5
-
6
-
7
-
8
-
9
-
10
-
11
-
12
-
13
-
14
-
15
-
16
-
17
-
18
-
19
-
20
-
21
-
22
-
23
-
24
-
25
-
26
-
27
-
28
-
29
-
30
-
31
-
32
-
33
-
34
-
35
-
36
-
37
-
38
-
39
-
40
-
41
-
42
-
43
-
44
-
45
-
46
-
47
-
48
-
49
-
50
-
51
-
52
-
53
-
 54
54 -
 55
55 -
 56
56 -
 57
57 -
 58
58 -
 59
59 -
 60
60 -
 61
61 -
 62
62 -
 63
63 -
 64
64 -
65
-
66
-
67
-
68
-
69
-
70
-
71
-
72
-
73
-
74
-
75
-
76
-
77
-
78
-
79
-
80
-
81
-
82
-
83
-
84
-
85
-
86
-
87
-
88
-
89
-
90
-
91
-
92
-
93
-
94
-
95
-
96
-
97
-
98
-
99
-
100
-
101
-
102
-
103
 |
 |