HealthRider 230 English Manual - Page 12
Identify the High Cable 73. It is approximately
 |
View all HealthRider 230 manuals
Add to My Manuals
Save this manual to your list of manuals |
Page 12 highlights
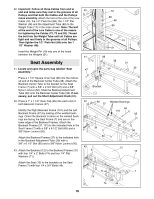
24. Thread the bolt at the end of the Low Cable (72) a 24 couple of turns into the Weight Tube (17). 72 Bolt 17 25. Identify the High Cable (73). It is approximately 340Ó long and it has a ball on one end and a loop on the other. Route the end of the High Cable (73) with the loop through the slot in the Main Upright (1). Wrap the end of the High Cable (73) with the ball around a 3 1/2Ó Pulley (24) as shown. Attach the 3 1/2Ó Pulley (24) inside the slot in the Main Upright (1) with a 3/8Ó x 3 3/4Ó Bolt (59), two 3/8Ó Flat Washers (55), two 5/8Ó x 1Ó Bushings (86) and a 3/8Ó Nylon Locknut (50). 26. Route the end of the High Cable (73) with the loop through the bracket on the Main Upright (1) from above. Route the High Cable over a 3 1/2Ó Pulley (24) in the direction shown. Slide the 3 1/2Ó Pulley (24) into the bracket on the Main Upright (1). Slide a 3/8Ó x 3Ó Bolt (53) through the bracket and the Pulley, but do not mount a Locknut yet. 25 55 50 1 Slot 55 86 26 73 24 1 Bracket 53 59 86 24 73 27. Locate the Adjustable Pulley Frame (23) and remove the 3 1/2Ó Pulleys (24) and Cable Traps (25). 27 Bracket Wrap the High Cable (73) around a 3 1/2Ó Pulley (24) in the direction shown. Attach the 3 1/2Ó Pulley and a Cable Trap (25) to the top half of the Adjustable Pulley Frame (23) with a 3/8Ó x 2Ó Bolt (54) and a 3/8Ó Nylon Locknut (50). Note: The Pulley must be attached to the upper of the three adjustment holes. Make sure the Cable Trap is oriented as shown. 1 24 73 25 54 Route the end of the High Cable (73) with the loop through the bracket on the Main Upright (1) from below. 50 23 12
-
 1
1 -
2
-
3
-
4
-
5
-
6
-
 7
7 -
 8
8 -
 9
9 -
 10
10 -
 11
11 -
 12
12 -
 13
13 -
 14
14 -
 15
15 -
 16
16 -
 17
17 -
18
-
19
-
20
-
21
-
22
-
23
-
24
-
25
-
26
-
27
-
28
-
29
 |
 |
