HealthRider 230 English Manual - Page 15
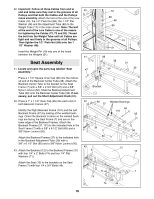
Identify the Butterfly Cable 92. It is approximate
 |
View all HealthRider 230 manuals
Add to My Manuals
Save this manual to your list of manuals |
Page 15 highlights
36. Route the High Cable (73) through the slot in the leg 36 of the Seat Frame (7). 7 41 Attach the closed loop at the end of the High Cable (73) to the Leg Lever (41) with a 3/8Ó x 2 3/4Ó Bolt 47 (47), two 3/8Ó Flat Washers (55) and a 3/8Ó Nylon Locknut (50). Note: Do not overtighten the Nylon Slot Locknut. 73 55 55 50 37. Identify the Butterfly Cable (92). It is approximate- 37 ly 61Ó long and it has a loop on both ends. Attach one end of the Butterfly Cable (92) to the Left Adjustment Disc (26) with a 5/16Ó x 1Ó Bolt (87), a 3/8Ó Flat Washer (55), a 1/2Ó x 3/8Ó Bushing (83) and a 5/16Ó Nylon Locknut (64). Note: The loop on the Cable must wrap around the 1/2Ó x 3/8Ó Bushing. For the sake of clarity, some parts have been removed and the Adjustment Disc is shown exploded. 92 26 64 55 83 87 38. Wrap the Butterfly Cable (92) around a 3 1/2Ó Pulley 38 (24) in the direction shown. 23 Attach the 3 1/2Ó Pulley (24) and a Cable Trap (25) to 50 the lower half of the Adjustable Pulley Frame (23) with a 3/8Ó x 2Ó Bolt (54) and a 3/8Ó Nylon Locknut (50). The Pulley must be attached to the middle of the three adjustment holes. 24 54 Note: For the sake of clarity, some parts have 92 25 been removed from the drawing. 39. Attach the free end of the Butterfly Cable (92) to the 39 Right Adjustment Disc (27) with a 5/16Ó x 1Ó Bolt (87), a 3/8Ó Flat Washer (55), a 1/2Ó x 3/8Ó Bushing (83) and a 5/16Ó Nylon Locknut (64). Note: The loop on the Cable must wrap around 27 the 1/2Ó x 3/8Ó Bushing. 64 92 87 83 55 15
-
 1
1 -
2
-
3
-
4
-
5
-
6
-
7
-
8
-
9
-
 10
10 -
 11
11 -
 12
12 -
 13
13 -
 14
14 -
 15
15 -
 16
16 -
 17
17 -
 18
18 -
 19
19 -
 20
20 -
21
-
22
-
23
-
24
-
25
-
26
-
27
-
28
-
29
 |
 |
