HealthRider 230 English Manual - Page 14
ented as shown.
 |
View all HealthRider 230 manuals
Add to My Manuals
Save this manual to your list of manuals |
Page 14 highlights
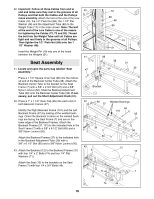
32. Wrap the High Cable (73) around a 3 1/2Ó Pulley (24) 32 50 in the direction shown. Attach the 3 1/2Ó Pulley (24) to the lower half of the Small Pulley Frame (22) with a 3/8Ó x 2Ó Bolt (54) and 24 a 3/8Ó Nylon Locknut (50). 73 22 54 33. Wrap the High Cable (73) around a 3 1/2Ó Pulley (24) in the direction shown. Attach the 3 1/2Ó Pulley (24) and a Cable Trap (25) to the riser on the Weight Base (5) by sliding the Cable Trap and Pulley onto the 3/8Ó x 4 3/4Ó Bolt (46) attached in step 31. Thread a 3/8Ó Nylon Locknut (50) onto the Bolt and tighten it. Make sure the Cable Traps for both of the Pulleys attached to the riser are oriented as shown in this step and in step 31. Note: For the sake of clarity, drawing 33A shows some parts removed. 34. Wrap the High Cable (73) around a 3 1/2Ó Pulley (24) in the direction shown. Attach the 3 1/2Ó Pulley (24) and a Cable Trap (25) to the sidearm on the Weight Base (5) by sliding the Pulley and Cable Trap onto the 3/8Ó x 3 1/2Ó Carriage Bolt (62) inserted earlier. Tighten a 3/8Ó Nylon Jamnut (63) onto the Bolt. Make sure the Cable Trap is oriented as shown. 33A Riser 34 B 73 24 50 25 5 46 Mount Pulley Here 63 25 24 73 62 5 35. Wrap the High Cable (73) around a 3 1/2Ó Pulley (24) in the direction shown. Attach the 3 1/2Ó Pulley (24) and a Cable Trap (25) to the welded tube on the Seat Base (6) by sliding the Pulley and Cable Trap onto the 3/8Ó x 3 1/2Ó Bolt (56) inserted earlier. Thread a 3/8Ó Nylon Locknut (50) onto the Bolt and tighten it. Make sure the Cable Trap is oriented as shown. Note: For the sake of clarity, drawing 35A shows some parts removed. 14 35A 50 25 24 Welded Tube 56 B 73 Mount Pulley Here 6
-
 1
1 -
2
-
3
-
4
-
5
-
6
-
7
-
8
-
 9
9 -
 10
10 -
 11
11 -
 12
12 -
 13
13 -
 14
14 -
 15
15 -
 16
16 -
 17
17 -
 18
18 -
 19
19 -
20
-
21
-
22
-
23
-
24
-
25
-
26
-
27
-
28
-
29
 |
 |
