HealthRider 230 English Manual - Page 7
in steps 2 through 9.
 |
View all HealthRider 230 manuals
Add to My Manuals
Save this manual to your list of manuals |
Page 7 highlights
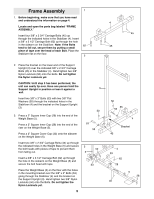
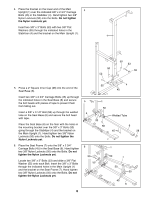
7. Locate two 3/8Ó x 4 3/4Ó Bolts (46) and slide a 3/8Ó 7 Flat Washer (55) onto each of them. Insert the Bolts through the indicated holes in the Top Frame (9) and 1 then through the holes in the Main Upright (1). Slide a 9 3/8Ó Flat Washer onto each Bolt and secure it with a 50 3/8Ó Nylon Locknut (50). Do not tighten the Nylon Locknut yet. 55 8. Slide a 3/8Ó Flat Washer (55) onto a 3/8Ó x 4 3/4Ó Bolt (46) and push the Bolt through the Top Frame (9). Push the Bolt into the hole in the Support Upright (3) until the tip of the Bolt is visible inside the Upright. Slide the 1/2Ó x 1 13/16Ó Bushing (84) down into the Upright and push the Bolt all the way through the 8 Bushing and the Upright. Note: Make sure you donÕt drop the Bushing into the Upright! Slide a 3/8Ó Flat Washer (55) onto the Bolt and secure it with a 3/8Ó Nylon Locknut (50). Do not tighten the Nylon Locknut yet. 28 50 84 55 Slide a 3/8Ó Flat Washer (55) onto a 3/8Ó x 2 3/4Ó Bolt (47) and insert the Bolt through the hole in the Support Upright (3) and the bracket on the Top Frame (9). Hand tighten a 3/8Ó Nylon Locknut (50) onto the 47 55 Bolt. Do not tighten the Nylon Locknut yet. 3 55 46 9 50 1 55 46 9. Place the bracket on the lower end of the Weight 9 Upright (2) over the indicated 3/8Ó x 2 3/4Ó Carriage Bolts (45) in the Weight Base (5). Hand tighten two 3/8Ó Nylon Locknuts (50) onto the Bolts. Do not tight- en the Nylon Locknuts yet. Locate two 3/8Ó x 1 3/4Ó Bolts (57) and slide a 3/8Ó Flat Washer (55) onto each of them. Insert the Bolts through the indicated holes in the Weight Upright (2) and then through the bracket on the Support Upright (3). Secure the Bolts with two 3/8Ó Nylon Locknuts (50). 3 Go back and fully tighten all Nylon Locknuts used in steps 2 through 9. 50 50 Bracket 55 2 57 50 5 45 50 Bracket 7
-
 1
1 -
 2
2 -
 3
3 -
 4
4 -
 5
5 -
 6
6 -
 7
7 -
 8
8 -
 9
9 -
 10
10 -
 11
11 -
 12
12 -
13
-
14
-
15
-
16
-
17
-
18
-
19
-
20
-
21
-
22
-
23
-
24
-
25
-
26
-
27
-
28
-
29
 |
 |
