HealthRider 230 English Manual - Page 13
Nylon Locknut 50.
 |
View all HealthRider 230 manuals
Add to My Manuals
Save this manual to your list of manuals |
Page 13 highlights
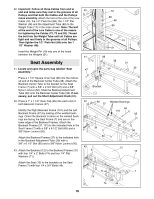
28. Wrap the High Cable (73) around a 3 1/2Ó Pulley (24) 28 in the direction shown and route it back down through the bracket on the Main Upright (1). Attach the 3 1/2Ó Pulley (24) inside the bracket on the Main Upright (1) with the 3/8Ó x 3Ó Bolt (53) that was 73 inserted in step 26. Secure the Bolt with a 3/8Ó Nylon Locknut (50). Make sure the Pulley you are attaching in this step is on the correct side of the Pulley 53 attached in step 26 (see the inset drawing). 24 1 50 Top View Second Pulley 1 First Pulley 29. Wrap the High Cable (73) around a 3 1/2Ó Pulley (24) 29 in the direction shown. Attach the 3 1/2Ó Pulley (24) to the bracket on the Stabilizer (4) with a 3/8Ó x 2Ó Bolt (54) and a 3/8Ó Nylon Locknut (50). 4 50 24 73 54 Bracket 30. Wrap the High Cable (73) around a 3 1/2Ó Pulley (24) 30 in the direction shown. 63 Attach the 3 1/2Ó Pulley (24) and a Cable Trap (25) to 25 the sidearm on the Stabilizer (4) with the 3/8Ó x 3 1/2Ó 73 Carriage Bolt (62, inserted earlier) and a 3/8Ó Nylon Jamnut (63). Make sure the Cable Trap is oriented as shown. 24 62 4 31. Wrap the High Cable (73) around a 3 1/2Ó Pulley (24) in the direction shown. Attach the 3 1/2Ó Pulley (24) and a Cable Trap (25) to the riser on the Weight Base (5) by sliding a 3/8Ó x 4 3/4Ó Bolt (46) through the Pulley, Cable Trap and riser. Do not use a 3/8Ó Nylon Locknut unless the Bolt slides out during the following step. 31 73 Riser 25 24 46 5 13
-
 1
1 -
2
-
3
-
4
-
5
-
6
-
7
-
 8
8 -
 9
9 -
 10
10 -
 11
11 -
 12
12 -
 13
13 -
 14
14 -
 15
15 -
 16
16 -
 17
17 -
 18
18 -
19
-
20
-
21
-
22
-
23
-
24
-
25
-
26
-
27
-
28
-
29
 |
 |
