HealthRider 230 English Manual - Page 17
Miscellaneous Assembly
 |
View all HealthRider 230 manuals
Add to My Manuals
Save this manual to your list of manuals |
Page 17 highlights
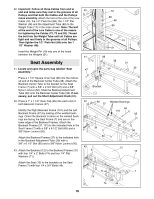
44. Press two 3/4Ó Round Inner Caps (43) into each Pad Tube (42). Insert one Pad Tube (42) into the Seat Frame (7). Slide a Foam Roller (30) onto each end of the Pad Tube. Insert the other Pad Tube (42) into the Leg Lever (41). Slide a Foam Roller (30) onto each end of the Pad Tube. 44 30 43 30 43 42 7 43 41 42 30 30 43 Miscellaneous Assembly 45. Identify the Right Shroud (36) which is the one that does not have a slot in it. Attach the Right Shroud (36) to the indicated brackets on the Weight Base (5) with two 1/4Ó x 5/8Ó Bolts (80). Do not tighten the Bolts yet. 45 80 Bracket 80 46. Attach the Right Shroud (36) to the indicated bracket on the Weight Upright (2) with a 1/4Ó x 5/8Ó Bolt (80). Do not tighten the Bolt yet. 46 Bracket 80 36 5 2 36 47. Follow the procedure described in steps 45 and 46 to attach the Left Shroud (35) on the opposite side of 47 2 the weight stack. Attach both Shrouds (35, 36) to the end of the top bar on the Weight Upright (2) with a 1/4Ó x 5/8Ó Bolt (80). Tie the Shrouds (35, 36) together with four 1/4Ó x 5/8Ó Bolts (80). Go back and fully tighten all of the 1/4Ó x 5/8Ó Bolts (80) used to attach both Shrouds (35, 36). Top Bar 80 80 80 80 80 36 35 17
-
 1
1 -
2
-
3
-
4
-
5
-
6
-
7
-
8
-
9
-
10
-
11
-
 12
12 -
 13
13 -
 14
14 -
 15
15 -
 16
16 -
 17
17 -
 18
18 -
 19
19 -
 20
20 -
 21
21 -
 22
22 -
23
-
24
-
25
-
26
-
27
-
28
-
29
 |
 |
