HP 6125G HP 6125-CMW520-R2106 Release Notes - Page 51
Using TFTP through the management Ethernet port
 |
View all HP 6125G manuals
Add to My Manuals
Save this manual to your list of manuals |
Page 51 highlights
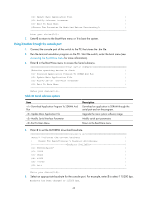
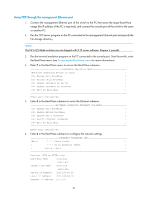
Using TFTP through the management Ethernet port 1. Connect the management Ethernet port of the switch to the PC that stores the target BootWare image (the IP address of the PC is required), and connect the console port of the switch to the same or another PC. 2. Run the TFTP server program on the PC connected to the management Ethernet port and specify the file storage directory. NOTE: The HP 6125 Blade switches are not shipped with TFTP server software. Prepare it yourself. 3. Run the terminal emulation program on the PC connected to the console port. Start the switch, enter the BootWare menu (see Accessing the BootWare menu for more information). 4. Enter 7 in the BootWare menu to access the BootWare submenu. BootWare Operation Menu |Note:the operating device is flash | | Backup Full BootWare | | Restore Full BootWare | | Update BootWare By Serial | | Update BootWare By Ethernet | | Exit To Main Menu | Enter your choice(0-4): 5. Enter 4 in the BootWare submenu to enter the Ethernet submenu. BOOTWARE OPERATION ETHERNET SUB-MENU | Update Full BootWare | | Update Extend BootWare | | Update Basic BootWare | | Modify Ethernet Parameter | | Exit To Main Menu | Enter your choice(0-4): 6. Enter 4 in the BootWare submenu to configure the network settings. ETHERNET PARAMETER SET |Note: '.' = Clear field. | | '-' = Go to previous field. | | Ctrl+D = Quit. | Protocol (FTP or TFTP):tftp Load File Name :test.bin :main.bin Target File Name :test.bin :main.bin Server IP Address :192.168.80.22 Local IP Address :192.168.80.10 Gateway IP Address :0.0.0.0 47
-
 1
1 -
2
-
3
-
4
-
5
-
6
-
7
-
8
-
9
-
10
-
11
-
12
-
13
-
14
-
15
-
16
-
17
-
18
-
19
-
20
-
21
-
22
-
23
-
24
-
25
-
26
-
27
-
28
-
29
-
30
-
31
-
32
-
33
-
34
-
35
-
36
-
37
-
38
-
39
-
40
-
41
-
42
-
43
-
44
-
45
-
 46
46 -
 47
47 -
 48
48 -
 49
49 -
 50
50 -
 51
51 -
 52
52 -
 53
53 -
 54
54 -
 55
55 -
 56
56 -
57
-
58
-
59
-
60
 |
 |
