HP Color LaserJet 4730 HP Embedded Web Server - User Guide - Page 67
Send to Fax, Table 4-4
 |
View all HP Color LaserJet 4730 manuals
Add to My Manuals
Save this manual to your list of manuals |
Page 67 highlights
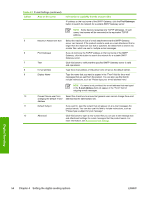
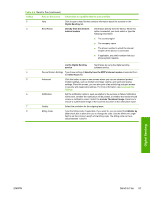
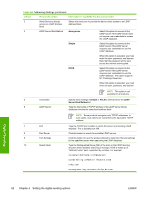
Table 4-4 Send to Fax (continued) Callout Area on the screen 2 Help 3 Send Faxes Information or capability that the area provides Click to open a help file that contains information about the screens on the Digital Sending tab. directly from the device's internal modem Send faxes directly from the device. When this option is selected, you must select or type the following information: ■ The country/region ■ The company name ■ The phone number to which the internal modem of the device is connected ■ If applicable, any prefix number that your phone system requires via the Digital Sending service Send faxes by using the digital sending software service. 4 Device Modem Settings Type these settings if directly from the MFP's internal modem is selected from the Send Faxes list. 5 Advanced Click this button to open a new screen where you can set advanced product modem settings, such as modem and ringer volume, and send and receive settings. From this screen, you can also print a fax activity log and gain access to security and diagnostics settings. For more information, see Advanced Fax Settings. 6 Notification Set the notification options, such as whether a fax success or failure notification will be sent, whether the notification will be printed, or whether the sender should receive a notification report. Select the Include Thumbnail Image check box to include a scaled-down image of the scanned document in the notification report. 7 Quality Select the resolution for the outgoing faxes. 8 Billing Code Type the billing code, if applicable. If you want to, you can select the Editable by User check box to allow the user to change the code. Use the Minimum Length field to set the minimum length of the billing code. The billing code can be a value between 1 and 16. Digital Sending ENWW Send to Fax 57
-
 1
1 -
2
-
3
-
4
-
5
-
6
-
7
-
8
-
9
-
10
-
11
-
12
-
13
-
14
-
15
-
16
-
17
-
18
-
19
-
20
-
21
-
22
-
23
-
24
-
25
-
26
-
27
-
28
-
29
-
30
-
31
-
32
-
33
-
34
-
35
-
36
-
37
-
38
-
39
-
40
-
41
-
42
-
43
-
44
-
45
-
46
-
47
-
48
-
49
-
50
-
51
-
52
-
53
-
54
-
55
-
56
-
57
-
58
-
59
-
60
-
61
-
 62
62 -
 63
63 -
 64
64 -
 65
65 -
 66
66 -
 67
67 -
 68
68 -
 69
69 -
 70
70 -
 71
71 -
 72
72 -
73
-
74
-
75
-
76
-
77
-
78
-
79
-
80
-
81
-
82
-
83
-
84
-
85
-
86
-
87
-
88
-
89
-
90
-
91
-
92
-
93
-
94
 |
 |
