HP Designjet 2000/3000cp HP DesignJet 2500 and 2000CP Printer Quick Reference
HP Designjet 2000/3000cp Manual
 |
View all HP Designjet 2000/3000cp manuals
Add to My Manuals
Save this manual to your list of manuals |
HP Designjet 2000/3000cp manual content summary:
- HP Designjet 2000/3000cp | HP DesignJet 2500 and 2000CP Printer Quick Reference - Page 1
i HP DesignJet 2500CP/2000CP Printer 18 425 488 4998 2000 325 1584 Quick Reference Guide - HP Designjet 2000/3000cp | HP DesignJet 2500 and 2000CP Printer Quick Reference - Page 2
Company 1998 Printed in Europe For trademark information, legal notices, safety notices and warranty information, refer to the HP DesignJet 2500CP/2000CP User's Guide, manual part number C4704-90241. Hewlett-Packard Company Barcelona Division Avda. Graells, 501 08190 Sant Cugat del Vallès Barcelona - HP Designjet 2000/3000cp | HP DesignJet 2500 and 2000CP Printer Quick Reference - Page 3
Quick Reference Guide Quick Reference Guide HP DesignJet 2000CP Printer HP DesignJet 2500CP Printer 3 - HP Designjet 2000/3000cp | HP DesignJet 2500 and 2000CP Printer Quick Reference - Page 4
Table of Contents 4 - HP Designjet 2000/3000cp | HP DesignJet 2500 and 2000CP Printer Quick Reference - Page 5
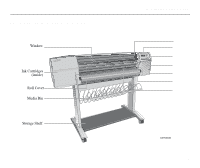
Identifying Printer Parts Identifying Printer Parts C4704106 5 - HP Designjet 2000/3000cp | HP DesignJet 2500 and 2000CP Printer Quick Reference - Page 6
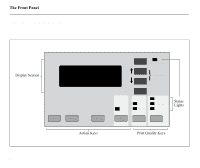
The Front Panel The front panel of the printer is made up of four functional areas. Cancel Form Feed and Cut Replace Ink System Previous Receiving Print Current Configuration (Press both Keys) Enter Pause Color Mono Best Normal Fast Print Quality C4704002 6 - HP Designjet 2000/3000cp | HP DesignJet 2500 and 2000CP Printer Quick Reference - Page 7
The Front Panel Display Section The display section of the front panel consists of the two-line display and the four display keys to its right ( , ↑, ↓ and ) C4704016 The display is used for displaying: Menus used to configure the printer. Messages about printer status, required actions, or - HP Designjet 2000/3000cp | HP DesignJet 2500 and 2000CP Printer Quick Reference - Page 8
Action Keys Press Press Press Press to cancel the current printer operation. to advance and cut media. to replace ink system components. to pause the printer. Action Keys dddddddy See chapter 7, Managing Your Prints, in the user's guide for detailed information on the use of these keys. 8 - HP Designjet 2000/3000cp | HP DesignJet 2500 and 2000CP Printer Quick Reference - Page 9
the print quality mode you want. Color Mono Best Normal Fast Print Quality C4704033 See chapter 6, Controlling the Overall Appearance of a Print, in the user's guide for detailed information on the use of these keys. 9 - HP Designjet 2000/3000cp | HP DesignJet 2500 and 2000CP Printer Quick Reference - Page 10
Status Lights The status lights provide status information about the current configuration and state of the printer. Receiving Pause Color Mono Best Normal Fast Print Quality C4704031 10 - HP Designjet 2000/3000cp | HP DesignJet 2500 and 2000CP Printer Quick Reference - Page 11
Entering the Menu System 1 Make sure a status screen is displayed, as shown in the example on the right. 2 3 Entering the Menu System C4704034 C4704008 or the FULL MENUS screen C4704008 is displayed, with the Queueing & Nesting option shown. 11 - HP Designjet 2000/3000cp | HP DesignJet 2500 and 2000CP Printer Quick Reference - Page 12
Navigating the Menu System Previous ←1 ↑ ↓ ↑ ↓ ↓ ↑ Enter → C4704006 ↵ NOTE: A → character in a menu option box indicates that another level of menu is available. 12 - HP Designjet 2000/3000cp | HP DesignJet 2500 and 2000CP Printer Quick Reference - Page 13
1 Check the leading edge as it unwinds from the spool. If it is not evenly cut or if it is skewed (not perpendicular to the guides), continue with the next procedure. If the media is cut correctly go to step 3 a Pull the media over the top of the machine and lay - HP Designjet 2000/3000cp | HP DesignJet 2500 and 2000CP Printer Quick Reference - Page 14
2 C4704131 3 C4704124a 14 - HP Designjet 2000/3000cp | HP DesignJet 2500 and 2000CP Printer Quick Reference - Page 15
4 5 ↓ 6 ↑ ↓ Loading Roll Media C4704029 C4704030 15 - HP Designjet 2000/3000cp | HP DesignJet 2500 and 2000CP Printer Quick Reference - Page 16
7 a When the front panel displays "Lower Lever". Lower the media lever. 16 C4704130 Impom iIomitpruoymui iIomitpruoymui C4704034 - HP Designjet 2000/3000cp | HP DesignJet 2500 and 2000CP Printer Quick Reference - Page 17
Loading Roll Media 8 Impom iIomitpruoymui iIomitpruoymui C4723127a C4723127b 9 Impom iIomitpruoymui iIomitpruoymui 17 - HP Designjet 2000/3000cp | HP DesignJet 2500 and 2000CP Printer Quick Reference - Page 18
10 18 C4704131 - HP Designjet 2000/3000cp | HP DesignJet 2500 and 2000CP Printer Quick Reference - Page 19
11 12 ↓ 13 a If the Take Up Reel is turned off the printer is now ready to print. Loading Roll Media C4704029 19 - HP Designjet 2000/3000cp | HP DesignJet 2500 and 2000CP Printer Quick Reference - Page 20
14 ↑ ↓ C4704016 20 - HP Designjet 2000/3000cp | HP DesignJet 2500 and 2000CP Printer Quick Reference - Page 21
Take Up Reel Loading Take Up Reel Loading 1 ↓ ↑ C4704016 21 - HP Designjet 2000/3000cp | HP DesignJet 2500 and 2000CP Printer Quick Reference - Page 22
2 C472351 3 4 22 - HP Designjet 2000/3000cp | HP DesignJet 2500 and 2000CP Printer Quick Reference - Page 23
5 6 NOTE: Use only tape which will not tear the media when it is removed later. NOTE: To avoid the media skewing as it is wound onto the Core tube, ensure the media is straight when it is attached Take Up Reel Loading 23 - HP Designjet 2000/3000cp | HP DesignJet 2500 and 2000CP Printer Quick Reference - Page 24
7 ↓ 8 24 - HP Designjet 2000/3000cp | HP DesignJet 2500 and 2000CP Printer Quick Reference - Page 25
9 10 NOTE: It is important that the media weight is inserted. The Take Up Reel will not function properly without it 11 +2+4+''=/=3=66515'0'0/4'9''/m'11/152m3m770m2mmmm Take Up Reel Loading 12'' / 305mm 4+2+'+' /=1=3=056650''74/'9''m/'11/125m37m70m2mmmm 12'' / 305mm 25 - HP Designjet 2000/3000cp | HP DesignJet 2500 and 2000CP Printer Quick Reference - Page 26
NOTE: When the Take Up Reel is in operation it is important to ensure that the Take Up Reel sensor is not blocked. 12 26 - HP Designjet 2000/3000cp | HP DesignJet 2500 and 2000CP Printer Quick Reference - Page 27
Unloading Media from the Take Up Reel 1 Press the Form feed and cut button on the front panel. C4704024 27 - HP Designjet 2000/3000cp | HP DesignJet 2500 and 2000CP Printer Quick Reference - Page 28
2 3 4 ↓ 28 C4704016 - HP Designjet 2000/3000cp | HP DesignJet 2500 and 2000CP Printer Quick Reference - Page 29
5 6 ↓ 7 Unloading Media from the Take Up Reel C4704016 29 - HP Designjet 2000/3000cp | HP DesignJet 2500 and 2000CP Printer Quick Reference - Page 30
8 9 A B 30 - HP Designjet 2000/3000cp | HP DesignJet 2500 and 2000CP Printer Quick Reference - Page 31
10 To remove roll media from the printer perform the following procedure. Unloading Media from the Take Up Reel 31 - HP Designjet 2000/3000cp | HP DesignJet 2500 and 2000CP Printer Quick Reference - Page 32
R 1 2 32 Impom C4704130 iIomitpruoymui iIomitpruoymui - HP Designjet 2000/3000cp | HP DesignJet 2500 and 2000CP Printer Quick Reference - Page 33
Removing a Roll from the Printer 3 B A C4704121a 4 5 33 - HP Designjet 2000/3000cp | HP DesignJet 2500 and 2000CP Printer Quick Reference - Page 34
Installing a New Roll into the Printer 1 If an empty spindle is installed in the printer, open the roll cover and remove the empty spindle by pulling firmly on each end, A and then B as shown. B 2 A C4704118a 34 - HP Designjet 2000/3000cp | HP DesignJet 2500 and 2000CP Printer Quick Reference - Page 35
3 a Push down on the media guide, making sure that the guide is flush against the ends of the roll. Installing a New Roll into the Printer B B A A 35 - HP Designjet 2000/3000cp | HP DesignJet 2500 and 2000CP Printer Quick Reference - Page 36
5 B NOTE: The media must be A positioned on the roll as shown. C4704122a 36 - HP Designjet 2000/3000cp | HP DesignJet 2500 and 2000CP Printer Quick Reference - Page 37
Changing the Core Tube on the Take Up Reel 1 2 3 4 12'' / 305mm B 42'' / + + + =1=30=6565'07'/4'9'm'/'11/15m23m770m2mmmm A 12'' / 305mm 37 - HP Designjet 2000/3000cp | HP DesignJet 2500 and 2000CP Printer Quick Reference - Page 38
+ replace the plastic Take Up Core that was supplied with your printer. 6 NOTE: Ensure the Take Up Core is pushed firmly into both media guides. NOTE: If you want to use a three inch cardboard core then use the 3 inch core adaptors shown. 3 inch core adaptors 42'' + + + /=1==3056560 - HP Designjet 2000/3000cp | HP DesignJet 2500 and 2000CP Printer Quick Reference - Page 39
Changing the Core Tube on the Take Up Reel 7 B 42'' + + / =1=30=6565'07'/4'9'm'/'11/15m23m770m2mmmm + A 12'' / 305mm 8 12'' / 305mm 39 - HP Designjet 2000/3000cp | HP DesignJet 2500 and 2000CP Printer Quick Reference - Page 40
1 You cannot load sheet media if roll media is loaded. If roll media is loaded refer to 32, Removing a Roll from the Printer. 2 3 40 C4704131 Cancel C4704129 - HP Designjet 2000/3000cp | HP DesignJet 2500 and 2000CP Printer Quick Reference - Page 41
4 ↑ 5 ↑↓ 6 7 Loading sheet media C4704035 C4704030 41 - HP Designjet 2000/3000cp | HP DesignJet 2500 and 2000CP Printer Quick Reference - Page 42
1 2 C4704024 42 - HP Designjet 2000/3000cp | HP DesignJet 2500 and 2000CP Printer Quick Reference - Page 43
Replacing the Ink System Replacing the Ink System Keep hair, jewelry, clothing, and other foreign objects away from the printer mechanisms. Keep used ink components out of the reach of children. CAUTION Do not touch, wipe, or attempt to clean the printhead nozzles or contacts. This can clog and - HP Designjet 2000/3000cp | HP DesignJet 2500 and 2000CP Printer Quick Reference - Page 44
The components of the ink system are numbered to match the sequence in which they must be installed. The number is printed on the printhead cleaner and ink cartridge, and on the sleeve containing the printhead. Remember: C2704112 Always change all three components for each ink color system at the - HP Designjet 2000/3000cp | HP DesignJet 2500 and 2000CP Printer Quick Reference - Page 45
NOTE Replacing the Ink System Follow the instructions in the front-panel display. If there are any problems during the installation, the printer will give you instructions in the front-panel display. Descriptions of all front-panel messages and instructions on what to do are listed in . 45 - HP Designjet 2000/3000cp | HP DesignJet 2500 and 2000CP Printer Quick Reference - Page 46
Removing and Replacing Printheads 1 When the printer carriage stops and the front panel displays the message "Open window to access printheads," open the window of the printer. C4704140 46 - HP Designjet 2000/3000cp | HP DesignJet 2500 and 2000CP Printer Quick Reference - Page 47
2 Press down lightly on the printhead you are replacing and pull it toward you, removing it from its stall. Discard the used printhead. Replacing the Ink System C4704036 C4704135 47 - HP Designjet 2000/3000cp | HP DesignJet 2500 and 2000CP Printer Quick Reference - Page 48
3 Take the new printhead and remove the colored protective tape from the printhead's nozzles. 4 Insert the printhead into the stall with the color dot that matches the color of the printhead label. Press down lightly and push the printhead away from you (toward the back of the cradle) until it snaps - HP Designjet 2000/3000cp | HP DesignJet 2500 and 2000CP Printer Quick Reference - Page 49
Replacing the Ink System 5 When you have finished replacing printheads, the printer front panel displays the message "Close window to continue". 6 The front panel will display the message "Open right door to access head cleaners". Continue with the next procedure, Removing and Replacing the - HP Designjet 2000/3000cp | HP DesignJet 2500 and 2000CP Printer Quick Reference - Page 50
Removing and Replacing the Printhead Cleaner . 1 Open the right door on the printer. C4704114 C4723036A 50 - HP Designjet 2000/3000cp | HP DesignJet 2500 and 2000CP Printer Quick Reference - Page 51
2 Press down on the printhead cleaner handle and pull it out of the printer. Discard the used printhead cleaner. 3 Insert the new printhead cleaner into the matching color-coded slot in the printer. Replacing the Ink System C4707138 C4704139 4 Repeat steps 2 and 3 for any additional printhead - HP Designjet 2000/3000cp | HP DesignJet 2500 and 2000CP Printer Quick Reference - Page 52
5 Close the right door on the printer. C4704107 The front panel will display the message "Open left door to access ink cartrg.". Continue with the next procedure, Removing and Replacing the Ink Cartridge 52 - HP Designjet 2000/3000cp | HP DesignJet 2500 and 2000CP Printer Quick Reference - Page 53
Removing and Replacing the Ink Cartridge 1 Open the left door on the printer. Replacing the Ink System C4704108 C4704036 53 - HP Designjet 2000/3000cp | HP DesignJet 2500 and 2000CP Printer Quick Reference - Page 54
2 While pressing down on the quick-release button (1), 1 unplug the ink cartridge tube by pulling the tube connector 2 away from the printer (2). C4704113 54 - HP Designjet 2000/3000cp | HP DesignJet 2500 and 2000CP Printer Quick Reference - Page 55
Replacing the Ink System CAUTION Never pull the ink cartridge out by the tube or connector. This may cause the ink cartridge to leak. Always grasp the body of the cartridge when removing or installing. 3 Remove the used ink cartridge from the slot in the printer. Discard the used ink cartridge. - HP Designjet 2000/3000cp | HP DesignJet 2500 and 2000CP Printer Quick Reference - Page 56
4 Insert the new ink cartridge into the slot in the printer, making sure that you match the ink color with the color code on the printer. 5 Plug the valve on the ink cartridge tube into the connector on the printer making sure that you match the valve color with the color code on the valve connector - HP Designjet 2000/3000cp | HP DesignJet 2500 and 2000CP Printer Quick Reference - Page 57
complete". Components Installed Incorrectly If any components have been installed incorrectly, the front panel will prompt you to take action to correct the problem. See page 60, Message Explanations and Actions for information about any messages that are displayed in the front panel. 57 - HP Designjet 2000/3000cp | HP DesignJet 2500 and 2000CP Printer Quick Reference - Page 58
After you replace the ink system, the printer performs some checks and alignments. If no media is loaded, the printer will display the message "Load media to align printheads." Load media following the directions on page 32, Removing a Roll from the Printer, or page 37, Changing the Core Tube on the - HP Designjet 2000/3000cp | HP DesignJet 2500 and 2000CP Printer Quick Reference - Page 59
Removing and Storing Partially Used Ink Systems Removing and Storing Partially Used Ink Systems 59 - HP Designjet 2000/3000cp | HP DesignJet 2500 and 2000CP Printer Quick Reference - Page 60
60 - HP Designjet 2000/3000cp | HP DesignJet 2500 and 2000CP Printer Quick Reference - Page 61
in turn. Ink System Error This message occurs after an earlier report of an error, when you have not fixed the problem. The error code "xxxxxx" indicates the nature of the problem. You will need to press the Replace Ink System key, to gain access to the printheads, printhead cleaners and ink - HP Designjet 2000/3000cp | HP DesignJet 2500 and 2000CP Printer Quick Reference - Page 62
If the Replace Ink System Key does not Work 1 Make sure the window is closed before you press the key. 2 3 If Brand New Printheads have Problems 1 Your printer may not detect the ink system that you have installed. Make sure that the protective blue tape and green cardboard have been removed - HP Designjet 2000/3000cp | HP DesignJet 2500 and 2000CP Printer Quick Reference - Page 63
, it is because an ink cartridge valve has become disconnected or the printer cannot detect an ink cartridge. Printing is disabled. To fix this problem: 1 Press the ↓ key. 2 You will see the message "Check ink cartridges / Abort" where the flashing squares indicate which valves to check. See 72 - HP Designjet 2000/3000cp | HP DesignJet 2500 and 2000CP Printer Quick Reference - Page 64
Reseating a Printhead). If you choose to check the ink systems you will be given the opportunity to check the printheads that may have caused the problem. Media Problems 1 Check that the media you are using is clean and has not been printed on. It should be white and opaque. Colored or clear - HP Designjet 2000/3000cp | HP DesignJet 2500 and 2000CP Printer Quick Reference - Page 65
System Problems 2 3 Working with Media that cannot be Used for Alignments You can still use media that the printer cannot align on. You will need to use a different type of media to realign the printheads whenever they are removed or reseated. 1 Unload the media that is causing problems. 2 3 4 5 65 - HP Designjet 2000/3000cp | HP DesignJet 2500 and 2000CP Printer Quick Reference - Page 66
printer, as they may not work correctly. Poor Printhead Start-Up 1 Perform the Recover Printhead procedure. Select Utilities / Service Tests / Recover Printheads. 2 Other Symptoms or If the Problem is not Fixed Above If the Printhead Alignment Error message still occurs, the printer will not be able - HP Designjet 2000/3000cp | HP DesignJet 2500 and 2000CP Printer Quick Reference - Page 67
Solving Ink System Problems Using the Replace Ink System Key The Replace Ink System key can be used to check what is wrong with the ink system. If you think you know which part of the ink system is giving trouble (see 62, If the Replace Ink System Key does not Work and - HP Designjet 2000/3000cp | HP DesignJet 2500 and 2000CP Printer Quick Reference - Page 68
Checking Ink Systems C4704034 ↑ ↓ ↑ ↓ 68 - HP Designjet 2000/3000cp | HP DesignJet 2500 and 2000CP Printer Quick Reference - Page 69
Solving Ink System Problems ↑ Checking the Printheads C4704034 ↓ CAUTION 77 69 - HP Designjet 2000/3000cp | HP DesignJet 2500 and 2000CP Printer Quick Reference - Page 70
Electrical Contacts 76, Cleaning If You Have Problems Reseating a Printhead 74 Checking the Printhead Cleaners C4704034 70 - HP Designjet 2000/3000cp | HP DesignJet 2500 and 2000CP Printer Quick Reference - Page 71
Solving Ink System Problems 71 - HP Designjet 2000/3000cp | HP DesignJet 2500 and 2000CP Printer Quick Reference - Page 72
Checking the Ink Cartridges C4704034 ↓ 72 - HP Designjet 2000/3000cp | HP DesignJet 2500 and 2000CP Printer Quick Reference - Page 73
Persistent InkSystem Problems Solving Ink System Problems 73 - HP Designjet 2000/3000cp | HP DesignJet 2500 and 2000CP Printer Quick Reference - Page 74
one or more of the squares are flashing. Each square represents a printhead, with the flashing ones representing printheads where the printer has detected a problem. C4704034 When you reseat or replace a printhead, the flashing filled square changes, for one or two seconds, to an hour-glass. At - HP Designjet 2000/3000cp | HP DesignJet 2500 and 2000CP Printer Quick Reference - Page 75
Solving Ink System Problems If the lights continue flashing and the printheads have been inserted inserted in the carriage; they may be making electrical contact and be the cause of the reseating problem, as you try to reseat other printheads. If the printer still refuses to accept your printheads, - HP Designjet 2000/3000cp | HP DesignJet 2500 and 2000CP Printer Quick Reference - Page 76
using dry cloths, as they may scratch delicate surfaces. Alternatively, you can use a suitable cleaning kit, for example, the HP C6247 Ink Cleaner-follow the supplied instructions. 1 Prepare a clean cotton swab by dampening it with distilled water. Rotate the end of the swab between your fingers to - HP Designjet 2000/3000cp | HP DesignJet 2500 and 2000CP Printer Quick Reference - Page 77
CAUTION Do not power off the printer. Never drip water into the printer. 2 Solving Ink System Problems Clean here Contact pads Nozzle plate Do not touch here! 77 - HP Designjet 2000/3000cp | HP DesignJet 2500 and 2000CP Printer Quick Reference - Page 78
CAUTION Do not touch, wipe, or attempt to clean the printhead nozzles (on the right-hand side in the diagram above). This can damage the printhead. Handle the ink systems with care. 3 C472380 78 - HP Designjet 2000/3000cp | HP DesignJet 2500 and 2000CP Printer Quick Reference - Page 79
Solving Ink System Problems 4 Clean here If you are using the cleaning kit, wipe the printhead as shown below: C472381 5 reinstall the printhead 79 - HP Designjet 2000/3000cp | HP DesignJet 2500 and 2000CP Printer Quick Reference - Page 80
Accessing head cleaners Accessing printheads Action unavailable Entry being printed Back media→ Forward media→ The printer is moving the platform that contains the printhead cleaners to a place where you can access them. Wait for a few seconds until this operation has finished. The printer is - HP Designjet 2000/3000cp | HP DesignJet 2500 and 2000CP Printer Quick Reference - Page 81
The calibration print was loaded incorrectly and it could not be measured. Press ↓ to continue, then reload the print for measurement. Follow front panel instructions. You are using sheet media and color calibration is on. The printer is asking you if you want to calibrate the color for the loaded - HP Designjet 2000/3000cp | HP DesignJet 2500 and 2000CP Printer Quick Reference - Page 82
print, and you may later resume checking the ink system by pressing the Replace Ink System button. (If you have persistent problems, see page 74, If You Have Problems Reseating a Printhead. You opened the left door while the printer was busy, or you have finished installing the ink cartridges. Close - HP Designjet 2000/3000cp | HP DesignJet 2500 and 2000CP Printer Quick Reference - Page 83
automatic calibration. Press ↓ to measure the pattern for automatic calibration. (HP DesignJet 2500CP only) An error on the hard disk has been detected. Press . The print has been lost. Press ↓ to delete the print. (HP DesignJet 2500CP only) An error on the hard disk has been detected. Press ↓ to - HP Designjet 2000/3000cp | HP DesignJet 2500 and 2000CP Printer Quick Reference - Page 84
. You may still be able to print again, but image print quality may be affected, as indicated by a subsequent message. See 74, If You Have Problems Reseating a Printhead. One or more of the printhead cleaners are full of ink, and the ink may overflow. Press ↓ to continue. Image print quality may - HP Designjet 2000/3000cp | HP DesignJet 2500 and 2000CP Printer Quick Reference - Page 85
check the failing head cleaner. You should reseat the head cleaners immediately; see 70, Checking the Printhead Cleaners. If this does not solve the problem, you will have to replace the entire ink system (printhead, printhead cleaner, and ink cartridge) using the Replace Ink System key. If you don - HP Designjet 2000/3000cp | HP DesignJet 2500 and 2000CP Printer Quick Reference - Page 86
↓ to continue, to replace the ink systems. Printing will be disabled. You should replace the faulty ink systems immediately; see page 74, If You Have Problems Reseating a Printhead. If you don't correct the error now, you will see the status message "Ink system error" described on page 89. 86 - HP Designjet 2000/3000cp | HP DesignJet 2500 and 2000CP Printer Quick Reference - Page 87
cartridge. Printing has been disabled. You should reseat the ink cartridge immediately; see 72, Checking the Ink Cartridges. If this does not solve the problem, you will have to replace the entire ink system (printhead, printhead cleaner, and ink cartridge) using the Replace Ink System key. If you - HP Designjet 2000/3000cp | HP DesignJet 2500 and 2000CP Printer Quick Reference - Page 88
. Press ↓ to continue. Image print quality may be affected. Replacement of the ink systems affected is recommended. To fix problems with the ink system, see 74, If You Have Problems Reseating a Printhead. The printer has detected that one or more components of the ink system have reached the end of - HP Designjet 2000/3000cp | HP DesignJet 2500 and 2000CP Printer Quick Reference - Page 89
replace the erroneous ink systems in order to print with your printer again. See 74, If You Have Problems Reseating a Printhead. Press the Enter key to access the main front panel menus. Ink system replacement has path on the printer when you've finished aligning the roll media as instructed. 89 - HP Designjet 2000/3000cp | HP DesignJet 2500 and 2000CP Printer Quick Reference - Page 90
Lift lever to continue Load arrow edge print side down Load cancelled Remove media Load error Remove media Load media for calibration Load media to align printheads Load media to check printheads Load sheet for calibration Lower lever Lower lever Remove media The media lever was lowered while the - HP Designjet 2000/3000cp | HP DesignJet 2500 and 2000CP Printer Quick Reference - Page 91
(A3-size paper or larger, in landscape orientation) and redo the procedure: • Use Image quality / Printhead service / Align now for printhead alignment. • Use Image quality / Printhead service / Printheads check / Now for a printhead check. The flow of data from the computer to the printer stopped - HP Designjet 2000/3000cp | HP DesignJet 2500 and 2000CP Printer Quick Reference - Page 92
systems in order to print with your printer. At power-on or after the ink systems have been serviced, the printer has detected components of different ink system types (for example, Imaging and UV Pigmented). continue, to check the ink systems. See 74, If You Have Problems Reseating a Printhead. 92 - HP Designjet 2000/3000cp | HP DesignJet 2500 and 2000CP Printer Quick Reference - Page 93
. You can press the Enter key to access the main front-panel menu. See 74, If You Have Problems Reseating a Printhead. The printer does not have the correct firmware for the HP DesignJet CP ink system UV currently installed. (This message only applies to firmware revision levels A.01.xx.) Press ↓ to - HP Designjet 2000/3000cp | HP DesignJet 2500 and 2000CP Printer Quick Reference - Page 94
by one or more flashing squares, is below acceptable limits for satisfactory printing. Press ↓ to check the indicated ink systems. See 74, If You Have Problems Reseating a Printhead. You will be prompted to change the kit or to ignore the error and continue printing. If there is still a large amount - HP Designjet 2000/3000cp | HP DesignJet 2500 and 2000CP Printer Quick Reference - Page 95
on page 10-3, Lens Maintenance in the Users Guide. "Media too small for calibration"-The roll repeat the procedure again, using Image Quality / Printhead Service / Align Now. If you use sheet media that quality. To fix problems with the ink system, see 74, If You Have Problems Reseating a Printhead. - HP Designjet 2000/3000cp | HP DesignJet 2500 and 2000CP Printer Quick Reference - Page 96
lens covers on page 10-3, Lens Maintenance in the Users Guide. "Media too small for calibration"-The roll that is loaded media and repeat the check again, using Image Quality / Printhead Service / Printheads Check / Now. If you use sheet media that is problems with the ink system, see 74, If You Have - HP Designjet 2000/3000cp | HP DesignJet 2500 and 2000CP Printer Quick Reference - Page 97
the ink systems that have failed. If the message contains no squares, the procedure has failed because of a problem that is not related to specific printheads, for example, a problem with the media. Press ↓ to continue. The message "Check ink system→ / Ignore→" will be displayed. If you press - HP Designjet 2000/3000cp | HP DesignJet 2500 and 2000CP Printer Quick Reference - Page 98
Printhead contact error → CAUTION: The printheads, indicated by flashing squares, have failed to function because of an unusual electrical signal from the printhead. The most likely cause of this message is that the electrical contacts on the printhead or printer carriage are dirty and need - HP Designjet 2000/3000cp | HP DesignJet 2500 and 2000CP Printer Quick Reference - Page 99
a new ink system to replace the old one. There has been a problem inside the printhead that has caused it to fail, for example, the printhead remove the printheads indicated. Try reseating the printhead (see ). If the problem recurs, the ink system should be replaced at the earliest opportunity. If - HP Designjet 2000/3000cp | HP DesignJet 2500 and 2000CP Printer Quick Reference - Page 100
in order to print with your printer again. See 74, If You Have Problems Reseating a Printhead. You are aligning roll media. Grasp the left and of the front-panel menu, and opened the left door when instructed. The printer is instructing you to remove all the ink cartridges. You have selected the - HP Designjet 2000/3000cp | HP DesignJet 2500 and 2000CP Printer Quick Reference - Page 101
right door when instructed. The printer is instructing you to remove all and opened the left door when instructed. The printer is waiting for you , and lifted the window when instructed. The printer is waiting for you instructions for lens cover replacement on page 10-3, Lens Maintenance in the - HP Designjet 2000/3000cp | HP DesignJet 2500 and 2000CP Printer Quick Reference - Page 102
is waiting for you to replace the printheads indicated by flashing squares. (If you have persistent problems, see .) You are in the ink system replacement process, and lifted the window when instructed. The printer is waiting for you to replace a printhead, or you can close the window without - HP Designjet 2000/3000cp | HP DesignJet 2500 and 2000CP Printer Quick Reference - Page 103
continue but the image quality is not assured. Press ↓ to continue. See the instructions for lens cover replacement on page 10-3, Lens Maintenance in the Users Guide. Spare lens covers are inside the right door. (HP DesignJet 2500CP only) The printer's hard disk is full. You are attempting to save - HP Designjet 2000/3000cp | HP DesignJet 2500 and 2000CP Printer Quick Reference - Page 104
Sheet misaligned Reload sheet Sheet required for calibration Sheet / Roll? Reload media STATUS messages Switch power off Switch power off Check paper path Switch power off Check printhead path Sheet media is skewed. Remove it and reload it so that the left and right edges being loaded into the - HP Designjet 2000/3000cp | HP DesignJet 2500 and 2000CP Printer Quick Reference - Page 105
the printer, and then turn it on again. If you still see the system error message, record the system error number and call HP to have the printer serviced. An internal error has occurred and a system error number is displayed. Press Enter; this may clear the error and allow you to continue - HP Designjet 2000/3000cp | HP DesignJet 2500 and 2000CP Printer Quick Reference - Page 106
UV inks YES→ installed NO→ Verify ink system → Wind the Take Up Reel Cut→ After you have finished installing a new ink cartridge, you are asked to confirm that you have changed the type of ink cartridges from Imaging to UV Pigmented. Press ↑ to confirm that you have changed the ink cartridges from - HP Designjet 2000/3000cp | HP DesignJet 2500 and 2000CP Printer Quick Reference - Page 107
the pattern has been printed. The printer is performing the accuracy calibration check. Wait until the printer has finished the check. (HP DesignJet 2500CP only) The printer is performing a color calibration. Wait until the printer has finished calibrating. The printer is performing an internal - HP Designjet 2000/3000cp | HP DesignJet 2500 and 2000CP Printer Quick Reference - Page 108
that will affect image print quality. Do not open any door or window on the printer when not instructed and it is busy. The printer is verifying that the ink system was correctly installed, or that all to replace the ink systems affected. See 74, If You Have Problems Reseating a Printhead. 108 - HP Designjet 2000/3000cp | HP DesignJet 2500 and 2000CP Printer Quick Reference - Page 109
key to replace the lens cover with a new one. Spare lens covers are inside the right door. See the instructions for lens cover replacement on page 10-3, Lens Maintenance in the Users Guide. The printer is loading roll media. Wait for the loading to complete. The printer is loading sheet media. Wait - HP Designjet 2000/3000cp | HP DesignJet 2500 and 2000CP Printer Quick Reference - Page 110
or HP service engineer to arrange a service. If you choose to ignore the message, you may continue to use the printer as normal, but may encounter a number of operational or print-quality problems. The printer is measuring the accuracy calibration print that you just loaded. Wait for the calibration - HP Designjet 2000/3000cp | HP DesignJet 2500 and 2000CP Printer Quick Reference - Page 111
after an ink system replacement process (only for UV Pigmented inks), or you have initiated the printhead recovery procedure under Utilities / Service Tests/ Recover Printheads. Wait for the printhead recovery procedure to complete. The printer is filling the printheads. (This message only applies - HP Designjet 2000/3000cp | HP DesignJet 2500 and 2000CP Printer Quick Reference - Page 112
Message STATUS Roll feed edge trim STATUS Waiting nest Explanation and Action The printer is trimming the edge of roll media. Wait until the media has been trimmed. Nesting is turned on. The printer is waiting for another print to nest. Send the printer another file for printing. 112 - HP Designjet 2000/3000cp | HP DesignJet 2500 and 2000CP Printer Quick Reference - Page 113
Front Panel, in the user's guide. Clear a media jam Chapter 11, Troubleshooting, in the user's guide. Solve image quality problems Chapter 11, Troubleshooting, in the user's guide. Solve ink system problems Page 61, Solving Ink System Problems Interpret a front-panel message Order accessories - HP Designjet 2000/3000cp | HP DesignJet 2500 and 2000CP Printer Quick Reference - Page 114
Manual Part Number C4704-90251 English Printed in Europe This manual is printed on chlorine-free bleached paper
-
 1
1 -
 2
2 -
 3
3 -
 4
4 -
 5
5 -
 6
6 -
 7
7 -
8
-
9
-
10
-
11
-
12
-
13
-
14
-
15
-
16
-
17
-
18
-
19
-
20
-
21
-
22
-
23
-
24
-
25
-
26
-
27
-
28
-
29
-
30
-
31
-
32
-
33
-
34
-
35
-
36
-
37
-
38
-
39
-
40
-
41
-
42
-
43
-
44
-
45
-
46
-
47
-
48
-
49
-
50
-
51
-
52
-
53
-
54
-
55
-
56
-
57
-
58
-
59
-
60
-
61
-
62
-
63
-
64
-
65
-
66
-
67
-
68
-
69
-
70
-
71
-
72
-
73
-
74
-
75
-
76
-
77
-
78
-
79
-
80
-
81
-
82
-
83
-
84
-
85
-
86
-
87
-
88
-
89
-
90
-
91
-
92
-
93
-
94
-
95
-
96
-
97
-
98
-
99
-
100
-
101
-
102
-
103
-
104
-
105
-
106
-
107
-
108
-
109
-
110
-
111
-
112
-
113
-
114
 |
 |

1584
4998
325
425
488
2000
18
i
HP DesignJet 2500CP/2000CP Printer
Quick Reference Guide