HP F4280 User Guide - Page 81
Clean the print cartridge contacts, Device Services, Related topics - troubleshooting
 |
UPC - 883585581313
View all HP F4280 manuals
Add to My Manuals
Save this manual to your list of manuals |
Page 81 highlights
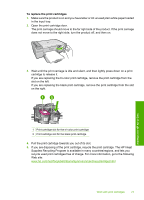
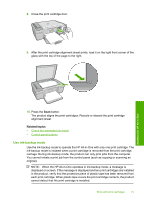
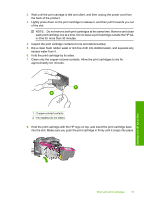
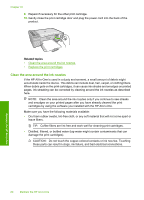
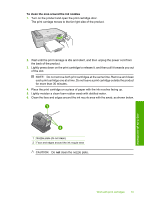
Chapter 10 3. Click the Device Services tab. 4. Click Clean the Print Cartridges. 5. Follow the prompts until you are satisfied with the quality of the output, and then click Done. If print quality still seems poor after you clean the print cartridges, try cleaning the print cartridge contacts before replacing the affected print cartridge. Related topics • Clean the print cartridge contacts • Replace the print cartridges Clean the print cartridge contacts CAUTION: Do not clean the print cartridge contacts unless you are having a problem with print quality and other measures have not been successful. For more information, see Print quality troubleshooting. Clean the print cartridge contacts if you get repeated messages on your computer screen prompting you to check a print cartridge after you already have cleaned or aligned the print cartridges, or if the Check Print Cartridge light is blinking. Before cleaning the print cartridge contacts, remove the print cartridge and verify that nothing is covering the print cartridge contacts, then reinstall the print cartridge. If you continue to get messages to check the print cartridges, clean the print cartridge contacts. Make sure you have the following materials available: • Dry foam rubber swabs, lint-free cloth, or any soft material that will not come apart or leave fibers. TIP: Coffee filters are lint-free and work well for cleaning print cartridges. • Distilled, filtered, or bottled water (tap water might contain contaminants that can damage the print cartridges). CAUTION: Do not use platen cleaners or alcohol to clean the print cartridge contacts. These can damage the print cartridge or the product. To clean the print cartridge contacts 1. Turn on the product and open the print cartridge door. The print carriage moves to the far right side of the product. Maintain the HP All-in-One 78 Maintain the HP All-in-One
-
 1
1 -
2
-
3
-
4
-
5
-
6
-
7
-
8
-
9
-
10
-
11
-
12
-
13
-
14
-
15
-
16
-
17
-
18
-
19
-
20
-
21
-
22
-
23
-
24
-
25
-
26
-
27
-
28
-
29
-
30
-
31
-
32
-
33
-
34
-
35
-
36
-
37
-
38
-
39
-
40
-
41
-
42
-
43
-
44
-
45
-
46
-
47
-
48
-
49
-
50
-
51
-
52
-
53
-
54
-
55
-
56
-
57
-
58
-
59
-
60
-
61
-
62
-
63
-
64
-
65
-
66
-
67
-
68
-
69
-
70
-
71
-
72
-
73
-
74
-
75
-
 76
76 -
 77
77 -
 78
78 -
 79
79 -
 80
80 -
 81
81 -
 82
82 -
 83
83 -
 84
84 -
 85
85 -
 86
86 -
87
-
88
-
89
-
90
-
91
-
92
-
93
-
94
-
95
-
96
-
97
-
98
-
99
-
100
-
101
-
102
-
103
-
104
-
105
-
106
-
107
-
108
-
109
-
110
-
111
-
112
-
113
-
114
-
115
-
116
-
117
-
118
-
119
-
120
-
121
-
122
-
123
-
124
-
125
-
126
-
127
-
128
-
129
-
130
-
131
-
132
-
133
-
134
-
135
-
136
-
137
-
138
-
139
-
140
-
141
-
142
-
143
-
144
-
145
-
146
-
147
-
148
-
149
-
150
-
151
-
152
-
153
-
154
-
155
-
156
-
157
-
158
-
159
-
160
-
161
-
162
-
163
-
164
-
165
-
166
-
167
-
168
-
169
-
170
-
171
-
172
-
173
-
174
-
175
-
176
-
177
-
178
-
179
-
180
-
181
-
182
-
183
-
184
-
185
-
186
-
187
-
188
-
189
-
190
-
191
-
192
-
193
-
194
-
195
-
196
-
197
-
198
-
199
-
200
-
201
-
202
-
203
-
204
-
205
-
206
-
207
-
208
-
209
-
210
-
211
-
212
-
213
-
214
-
215
-
216
-
217
-
218
-
219
-
220
-
221
-
222
-
223
-
224
-
225
-
226
-
227
 |
 |
