HP Mini 100e HP Mini 100e Education Edition - Maintenance and Service Guide - Page 45
Using the Mylar tab, lift the bracket, away from the hard drive.
 |
View all HP Mini 100e manuals
Add to My Manuals
Save this manual to your list of manuals |
Page 45 highlights
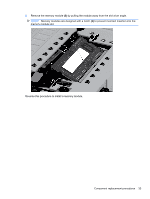
2. Use the Mylar tab (2) to pull the assembly straight up to disconnect it, and then remove the assembly. If it is necessary to replace the hard drive bracket, follow these steps: 1. Remove the 4 Phillips 3.0x3.0 screws (1) that secure the hard drive bracket to the hard drive. 2. Using the Mylar tab, lift the bracket (2) away from the hard drive. Component replacement procedures 37
-
 1
1 -
2
-
3
-
4
-
5
-
6
-
7
-
8
-
9
-
10
-
11
-
12
-
13
-
14
-
15
-
16
-
17
-
18
-
19
-
20
-
21
-
22
-
23
-
24
-
25
-
26
-
27
-
28
-
29
-
30
-
31
-
32
-
33
-
34
-
35
-
36
-
37
-
38
-
39
-
 40
40 -
 41
41 -
 42
42 -
 43
43 -
 44
44 -
 45
45 -
 46
46 -
 47
47 -
 48
48 -
 49
49 -
 50
50 -
51
-
52
-
53
-
54
-
55
-
56
-
57
-
58
-
59
-
60
-
61
-
62
-
63
-
64
-
65
-
66
-
67
-
68
-
69
-
70
-
71
-
72
-
73
-
74
-
75
-
76
-
77
-
78
-
79
-
80
-
81
-
82
-
83
-
84
-
85
-
86
-
87
-
88
-
89
-
90
-
91
-
92
-
93
-
94
-
95
-
96
-
97
-
98
-
99
 |
 |

2.
Use the Mylar tab
(2)
to pull the assembly straight up to disconnect it, and then remove the
assembly.
If it is necessary to replace the hard drive bracket, follow these steps:
1.
Remove the 4 Phillips 3.0x3.0 screws
(1)
that secure the hard drive bracket to the hard drive.
2.
Using the Mylar tab, lift the bracket
(2)
away from the hard drive.
Component replacement procedures
37