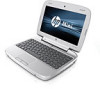
HP Mini 100e HP Mini 100e Education Edition - Maintenance and Service Guide - Page 78
Performing a recovery, Using the Windows recovery tools
 |
View all HP Mini 100e manuals
Add to My Manuals
Save this manual to your list of manuals |
Page 78 highlights
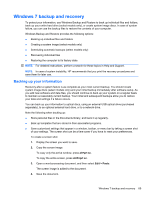
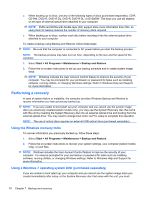
● When backing up to discs, use any of the following types of discs (purchased separately): CD-R, CD-RW, DVD+R, DVD+R DL, DVD-R, DVD-R DL, or DVD±RW. The discs you use will depend on the type of external optical drive attached to your computer. NOTE: DVDs and DVDs with double-layer (DL) support store more information than CDs, so using them for backup reduces the number of recovery discs required. ● When backing up to discs, number each disc before inserting it into the external optical drive attached to your computer. To create a backup using Backup and Restore, follow these steps: NOTE: Be sure that the computer is connected to AC power before you start the backup process. NOTE: The backup process may take over an hour, depending on file size and the speed of the computer. 1. Select Start > All Programs > Maintenance > Backup and Restore. 2. Follow the on-screen instructions to set up your backup schedule and to create system image discs. NOTE: Windows includes the User Account Control feature to improve the security of your computer. You may be prompted for your permission or password for tasks such as installing software, running utilities, or changing Windows settings. Refer to Windows Help and Support for more information. Performing a recovery In case of system failure or instability, the computer provides Windows Backup and Restore to recover information you have previously backed up. NOTE: If you are unable to boot (start up) your computer and you cannot use the system image discs you previously created (select models only), you may use the System Recovery disc that came with the unit by inserting the System Recovery disc into an external optical drive and booting from the external optical drive. You may need to change boot order via F10-setup to complete this operation. NOTE: The use of optical discs requires an external USB optical drive (purchased separately). Using the Windows recovery tools To recover information you previously backed up, follow these steps: 1. Select Start > All Programs > Maintenance > Backup and Restore. 2. Follow the on-screen instructions to recover your system settings, your computer (select models only), or your files. NOTE: Windows includes the User Account Control feature to improve the security of your computer. You may be prompted for your permission or password for tasks such as installing software, running utilities, or changing Windows settings. Refer to Windows Help and Support for more information. Using a Windows 7 operating system DVD (purchased separately) If you are unable to boot (start up) your computer and you cannot use the system image discs you created immediately after setup, or the System Recovery disc that came with the unit, you must 70 Chapter 7 Backup and recovery
-
 1
1 -
2
-
3
-
4
-
5
-
6
-
7
-
8
-
9
-
10
-
11
-
12
-
13
-
14
-
15
-
16
-
17
-
18
-
19
-
20
-
21
-
22
-
23
-
24
-
25
-
26
-
27
-
28
-
29
-
30
-
31
-
32
-
33
-
34
-
35
-
36
-
37
-
38
-
39
-
40
-
41
-
42
-
43
-
44
-
45
-
46
-
47
-
48
-
49
-
50
-
51
-
52
-
53
-
54
-
55
-
56
-
57
-
58
-
59
-
60
-
61
-
62
-
63
-
64
-
65
-
66
-
67
-
68
-
69
-
70
-
71
-
72
-
 73
73 -
 74
74 -
 75
75 -
 76
76 -
 77
77 -
 78
78 -
 79
79 -
 80
80 -
 81
81 -
 82
82 -
 83
83 -
84
-
85
-
86
-
87
-
88
-
89
-
90
-
91
-
92
-
93
-
94
-
95
-
96
-
97
-
98
-
99
 |
 |
