HP Mini 100e HP Mini 100e Education Edition - Maintenance and Service Guide - Page 57
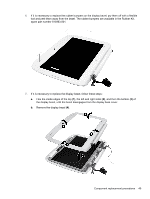
and then the bottom, the display bezel, until the bezel disengages from the display back cover.
 |
View all HP Mini 100e manuals
Add to My Manuals
Save this manual to your list of manuals |
Page 57 highlights
6. If it is necessary to replace the rubber bumpers on the display bezel, pry them off with a flexible tool and peel them away from the bezel. The rubber bumpers are available in the Rubber Kit, spare part number 615963-001. 7. If it is necessary to replace the display bezel, follow these steps: a. Flex the inside edges of the top (1), the left and right sides (2), and then the bottom (3) of the display bezel, until the bezel disengages from the display back cover. b. Remove the display bezel (4). Component replacement procedures 49
-
 1
1 -
2
-
3
-
4
-
5
-
6
-
7
-
8
-
9
-
10
-
11
-
12
-
13
-
14
-
15
-
16
-
17
-
18
-
19
-
20
-
21
-
22
-
23
-
24
-
25
-
26
-
27
-
28
-
29
-
30
-
31
-
32
-
33
-
34
-
35
-
36
-
37
-
38
-
39
-
40
-
41
-
42
-
43
-
44
-
45
-
46
-
47
-
48
-
49
-
50
-
51
-
 52
52 -
 53
53 -
 54
54 -
 55
55 -
 56
56 -
 57
57 -
 58
58 -
 59
59 -
 60
60 -
 61
61 -
 62
62 -
63
-
64
-
65
-
66
-
67
-
68
-
69
-
70
-
71
-
72
-
73
-
74
-
75
-
76
-
77
-
78
-
79
-
80
-
81
-
82
-
83
-
84
-
85
-
86
-
87
-
88
-
89
-
90
-
91
-
92
-
93
-
94
-
95
-
96
-
97
-
98
-
99
 |
 |

6.
If it is necessary to replace the rubber bumpers on the display bezel, pry them off with a flexible
tool and peel them away from the bezel. The rubber bumpers are available in the Rubber Kit,
spare part number 615963-001.
7.
If it is necessary to replace the display bezel, follow these steps:
a.
Flex the inside edges of the top
(1)
, the left and right sides
(2)
, and then the bottom
(3)
of
the display bezel, until the bezel disengages from the display back cover.
b.
Remove the display bezel
(4)
.
Component replacement procedures
49