HP Mini 5102 HP Mini 5102 - Maintenance and Service Guide - Page 82
Remove the audio connector cover and pull the system board
 |
View all HP Mini 5102 manuals
Add to My Manuals
Save this manual to your list of manuals |
Page 82 highlights
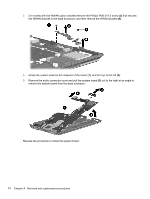
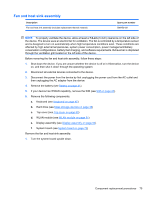
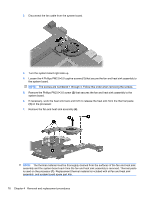
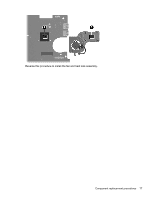
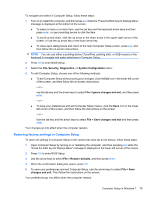
3. On models with the WWAN option installed remove the Phillips PM2.0×2.0 screw (3) that secures the WWAN bracket to the base enclosure, and then remove the WWAN bracket (4). 4. Grasp the system board at the midpoint of the board (1), and tilt it up to the left (2). 5. Remove the audio connector cover and pull the system board (3) out to the right at an angle to remove the system board from the base enclosure. Reverse the procedure to install the system board. 74 Chapter 4 Removal and replacement procedures
-
 1
1 -
2
-
3
-
4
-
5
-
6
-
7
-
8
-
9
-
10
-
11
-
12
-
13
-
14
-
15
-
16
-
17
-
18
-
19
-
20
-
21
-
22
-
23
-
24
-
25
-
26
-
27
-
28
-
29
-
30
-
31
-
32
-
33
-
34
-
35
-
36
-
37
-
38
-
39
-
40
-
41
-
42
-
43
-
44
-
45
-
46
-
47
-
48
-
49
-
50
-
51
-
52
-
53
-
54
-
55
-
56
-
57
-
58
-
59
-
60
-
61
-
62
-
63
-
64
-
65
-
66
-
67
-
68
-
69
-
70
-
71
-
72
-
73
-
74
-
75
-
76
-
 77
77 -
 78
78 -
 79
79 -
 80
80 -
 81
81 -
 82
82 -
 83
83 -
 84
84 -
 85
85 -
 86
86 -
 87
87 -
88
-
89
-
90
-
91
-
92
-
93
-
94
-
95
-
96
-
97
-
98
-
99
-
100
-
101
-
102
-
103
-
104
-
105
-
106
-
107
-
108
-
109
-
110
-
111
-
112
-
113
-
114
-
115
-
116
-
117
-
118
-
119
-
120
-
121
-
122
-
123
-
124
-
125
-
126
-
127
-
128
-
129
-
130
-
131
-
132
-
133
-
134
-
135
-
136
-
137
-
138
-
139
-
140
-
141
-
142
-
143
-
144
-
145
-
146
-
147
 |
 |

3.
On models with the WWAN option installed remove the Phillips PM2.0×2.0 screw
(3)
that secures
the WWAN bracket to the base enclosure, and then remove the WWAN bracket
(4)
.
4.
Grasp the system board at the midpoint of the board
(1)
, and tilt it up to the left
(2)
.
5.
Remove the audio connector cover and pull the system board
(3)
out to the right at an angle to
remove the system board from the base enclosure.
Reverse the procedure to install the system board.
74
Chapter 4
Removal and replacement procedures