HP Officejet Pro 8600 User Guide - Page 37
Turn on accessories in the printer driver, To turn on accessories (Windows), Maintain the printer - drivers windows 7
 |
View all HP Officejet Pro 8600 manuals
Add to My Manuals
Save this manual to your list of manuals |
Page 37 highlights
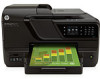
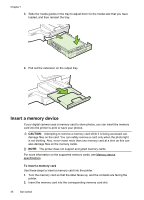
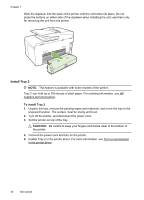
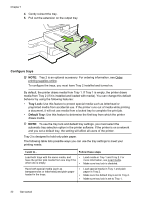
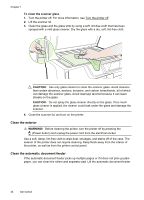
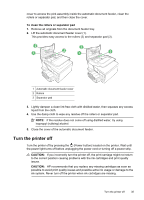
(continued) I want to... Load media in both trays but have the printer pick media from a specific tray first. Follow these steps • Load media in Tray 1 and Tray 2. • Make sure default tray is set to the appropriate tray. To configure the trays 1. Make sure the printer is turned on. 2. Touch (right arrow), touch Setup, touch Preferences, and then select Default Tray or Tray Lock. 3. Click OK or Apply after changing the desired tray settings. Turn on accessories in the printer driver • To turn on accessories (Windows) • To turn on accessories on (Mac OS X) To turn on accessories (Windows) 1. Click Start, point to Settings, and then click Printers or Printers and Faxes. - Or Click Start, click Control Panel, and then double-click Printers. 2. Right-click the printer icon, and then click Properties. 3. Select the Device Settings tab. Click the accessory that you want to turn on, click Installed from the drop-down menu, and then click OK. To turn on accessories on (Mac OS X) Mac OS X automatically turns on all accessories in the printer driver when you install the printer software. If you add a new accessory later, follow these steps: 1. Open the System Preferences and then select Print & Fax. 2. Select the printer from list of printers, and then click Options & Supplies. 3. Click the Driver tab. 4. Select the options you want to install, and then click OK. Maintain the printer This section provides instructions for keeping the printer in top working condition. Perform these maintenance procedures as necessary. • Clean the scanner glass • Clean the exterior • Clean the automatic document feeder Clean the scanner glass NOTE: Dust or dirt on the scanner glass, scanner lid backing, or scanner frame can slow down performance, degrade the quality of scans, and affect the accuracy of special features such as fitting copies to a certain page size. Maintain the printer 33
-
 1
1 -
2
-
3
-
4
-
5
-
6
-
7
-
8
-
9
-
10
-
11
-
12
-
13
-
14
-
15
-
16
-
17
-
18
-
19
-
20
-
21
-
22
-
23
-
24
-
25
-
26
-
27
-
28
-
29
-
30
-
31
-
 32
32 -
 33
33 -
 34
34 -
 35
35 -
 36
36 -
 37
37 -
 38
38 -
 39
39 -
 40
40 -
 41
41 -
 42
42 -
43
-
44
-
45
-
46
-
47
-
48
-
49
-
50
-
51
-
52
-
53
-
54
-
55
-
56
-
57
-
58
-
59
-
60
-
61
-
62
-
63
-
64
-
65
-
66
-
67
-
68
-
69
-
70
-
71
-
72
-
73
-
74
-
75
-
76
-
77
-
78
-
79
-
80
-
81
-
82
-
83
-
84
-
85
-
86
-
87
-
88
-
89
-
90
-
91
-
92
-
93
-
94
-
95
-
96
-
97
-
98
-
99
-
100
-
101
-
102
-
103
-
104
-
105
-
106
-
107
-
108
-
109
-
110
-
111
-
112
-
113
-
114
-
115
-
116
-
117
-
118
-
119
-
120
-
121
-
122
-
123
-
124
-
125
-
126
-
127
-
128
-
129
-
130
-
131
-
132
-
133
-
134
-
135
-
136
-
137
-
138
-
139
-
140
-
141
-
142
-
143
-
144
-
145
-
146
-
147
-
148
-
149
-
150
-
151
-
152
-
153
-
154
-
155
-
156
-
157
-
158
-
159
-
160
-
161
-
162
-
163
-
164
-
165
-
166
-
167
-
168
-
169
-
170
-
171
-
172
-
173
-
174
-
175
-
176
-
177
-
178
-
179
-
180
-
181
-
182
-
183
-
184
-
185
-
186
-
187
-
188
-
189
-
190
-
191
-
192
-
193
-
194
-
195
-
196
-
197
-
198
-
199
-
200
-
201
-
202
-
203
-
204
-
205
-
206
-
207
-
208
-
209
-
210
-
211
-
212
-
213
-
214
-
215
-
216
-
217
-
218
-
219
-
220
-
221
-
222
-
223
-
224
-
225
-
226
-
227
-
228
-
229
-
230
-
231
-
232
-
233
-
234
-
235
-
236
-
237
-
238
-
239
-
240
-
241
-
242
-
243
-
244
-
245
-
246
-
247
-
248
-
249
-
250
-
251
-
252
 |
 |