HP Pavilion All-in-One MS210 Maintenance and Service Guide: HP Pro All-in-One - Page 27
WLAN module
 |
View all HP Pavilion All-in-One MS210 manuals
Add to My Manuals
Save this manual to your list of manuals |
Page 27 highlights
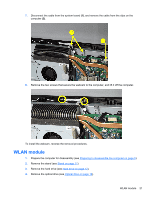
7. Disconnect the cable from the system board (1), and remove the cable from the clips on the computer (2). 8. Remove the two screws that secure the webcam to the computer, and lift it off the computer. To install the webcam, reverse the removal procedures. WLAN module 1. Prepare the computer for disassembly (see Preparing to disassemble the computer on page 5). 2. Remove the stand (see Stand on page 11). 3. Remove the hard drive (see Hard drive on page 13). 4. Remove the optical drive (see Optical drive on page 16). WLAN module 21
-
 1
1 -
2
-
3
-
4
-
5
-
6
-
7
-
8
-
9
-
10
-
11
-
12
-
13
-
14
-
15
-
16
-
17
-
18
-
19
-
20
-
21
-
 22
22 -
 23
23 -
 24
24 -
 25
25 -
 26
26 -
 27
27 -
 28
28 -
 29
29 -
 30
30 -
 31
31 -
 32
32 -
33
-
34
-
35
-
36
-
37
-
38
-
39
-
40
-
41
-
42
-
43
-
44
-
45
-
46
-
47
-
48
-
49
-
50
-
51
-
52
-
53
-
54
-
55
-
56
-
57
-
58
-
59
 |
 |

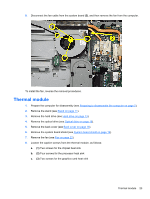
7.
Disconnect the cable from the system board
(1)
, and remove the cable from the clips on the
computer
(2)
.
8.
Remove the two screws that secure the webcam to the computer, and lift it off the computer.
To install the webcam, reverse the removal procedures.
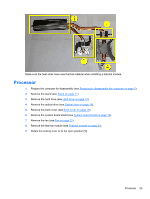
WLAN module
1.
Prepare the computer for disassembly (see
Preparing to disassemble the computer
on page
5
).
2.
Remove the stand (see
Stand
on page
11
).
3.
Remove the hard drive (see
Hard drive
on page
13
).
4.
Remove the optical drive (see
Optical drive
on page
16
).
WLAN module
21