HP Pavilion All-in-One MS210 Maintenance and Service Guide: HP Pro All-in-One - Page 31
Processor
 |
View all HP Pavilion All-in-One MS210 manuals
Add to My Manuals
Save this manual to your list of manuals |
Page 31 highlights
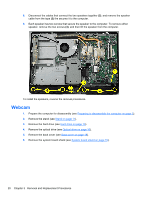
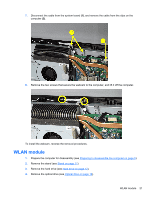
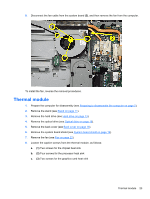
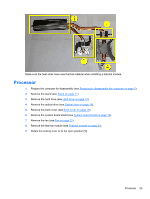
Make sure the heat sinks have new thermal material when installing a thermal module. Processor 1. Prepare the computer for disassembly (see Preparing to disassemble the computer on page 5). 2. Remove the stand (see Stand on page 11). 3. Remove the hard drive (see Hard drive on page 13). 4. Remove the optical drive (see Optical drive on page 16). 5. Remove the back cover (see Back cover on page 18). 6. Remove the system board shield (see System board shield on page 19). 7. Remove the fan (see Fan on page 22). 8. Remove the thermal module (see Thermal module on page 23). 9. Rotate the locking lever to its full open position (1). Processor 25
-
 1
1 -
2
-
3
-
4
-
5
-
6
-
7
-
8
-
9
-
10
-
11
-
12
-
13
-
14
-
15
-
16
-
17
-
18
-
19
-
20
-
21
-
22
-
23
-
24
-
25
-
 26
26 -
 27
27 -
 28
28 -
 29
29 -
 30
30 -
 31
31 -
 32
32 -
 33
33 -
 34
34 -
 35
35 -
 36
36 -
37
-
38
-
39
-
40
-
41
-
42
-
43
-
44
-
45
-
46
-
47
-
48
-
49
-
50
-
51
-
52
-
53
-
54
-
55
-
56
-
57
-
58
-
59
 |
 |

Make sure the heat sinks have new thermal material when installing a thermal module.
Processor
1.
Prepare the computer for disassembly (see
Preparing to disassemble the computer
on page
5
).
2.
Remove the stand (see
Stand
on page
11
).
3.
Remove the hard drive (see
Hard drive
on page
13
).
4.
Remove the optical drive (see
Optical drive
on page
16
).
5.
Remove the back cover (see
Back cover
on page
18
).
6.
Remove the system board shield (see
System board shield
on page
19
).
7.
Remove the fan (see
Fan
on page
22
).
8.
Remove the thermal module (see
Thermal module
on page
23
).
9.
Rotate the locking lever to its full open position
(1)
.
Processor
25