HP Pavilion All-in-One MS210 Maintenance and Service Guide: HP Pro All-in-One - Page 33
Remove the eight screws that secure the system board to the computer.
 |
View all HP Pavilion All-in-One MS210 manuals
Add to My Manuals
Save this manual to your list of manuals |
Page 33 highlights
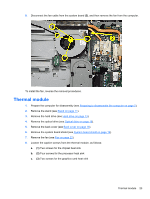
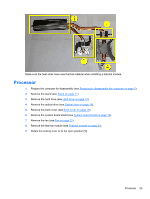
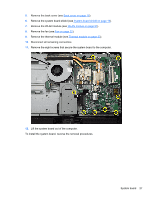
5. Remove the back cover (see Back cover on page 18). 6. Remove the system board shield (see System board shield on page 19). 7. Remove the WLAN module (see WLAN module on page 21). 8. Remove the fan (see Fan on page 22). 9. Remove the thermal module (see Thermal module on page 23). 10. Disconnect all remaining connectors. 11. Remove the eight screws that secure the system board to the computer. 12. Lift the system board out of the computer. To install the system board, reverse the removal procedures. System board 27
-
 1
1 -
2
-
3
-
4
-
5
-
6
-
7
-
8
-
9
-
10
-
11
-
12
-
13
-
14
-
15
-
16
-
17
-
18
-
19
-
20
-
21
-
22
-
23
-
24
-
25
-
26
-
27
-
 28
28 -
 29
29 -
 30
30 -
 31
31 -
 32
32 -
 33
33 -
 34
34 -
 35
35 -
 36
36 -
 37
37 -
 38
38 -
39
-
40
-
41
-
42
-
43
-
44
-
45
-
46
-
47
-
48
-
49
-
50
-
51
-
52
-
53
-
54
-
55
-
56
-
57
-
58
-
59
 |
 |

5.
Remove the back cover (see
Back cover
on page
18
).
6.
Remove the system board shield (see
System board shield
on page
19
).
7.
Remove the WLAN module (see
WLAN module
on page
21
).
8.
Remove the fan (see
Fan
on page
22
).
9.
Remove the thermal module (see
Thermal module
on page
23
).
10.
Disconnect all remaining connectors.
11.
Remove the eight screws that secure the system board to the computer.
12.
Lift the system board out of the computer.
To install the system board, reverse the removal procedures.
System board
27