HP Pavilion zt1100 HP Pavilion Notebook zt1000, xz100 and Omnibook xt1000 Seri - Page 41
Removing the Hard Disk Tray, Reassembly Notes
 |
View all HP Pavilion zt1100 manuals
Add to My Manuals
Save this manual to your list of manuals |
Page 41 highlights
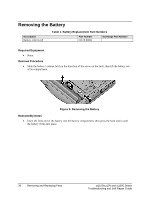
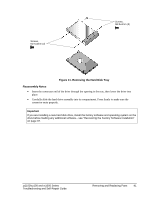
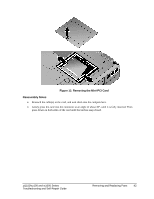
Screws, M2.5x4mm (2) Screws, M2.5x4mm (2) Figure 11. Removing the Hard Disk Tray Reassembly Notes • Insert the connector end of the drive through the opening in the tray, then lower the drive into place. • Carefully slide the hard drive assembly into its compartment. Press firmly to make sure the connector seats properly. Important If you are installing a new hard disk drive, install the factory software and operating system on the drive before loading any additional software-see "Recovering the Factory Software Installation" on page 37. zt1100/xz100 and xt1000 Series Troubleshooting and Self-Repair Guide Removing and Replacing Parts 41
-
 1
1 -
2
-
3
-
4
-
5
-
6
-
7
-
8
-
9
-
10
-
11
-
12
-
13
-
14
-
15
-
16
-
17
-
18
-
19
-
20
-
21
-
22
-
23
-
24
-
25
-
26
-
27
-
28
-
29
-
30
-
31
-
32
-
33
-
34
-
35
-
 36
36 -
 37
37 -
 38
38 -
 39
39 -
 40
40 -
 41
41 -
 42
42 -
 43
43 -
 44
44 -
 45
45 -
 46
46 -
47
-
48
-
49
-
50
-
51
-
52
-
53
-
54
-
55
-
56
 |
 |

zt1100/xz100 and xt1000 Series
Removing and Replacing Parts
41
Troubleshooting and Self-Repair Guide
Figure 11. Removing the Hard Disk Tray
Reassembly Notes
•
Insert the connector end of the drive through the opening in the tray, then lower the drive into
place.
•
Carefully slide the hard drive assembly into its compartment. Press firmly to make sure the
connector seats properly.
Important
If you are installing a new hard disk drive, install the factory software and operating system on the
drive before loading any additional software
—
see
“
Recovering the Factory Software Installation
”
on page 37.
Screws,
M2.5x4mm (2)
Screws,
M2.5x4mm (2)