HP Pavilion zt1100 HP Pavilion Notebook zt1000, xz100 and Omnibook xt1000 Seri - Page 45
Removing the Keyboard Cover, Reassembly Notes - motherboard
 |
View all HP Pavilion zt1100 manuals
Add to My Manuals
Save this manual to your list of manuals |
Page 45 highlights
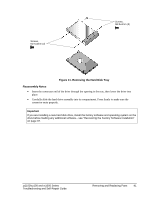
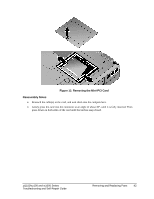
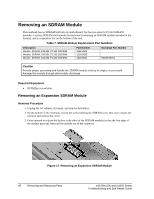
6. Disconnect the keyboard cover switch cable from the motherboard, and remove the cover from the notebook. Figure 14. Removing the Keyboard Cover Reassembly Notes • Make sure the keyboard cover switch cable is securely connected to the motherboard. • Bend the center of the keyboard cover upward slightly, and insert the tabs on the ends of the cover into the slots in the notebook's case. Fit the hinge covers over the hinges, and gently press the cover into place. zt1100/xz100 and xt1000 Series Troubleshooting and Self-Repair Guide Removing and Replacing Parts 45
-
 1
1 -
2
-
3
-
4
-
5
-
6
-
7
-
8
-
9
-
10
-
11
-
12
-
13
-
14
-
15
-
16
-
17
-
18
-
19
-
20
-
21
-
22
-
23
-
24
-
25
-
26
-
27
-
28
-
29
-
30
-
31
-
32
-
33
-
34
-
35
-
36
-
37
-
38
-
39
-
 40
40 -
 41
41 -
 42
42 -
 43
43 -
 44
44 -
 45
45 -
 46
46 -
 47
47 -
 48
48 -
 49
49 -
 50
50 -
51
-
52
-
53
-
54
-
55
-
56
 |
 |
zt1100/xz100 and xt1000 Series
Removing and Replacing Parts
45
Troubleshooting and Self-Repair Guide
6. Disconnect the keyboard cover switch cable from the motherboard, and remove the cover from
the notebook.
Figure 14. Removing the Keyboard Cover
Reassembly Notes
•
Make sure the keyboard cover switch cable is securely connected to the motherboard.
•
Bend the center of the keyboard cover upward slightly, and insert the tabs on the ends of the cover
into the slots in the notebook
’
s case. Fit the hinge covers over the hinges, and gently press the
cover into place.